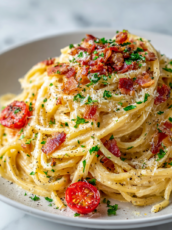
Blog

  • Chill Out: The Art of Crafting Unique Vodka Slushies for Summer Sipping

    Chill Out: The Art of Crafting Unique Vodka Slushies for Summer Sipping

    Imagine turning your freezer into a mini laboratory of icy confections, where vodka becomes the secret ingredient to elevate a simple slushie into an adult playground of flavors. This approach isn’t about just freezing fruit and adding spirits; it’s about balancing clarity, chill, and a punch of flavor that makes each sip a cool escape. The best part? Creating a vodka slushie that surprises your taste buds without turning into a boozy snowpile.

    Crafting these slushies requires a delicate dance of patience and a little bit of chaos—freezing, blending, and perfecting. What makes this recipe special is how it crafts nostalgia into a cocktail-like delight, perfect for summer gatherings, lazy weekends, or just because you crave something refreshingly different. It’s about transforming ordinary frozen fruit into a vibrant, spirited toast to hot days.

    Vodka Fruit Slushie

    This vodka fruit slushie is a frozen beverage made by blending fruit with spirits to create a smooth, icy texture. The main ingredients include frozen fruit and vodka, resulting in a vibrant, refreshing drink with a firm, slush-like consistency. It offers a colorful, icy appearance perfect for summer gatherings or a cool treat.
    Prep Time 10 minutes
    Total Time 10 minutes
    Servings: 4
    Course: Main Course
    Cuisine: globally-inspired
    Calories: 150

    Ingredients
      

    • 4 cups frozen mixed fruit such as berries, mango, pineapple
    • 1 cup vodka use your favorite brand
    • 0.5 cup simple syrup optional, for added sweetness

    Equipment

    • Freezer
    • Blender
    • Measuring cups and spoons

    Method
     

    1. Measure out the frozen fruit and place it in a blender.
    2. Pour the vodka over the fruit, ensuring everything is well covered for even blending.
    3. If desired, add a splash of simple syrup to enhance sweetness.
    4. Secure the lid on the blender and start blending on low speed, gradually increasing to high until the mixture is smooth and icy, with a slush-like consistency.
    5. Check the texture—if it’s too thick, add a splash of water or more vodka and give it a quick blend to loosen it up.
    6. Once the mixture is smooth and scoopable, pour it into chilled glasses, creating a vibrant, icy appearance.
    7. Optionally, garnish with fresh fruit slices or a sprig of mint for a colorful finishing touch.

    Notes

    For best results, use very ripe, frozen fruit for vibrant flavor and color. Adjust the amount of vodka to suit your desired alcohol strength.
    So, next time you want to impress friends or just treat yourself, pull out your blender and give this vodka slushie recipe a try. The combination of icy texture with a burst of fruit flavor and a kick of alcohol makes it endlessly versatile. Plus, it’s a simple, no-fuss way to enjoy a cocktail without the fuss.

    This frozen marvel isn’t just a treat; it’s a small celebration of summer’s simple joys. Whether served in a fancy glass or a plastic cup, it’s sure to spark smiles and spontaneous toasts. Relax and enjoy the icy rush—these slushies are here to cool down those summer days, one chilled sip at a time.

  • Spooky Spider Cheese Ball: A Halloween Delight

    Spooky Spider Cheese Ball: A Halloween Delight

    As the nights grow longer and the air turns crisp, I find myself craving playful, crowd-pleasing snacks for Halloween. This Spider Cheese Ball transforms a simple appetizer into a spooky centerpiece that’s as fun to look at as it is to eat. It’s the perfect mix of nostalgic comfort and festive chaos.

    Crafted with creamy cheese and adorned with black olives and pretzels, it’s a visual feast. Seeing those tiny legs crawling across the serving platter always sparks a grin and invites everyone to dig in. This recipe invites a little chaos into the kitchen, and I love every bit of it.

    Spider Cheese Ball

    The Spider Cheese Ball is a creamy cheese mixture shaped into a ball and decorated with black olives and pretzels to resemble a spider. It features a smooth, cheese-based exterior with crunchy and flavorful toppings that create a playful, spooky presentation for Halloween. The final product has a soft, cheesy interior with eye-catching adornments resembling spider legs.
    Prep Time 15 minutes
    Total Time 15 minutes
    Servings: 8
    Course: Main Course
    Cuisine: American
    Calories: 250

    Ingredients
      

    • 8 oz cream cheese softened at room temperature
    • 1 cup shredded cheddar cheese for flavor and texture
    • 2 tablespoons sour cream adds creaminess
    • 1 teaspoon garlic powder
    • to taste salt and pepper for seasoning
    • half black olives pitted, sliced into small rounds
    • 1 pack pretzels small pretzel rods for spider legs

    Equipment

    • Mixing bowl
    • Rubber spatula
    • Plastic wrap
    • Serving platter

    Method
     

    1. In a mixing bowl, combine the softened cream cheese, shredded cheddar, sour cream, garlic powder, and a pinch of salt and pepper. Mix with a rubber spatula until smooth and creamy, with no lumps remaining. This creates the cheesy mixture base.
    2. Transfer the cheese mixture onto a piece of plastic wrap and shape it into a round ball using your hands or a spatula. Wrap it tightly and refrigerate for about 30 minutes to firm up, making it easier to decorate and serve.
    3. Remove the cheese ball from the fridge and carefully unwrap it. Place it on a serving platter. Smooth the surface if needed to ensure a neat round shape.
    4. Slice the black olives into small rounds to create the spider’s eyes and tiny legs. Use a few slices for eyes and thin strips or slices for the spider’s legs.
    5. Insert two olive slices into the top of the cheese ball to serve as eyes. Place the small olive circles close together for a cute, spooky face.
    6. Arrange the pretzel rods around the cheese ball, pressing them lightly into the surface to resemble spider legs crawling outward from the body.
    7. Gently press additional olive slices on the pretzel legs if you’d like to add more spider-like details or eyes.
    8. Once decorated, place the assembled spider cheese ball on your serving platter. Serve immediately or keep refrigerated until ready to enjoy.
    9. Enjoy this fun, spooky appetizer with friends and family as part of your Halloween festivities.

    This Spider Cheese Ball isn’t just fun to make; it sparks joy around the table. Its quirky charm makes it a memorable part of any Halloween spread. Plus, it’s a reminder that sometimes, the silly foods are the most enjoyed.

    Every bite delivers familiar flavors with a twist, creating a playful, festive atmosphere. It’s a treat that adds a touch of mischief and a whole lot of flavor to your holiday gathering. Enjoy the fun, and let those tiny legs scare up some smiles!

  • Spooktacularly Creepy & Delicious: Halloween Mummy Pizza

    Spooktacularly Creepy & Delicious: Halloween Mummy Pizza

    Every October, I aim for festive recipes that make both the eyes and the taste buds happy. The Halloween Mummy Pizza is a hauntingly fun twist on classic comfort food, perfect for low-stress celebrations. Its playful, slightly chaotic look reminds me of childhood Halloweens, where simplicity and a sprinkle of silliness reigned supreme.

    What sets this recipe apart is its ability to transform simple pizza ingredients into a spooky centerpiece with minimal effort. The crispy pepperoni ‘bandages’ and gooey cheese eyes create a fun, edible costume that kids and adults will love. It’s a guaranteed crowd-pleaser that sparks joy and a little chaos in the kitchen.

    Halloween Mummy Pizza

    The Halloween Mummy Pizza is a fun, themed dish made by decorating baked pizza with crispy pepperoni strips to resemble mummy bandages and cheese or olive slices as eyes. It combines a crispy crust, melted cheese, and savory toppings to create a playful and slightly chaotic Halloween-inspired presentation with a chewy texture and a crispy edge.
    Prep Time 15 minutes
    Cook Time 15 minutes
    Total Time 30 minutes
    Servings: 4
    Course: Main Course
    Cuisine: American
    Calories: 350

    Ingredients
      

    • 1 package pre-made pizza dough store-bought or homemade
    • 1 cup pizza sauce preferably marinara
    • 2 cups shredded mozzarella cheese for melting and gooey texture
    • 12-15 slices pepperoni slices for the mummy bandages
    • a few black olives pitted, sliced for eyes
    • 1 tablespoon olive oil for brushing the crust

    Equipment

    • Baking sheet
    • Rolling pin
    • Oven
    • Cooking scissors or knife
    • Paper towels

    Method
     

    1. Preheat your oven to 400°F (200°C). Roll out the pizza dough on a lightly floured surface into a large circle or rectangle, then transfer it to a baking sheet lined with parchment paper.
    2. Spread a layer of pizza sauce evenly over the dough, leaving about a half-inch border around the edges for the crust.
    3. Sprinkle shredded mozzarella cheese generously over the sauce, covering the surface completely for a melty base.
    4. Brush the exposed crust border with olive oil to help it turn golden and crispy as it bakes.
    5. Bake the pizza in the preheated oven for about 12-15 minutes, or until the crust is golden brown and the cheese is bubbling.
    6. While the pizza bakes, prepare the pepperoni strips by tearing or cutting them into thin, bandage-like strips. Set aside.
    7. Once the pizza is out of the oven and cooled slightly, use scissors or a knife to cut the pepperoni slices into long, thin strips, mimicking mummy bandages. Arrange these strips across the pizza in a whimsical, chaotic way.
    8. Slice black olives in half and place two on each side of the pizza to serve as eyes. For added effect, you can place small olive slices on top of cheese for pupils.
    9. Carefully press the olive eyes into the cheese so they stay in place, creating a fun, spooky face.
    10. Put the decorated pizza back in the oven for 2-3 minutes just to warm everything through and slightly melt the toppings if needed.
    11. Remove the pizza from the oven, slice into pieces, and serve immediately to enjoy the crispy crust, melted cheese, and spooky mummy decorations.

    Notes

    For an extra spooky effect, add small edible eyes or use colored cheese for the eyes. Be sure to serve while warm for the best gooey cheese pull.

    This Mummy Pizza is more than just a fun holiday treat — it’s a reminder that sometimes, the best recipes are the ones that invite a little mess and imagination. It’s great for parties, lazy weekends, or whenever you want to celebrate the spooky season with a grin.

    As flavors meld and the crispy edges tempt your senses, you’ll find yourself craving this creative comfort food long after Halloween has passed. It’s a little project that makes the holiday extra memorable, with a delicious result everyone will talk about.

  • Chill Out with the Most Unexpected Chocolate Slushie Twist

    Chill Out with the Most Unexpected Chocolate Slushie Twist

    Imagine biting into a chocolate bar on a hot day, then freezing that moment into a icy beverage. That’s the magic of this chocolate slushie, but with a twist that only true dessert adventurers will appreciate. I stumbled upon this idea when I wanted something rich but refreshingly different, and it turned into a childhood-flavored chaos.

    This isn’t your average icy treat. It’s a nostalgic dive into the chaos of childhood summers, rebooted with a splash of sophistication. Maybe it’s the creaminess, maybe the crunch of chocolate bits in every sip, or the way it crackles when you drink—it’s unexpectedly playful. Perfect for when you need a cool escape from the usual.

    ## WHY I LOVE THIS RECIPE?
    – It reminds me of my summers at grandma’s, where chocolate never ran out.
    – The simplicity lets me experiment without ruining the fun.
    – It’s a relief to have an easy, crowd-pleasing dessert quick enough for last-minute gatherings.
    – I love how the flavors evolve as it melts, turning richer and more velvety.

    Chocolate Slushie with Chocolate Bits

    This chocolate slushie is a frozen, icy beverage made by blending rich chocolate ice cream or milk with crushed ice. The mixture results in a creamy, textured drink with chocolate bits throughout, topped with a crackling, velvety surface that resembles a childhood treat turned refreshingly cool.
    Prep Time 10 minutes
    Total Time 10 minutes
    Servings: 2
    Course: Main Course
    Cuisine: Dessert
    Calories: 250

    Ingredients
      

    • 2 cups chocolate ice cream or milk use chocolate ice cream for a richer flavor or milk for a lighter version
    • 1 cup crushed ice adjust for desired thickness
    • 1/4 cup chopped chocolate bits for texture and visual appeal

    Equipment

    • Blender
    • Measuring Cups
    • Spoon
    • Serving Glasses

    Method
     

    1. Place the chocolate ice cream or milk into the blender, creating a smooth base for the slushie.
    2. Add the crushed ice to the blender, then secure the lid tightly.
    3. Blend the mixture on high speed until the ice is broken down and the mixture becomes thick and slushy, about 30-45 seconds. You should see the texture turn creamy with icy bits dispersed evenly.
    4. Add the chopped chocolate bits into the blender and pulse a few times just to incorporate them evenly without crushing them completely, so they remain crunchy.
    5. Pour the thickened, chocolatey slushie into chilled glasses, filling them nearly to the top.
    6. Serve immediately with a straw or spoon, enjoying the crunchy bits and velvety ice. Feel free to garnish with extra chocolate shavings if desired.
    Whether you’re cooling off after a marathon of summer chores or just craving that elusive chocolate fix, this slushie hits the mark. It’s a playful way to bring a little chaos into your dessert routine, with minimal fuss and maximum flavor. Plus, it’s endlessly customizable—more chocolate, a splash of coffee, or even a swirl of caramel.

    As the weather warms up, having a stash of this slushie in the freezer becomes a sweet survival tactic. It’s a quick scoop of joy when the day feels too long or simply in need of a sweet escape. No matter the season, this icy treat is ready to surprise and delight.

  • Spiced Pumpkin Muffins That Invoke Fall Nostalgia

    Spiced Pumpkin Muffins That Invoke Fall Nostalgia

    Imagine biting into a muffin that tastes like a warm autumn afternoon. The rich aroma of cinnamon, clove, and roasted pumpkin fills the air as the batter comes together, promising comfort in every crumb. This recipe transforms canned pumpkin into fluffy, moist muffins perfect for crisp mornings or cozy afternoons.

    What makes these muffins stand out is their unexpected hint of maple syrup and a sprinkle of toasted pecans. They’re more than just a seasonal treat—they’re a celebration of fall flavors in a handheld form. Baking these is like capturing a moment of seasonal magic, ready to be enjoyed with your favorite hot beverage.

    Pumpkin Spiced Muffins with Maple & Pecans

    These muffins are moist and fluffy with a tender crumb, featuring warm autumn flavors from cinnamon, clove, and roasted pumpkin. The batter includes hints of maple syrup and is topped with toasted pecans, creating a cozy, seasonal treat. They have a golden exterior and a soft, cake-like interior, perfect for breakfast or a snack.
    Prep Time 15 minutes
    Cook Time 20 minutes
    Total Time 35 minutes
    Servings: 12
    Course: Main Course
    Cuisine: Fall
    Calories: 210

    Ingredients
      

    • 1 3/4 cups all-purpose flour
    • 1 teaspoon baking soda
    • 1 teaspoon ground cinnamon
    • 1/2 teaspoon ground cloves
    • 1/2 teaspoon salt
    • 1/2 cup packed brown sugar
    • 1/2 cup maple syrup
    • 1/2 cup vegetable oil
    • 2 large eggs
    • 1 cup canned pumpkin (pureed)
    • 1 cup chopped toasted pecans

    Equipment

    • Mixing bowls
    • Whisk
    • Muffin tin
    • Paper liners or non-stick spray
    • Cooling rack
    • Spatula

    Method
     

    1. Preheat your oven to 350°F (175°C). Line a muffin tin with paper liners or lightly spray with non-stick spray.
    2. In a large mixing bowl, whisk together the flour, baking soda, cinnamon, cloves, salt, and brown sugar until well combined. This creates an even dry mixture for the batter.
    3. In a separate bowl, whisk together the eggs, pumpkin, maple syrup, and vegetable oil until smooth and slightly frothy. This ensures the wet ingredients are well integrated.
    4. Pour the wet mixture into the bowl with the dry ingredients, then gently fold everything together with a spatula until just combined. Do not overmix to keep the muffins tender.
    5. Add the chopped toasted pecans to the batter and fold them in evenly, distributing the nuts throughout the batter.
    6. Spoon the batter into the prepared muffin tin, filling each cup about three-quarters full. You should get about 12 muffins.
    7. Bake in the preheated oven for 20-22 minutes, or until the muffins are golden brown and a toothpick inserted in the center comes out clean.
    8. Remove the muffins from the oven and let them cool in the tin for 5 minutes, then transfer them to a wire rack to cool completely.
    9. Observe the muffins’ golden crust and soft, moist crumb with visible pecans peeking through. They are ready to enjoy warm or at room temperature.
    This pumpkin muffin recipe is a testament to the simple joy of baking with seasonal ingredients. The combination of spices and pumpkin makes each muffin a little pocket of fall in your hand, perfect for sharing or savoring alone on a quiet morning.

    As the season shifts, these muffins serve as a warm reminder of cozy weekends and crackling fires. They are quick to make and even quicker to disappear from the plate. A small dish of butter melting into one just out of the oven is a moment worth treasuring.

  • Spooky Sweetness: Halloween Bat Wings with a Soy Sauce Twist

    Spooky Sweetness: Halloween Bat Wings with a Soy Sauce Twist

    Halloween is the perfect time to embrace the eerie and the edible. Imagine biting into crispy chicken wings, darkened to a rich, soy glaze that resembles tiny bat wings fluttering in the night. This recipe turns a simple favorite into a seasonal spectacle, blending savory soy flavors with a playful, spooky presentation.

    As I prepped these wings, the smell of soy, garlic, and a hint of honey filled the kitchen—an irresistible aroma that promises both comfort and a touch of chaos. The crispy skin and the glossy dark glaze create a visual feast, perfect for a party or a fun family dinner. These wings aren’t just food; they’re a conversation starter, a Halloween costume for your taste buds.

    Spooky Soy-Glazed Chicken Wings

    These chicken wings are baked until crispy and coated with a glossy, dark soy glaze that gives them a bat wing-like appearance perfect for Halloween. The wings are seasoned, baked, and then tossed in a savory soy-honey sauce, resulting in a crunchy exterior and tender interior with an appealing dark finish.
    Prep Time 15 minutes
    Cook Time 40 minutes
    Total Time 55 minutes
    Servings: 4
    Course: Main Course
    Cuisine: Western
    Calories: 420

    Ingredients
      

    • 2 pounds chicken wings
    • 2 tablespoons soy sauce
    • 1 tablespoon honey
    • 2 cloves garlic, minced
    • 1 teaspoon sesame oil
    • to taste salt and pepper

    Equipment

    • Baking sheet
    • Cooling rack
    • Brush

    Method
     

    1. Preheat your oven to 400°F (200°C). Line a baking sheet with foil and place a cooling rack on top to allow air circulation around the wings.
    2. Pat the chicken wings dry with paper towels to remove excess moisture, ensuring they’ll crisp up nicely in the oven.
    3. Season the wings with salt and pepper, then arrange them evenly on the cooling rack in a single layer.
    4. Bake the wings in the preheated oven for about 40 minutes, turning once halfway through, until they are golden and crispy.
    5. While the wings bake, combine soy sauce, honey, minced garlic, and sesame oil in a small saucepan. Bring the mixture to a gentle simmer over low heat, stirring occasionally.
    6. Let the sauce simmer for 3-5 minutes until it thickens slightly and becomes glossy, filling the kitchen with a fragrant aroma.
    7. Remove the baked wings from the oven and transfer them to a large bowl.
    8. Pour the warm soy glaze over the wings and toss gently to coat each piece evenly with the dark, shiny sauce.
    9. Arrange the glazed wings on a serving platter, ensuring they look dark and glossy, resembling tiny bat wings ready to flutter in the night.
    10. Optional: Use a small brush or toothpick to add extra dark glaze or garnish for a more spooky, Halloween-themed presentation.
    11. Serve the wings hot, enjoying their crispy skin and savory-sweet glaze that look as fun as they taste.
    Enjoy these Halloween Bat Wings as a centerpiece for your spooky feast or a fun snack that kids and grown-ups will love. Their crispiness and savory soy punch make every bite a delightful surprise amid the candy chaos. Plus, they’re so quick to toss together that you’ll have more time to enjoy the haunted atmosphere.

    This recipe is a small celebration of the season’s playful spirit, blending comfort food with creative flair. Whether Halloween or just a day craving something different, these wings bring the fun and flavor to any table, daring everyone to take a bite into the dark side.

  • The Surprising Charm of the Clear Sprite Slushie

    The Surprising Charm of the Clear Sprite Slushie

    Imagine a summer evening where the air hums with the scent of fresh lemons and the promise of something chilled and fizzy. Instead of reaching for a typical soda, I discovered the joy of transforming Sprite into a vibrant, icy treat that’s almost too fun to sip. It’s a nostalgic burst of childhood with an adult twist, perfect for backyard gatherings or simply cooling down on a hot day.

    What makes this Sprite slushie stand out isn’t just its simplicity but its ability to elevate a common soda into a spectacle of texture and flavor. The icy crunch mixed with the zing of citrus creates a sensory moment you don’t want to miss. Plus, it’s so quick to make, it’s perfect for impromptu parties or a spontaneous treat to beat the heat.

    Sprite Slushie

    The Sprite slushie is a frozen beverage made by blending chilled Sprite with ice to create a crunchy, icy texture. The key ingredients are sparkling lemon-lime soda and crushed ice, resulting in a bright, fizzy, and refreshing treat with a semi-thick, granular appearance. It’s perfect for hot days and casual gatherings, offering a playful twist on traditional frozen drinks.
    Prep Time 5 minutes
    Total Time 5 minutes
    Servings: 2
    Course: Main Course
    Cuisine: American
    Calories: 150

    Ingredients
      

    • 1 liter chilled Sprite Well chilled for best blending
    • 2 cups ice cubes Crushed or whole before blending

    Equipment

    • Blender
    • Measuring Cups

    Method
     

    1. Place the ice cubes into the blender.
    2. Pour the chilled Sprite over the ice in the blender.
    3. Blend on high speed until the mixture is slushy and smooth, with a granular, icy texture that looks opaque and frosty.
    4. Stop blending and check the consistency; it should be thick and icy but scoopable.
    5. Scoop the Sprite slushie into glasses, allowing the icy froth to mound slightly over the rim.
    6. Serve immediately with a straw or small spoon for a refreshing, fizzy icy treat.

    Notes

    For an even cooler experience, freeze the Sprite in a shallow dish overnight before blending.

    Taking that quick step from ordinary soda to icy delight reminds us that some of the best comforts can come from the simplest ingredients. This Sprite slushie is a reminder to embrace playful, easy, and refreshing pleasures, especially when the sun blazes down.

    Now, with just a bag of ice and a bottle of Sprite, you can turn any moment into a cool escape. No matter the season, a icy glass of this slushie offers a crisp, fizzy retreat—light, lively, and utterly satisfying.

  • Eerie-sweet Delight: Halloween Ghost Brownies with a Surprisingly Crisp Finish

    Eerie-sweet Delight: Halloween Ghost Brownies with a Surprisingly Crisp Finish

    Every October, I find myself hunting for treats that spark a little extra excitement beyond the usual candy stash. This year, I stumbled upon a whimsical idea that turned my kitchen into a haunted workshop—Halloween Ghost Brownies. They look cute, but the real magic is in their unexpected crunch, which dances on your taste buds before melting into chocolaty comfort.

    What sets these ghosts apart? It’s the crisp sugar topping that creates a ghostly shell, cracking with a satisfying snap. The contrast between the crunchy exterior and the fudgy interior feels like a spooky surprise in each bite, making them perfect for both playful kids and nostalgic grown-ups. Plus, they’re so simple to assemble, even a hurried Halloween host can pull them off with flair.

    WHY I LOVE THIS RECIPE?

    • Joy of transforming a simple brownie into a whimsical Halloween centerpiece.
    • Relief that the crunchy shell stays crisp, even after hours on the party table.
    • Memories of childhood Halloweens mixed with a modern twist.
    • Pure pride in creating a festive, eye-catching treat that’s also delicious.

    AVOID MY DISASTER (You’re Welcome)

    • FORGOT to chill the sugar before applying—tasted like overcooked caramel.
    • DUMPED sauce on hot brownies—created a sticky mess that softened shells too quickly.
    • OVER‑TORCHED the marshmallow topping—smelled burnt and ruined the overall look.
    • SKIPPED the parchment lining—made removal a nightmare, almost breaking the delicate ghosts.

    QUICK FIXES THAT SAVE YOUR DAY

    • When shells are soft, splash with a little cold water and re-crisp in the fridge.
    • Patch cracked shells with melted chocolate—lick the spoon for extra flavor.
    • Shield the brownies from humidity with plastic wrap—keeps shells crisp longer.
    • When marshmallow browns too fast, reduce heat and add a splash of vanilla.
    • When in doubt, swap marshmallow for royal icing—crisp, sugary, and foolproof.

    Creating these Ghost Brownies is like conducting a mini Halloween experiment—fun and a little chaotic. Their blend of crunch and fudge makes them stand out among typical treats. As the season shifts, they remind us that the little details—like a crisp shell—can turn normal into magical.

    There’s a quiet satisfaction in seeing a tray of these ghosts disappear fast. They’re simple enough for a last-minute bake, yet special enough to make your celebration feel a bit more enchanted. Sometimes, all it takes is a crunchy ghost for a Halloween that lingers sweetly in memory.

    ,

    Halloween Ghost Brownies

    Halloween Ghost Brownies are a playful treat featuring fudgy chocolate brownies topped with a crisp, sugary shell that cracks when bitten into. The shells are created by applying a sugar-based coating that hardens upon cooling, contrasting with the soft, dense interior of the brownie for a delightful crunch and smooth chocolate flavor. The final appearance resembles small, white ghost figures with a flaky, crackled exterior.
    Prep Time 20 minutes
    Cook Time 25 minutes
    Total Time 45 minutes
    Servings: 12
    Course: Main Course
    Cuisine: Halloween
    Calories: 250

    Ingredients
      

    • 1 pack Brownie mix / homemade brownie batter enough to fill a 9×9 inch pan
    • 1 cup granulated sugar preferably chilled
    • 1/4 cup water
    • 2 tablespoons light corn syrup helps with gloss and crunch
    • 1/2 teaspoon vanilla extract optional, for flavor
    • pinch salt to enhance flavor

    Equipment

    • Mixing bowls
    • Baking pan
    • Silicone spatula
    • Candy thermometer
    • Parchment paper
    • Whisk

    Method
     

    1. Preheat your oven to 350°F (175°C) and line a 9×9 inch baking pan with parchment paper. Bake the brownies according to your recipe or package instructions, then let them cool completely in the pan to prevent cracking.
    2. While the brownies are cooling, prepare the sugar shell by combining the chilled sugar, water, corn syrup, vanilla, and salt in a heavy saucepan. Attach a candy thermometer and heat the mixture over medium heat without stirring, watching for it to reach 300°F (hard crack stage).
    3. Once the sugar syrup reaches 300°F, remove the saucepan from heat and carefully pour the hot syrup into a heatproof container. Allow it to cool just enough to handle but remain pourable and glossy.
    4. Using a spoon or a piping bag, gently spread or drizzle the warm sugar shell over the cooled brownies, creating uneven cracks and a ghostly, flaky shell. Let the coating set and harden at room temperature, which may take about 15 to 20 minutes.
    5. Once the shells are crisp and cool, gently break or crack them slightly if needed to enhance the spooky, ghost-like appearance. This contrast between the crunchy shell and fudgy interior adds texture and visual interest.
    6. Slice the brownies into squares or ghost-shaped pieces. Serve immediately to enjoy the satisfying crunch followed by the soft, chocolatey interior.

    These Halloween Ghost Brownies are more than just a sweet treat; they’re a small moment of joy and creativity. In the rush of October’s chaos, they bring a sprinkle of fun that everyone can enjoy. Plus, they’re surprisingly forgiving, which means fewer worries for the baker.

    As the nights grow colder and the pumpkin lanterns glow brighter, these crispy-then-melt-in-your-mouth ghosts are sure to carve out a special place on your holiday table. They serve as a gentle reminder that sometimes, baking for fun is the best way to celebrate. Here’s to a spooky and scrumptious season—happy haunting!

  • Frozen Blueberry Bliss: The Secret to a No-Mess Summer Slushie

    Frozen Blueberry Bliss: The Secret to a No-Mess Summer Slushie

    Imagine turning on your blender and unleashing a burst of cold, sweet blueberry aroma that instantly transports you to a sun-drenched berry patch. This blueberry slushie isn’t just a frozen treat; it’s a playful escape from the blazing heat with a twist of unexpected tartness that tickles your taste buds.

    What makes this recipe special isn’t just its vibrant color or the burst of flavor—it’s how effortlessly it comes together. No complicated ingredients, no lengthy prep; just ripe blueberries, a splash of lemon, and a handful of ice. Perfect for those moments when your sweet tooth calls and you want a quick, refreshing fix.

    Blueberry Slushie

    A blueberry slushie is a frozen beverage made by blending ripe blueberries with ice and a touch of lemon juice to create a vibrant, Refreshing drink. It has a smooth, icy texture with bursts of tartness and sweetness, served in a glass with a chilled appearance.
    Prep Time 5 minutes
    Total Time 5 minutes
    Servings: 2
    Course: Main Course
    Cuisine: Global
    Calories: 80

    Ingredients
      

    • 1 cup fresh blueberries ripe for sweetness
    • 1/2 lemon lemon juice freshly squeezed
    • 1 cup ice crushed or cubed

    Equipment

    • Blender
    • Measuring cups and spoons

    Method
     

    1. Add fresh blueberries, lemon juice, and ice to your blender.
    2. Secure the lid tightly and blend on high speed until the mixture is smooth and icy, about 30-40 seconds. You should see a vibrant purple slush with tiny frozen bits.
    3. Stop the blender and check the consistency; if it’s too thick, add a splash more lemon juice or a little water and blend again briefly.
    4. Pour the blueberry slushie into chilled glasses, and notice the bright, icy appearance combined with flecks of deep purple.
    5. Garnish with fresh blueberries or a lemon wedge if desired for an inviting presentation.
    6. Serve immediately with a straw for a cooling, refreshing treat.
    This blueberry slushie is more than a simple frozen snack; it’s a moment of cool bliss in your busy day. No matter the season, it offers a consistent burst of berry freshness that’s both satisfying and energizing.

    So, the next time you crave something quick, colorful, and full of flavor, let this slushie be your go-to. It’s a reminder that sometimes, the simplest ingredients create the most memorable delights, especially when served icy and loud in a glass.

  • Spooky & Stylish: Halloween Poison Toffee Apples That Trick and Treat

    Spooky & Stylish: Halloween Poison Toffee Apples That Trick and Treat

    Lighting a fiery orange candle and hearing the crackle of caramel as it cooks, I think about the fun chaos of Halloween. These Poison Toffee Apples aren’t just sweet treats; they’re a statement, blending nostalgia with a daring twist. The dark, glossy coating hides a surprise, perfect for a night of spooky surprises.

    Transforming simple apples into spooky enchantments, I love how easily these turn into conversation starters. The blend of crunchy, sticky toffee and the tartness of crisp apples makes each bite a delight—think of it as edible Halloween decor. Plus, you get to indulge in a bit of playful mischief while making them.

    Poison Toffee Apples

    Poison Toffee Apples are crisp apples coated in a glossy, dark caramel toffee shell. The toffee hardens to a crunchy exterior while remaining sticky and chewy inside, creating a visually striking and playful Halloween treat.
    Prep Time 15 minutes
    Cook Time 20 minutes
    Total Time 35 minutes
    Servings: 4
    Course: Main Course
    Cuisine: Halloween
    Calories: 250

    Ingredients
      

    • 4 large fresh apples preferably tart, like Granny Smith
    • 200 grams granulated sugar for the toffee coating
    • 50 grams unsalted butter adds richness to the toffee
    • 1 tablespoon water helps to dissolve sugar
    • 1 teaspoon vanilla extract optional, for flavor

    Equipment

    • Apple Corer or Knife
    • Cooking saucepan
    • Candy thermometer
    • Baking sheet lined with parchment paper
    • Skewer or popsicle sticks

    Method
     

    1. Wash the apples thoroughly and remove the stems. Insert a skewer or popsicle stick into the core of each apple to make handling easier. Place the prepared apples on a tray lined with parchment paper.
    2. Combine granulated sugar, water, and butter in a heavy saucepan over medium heat. Stir gently until the sugar dissolves completely and the mixture begins to bubble.
    3. Attach a candy thermometer and cook the toffee mixture without stirring until it reaches 150°C (300°F), indicating it has turned into a caramel toffee consistency. Watch for a deep amber color and a fragrant caramel aroma.
    4. Remove the saucepan from heat and carefully dip each apple into the hot toffee, tilting the pan as needed to submerge the apple completely. Tap gently to let excess toffee drip off, then place the coated apple on the parchment-lined tray to set.
    5. Repeat the dipping process for all apples, ensuring an even, glossy coating. Allow the toffee to cool and harden, which should take about 10-15 minutes at room temperature.
    6. Once the toffee is firm and shiny, serve the Poison Toffee Apples as a spooky, crunchy treat perfect for Halloween celebrations.
    As the night winds down, these Poison Toffee Apples stand as a testament to creative Halloween fun. They’re easy to make, yet striking enough to steal the show at any party. With their dark allure and sweet surprise, they promise a memorable night of treats.

    When you pull these apples from the fridge, the glossy coating crackles delightfully in the cold air—an irresistible sound that’s part of the magic. Whether for a spooky gathering or a fun family project, these toffee apples bring a little chaos and a lot of charm to the season. Enjoy crafting and devouring every last bite.