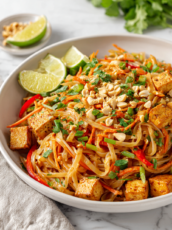
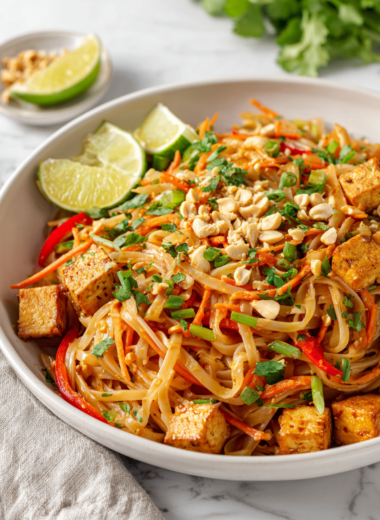
Blog

  • Bat-Shaped Calzones: A Spooky Twist on a Classic

    Bat-Shaped Calzones: A Spooky Twist on a Classic

    Baking anything in a shape that sparks a bit of childhood mischief feels like a secret rebellion. These bat-shaped calzones bring that playful spirit into your kitchen, especially when Halloween’s around the corner or you just want to surprise someone. They’re a little spooky, a little cheesy, and totally doable even on a busy weeknight. Plus, the smell of baking bread and melting cheese is a cheer in itself.

    Why These Bats Keep Coming Back to My Kitchen

    Because they turn a simple dinner into a playful adventure. The crispy edges and gooey insides are just a bonus. Plus, shaping these is oddly satisfying—like a tiny, edible sculpture. They remind me that cooking can be as much about fun as it is about flavor.

    Inside the Ingredients: What Makes These Calzones Special

    • Pizza dough: The blank canvas—chewy, golden, and perfect for shaping into spooky shapes.
    • Mozzarella cheese: Oozy, melty, stretches with a whisper of salty tang.
    • Tomato sauce: Bright, slightly sweet, with a hint of garlic—like a whisper of summer.
    • Ham or pepperoni: Adds a smoky richness, but veggie options work just as well.
    • Egg wash (optional): Gives a shiny finish, makes those tiny bat wings gleam.
    • Black olives or spinach (for decoration): Use to create eyes or other details—think contrast and fun.
    • Dough scraps: Save to cut out wings and ears—every piece counts for the spooky finish.

    Tools of the Bat-ty Trade

    • Rolling pin: Flattening the dough evenly.
    • Baking sheet: Cooking the calzones evenly in the oven.
    • Parchment paper: Preventing sticking and easy cleanup.
    • Sharp knife or scissors: Cutting out bat wings and ears.
    • Fork: Sealing the edges for a crimped finish.

    Step-by-step: Crafting your spooky bat calzones.

    Step 1: Mix warm water, yeast, and a pinch of sugar in a bowl. Let sit until frothy, about 5 minutes.

    Step 2: Add flour, salt, and olive oil to the yeast mixture. Stir until a shaggy dough forms.

    Step 3: Knead the dough on a floured surface for about 8 minutes until smooth and elastic.

    Step 4: Place in a greased bowl, cover with a damp cloth, and let rise in a warm spot for 1 hour, or until doubled in size.

    Step 5: Preheat oven to 200°C (390°F). Punch down the dough and divide into 6 equal pieces.

    Step 6: Roll each piece into a circle about 15cm (6 inches) in diameter.

    Step 7: Fill half of each circle with cheese and your choice of fillings. Fold over to create a semi-circle.

    Step 8: Seal the edges by pinching or crimping with a fork.

    Step 9: Cut out bat wings and ears from leftover dough and attach to the calzones with a little water.

    Step 10: Bake on a parchment-lined baking sheet for 20-25 minutes, until golden brown and crisp.

    Step 11: Remove from oven and let rest for 5 minutes before serving.

    Cooking checkpoints and tips to keep your bats flying straight.

    • Dough should be soft but not sticky; add more flour if it’s sticking.
    • Fillings should be moist but not drippy to prevent leaks.
    • Watch the oven; golden brown edges mean they’re done, not burnt.
    • Ensure the calzones are fully sealed to prevent filling from escaping during baking.

    Common Mistakes and How to Fix Them

    • Over-kneading the dough.? Dough is tough or dry → Add a splash of water and knead a bit more.
    • Filling too wet or overstuffed.? Filling leaks during baking → Ensure edges are well sealed, press firmly with a fork.
    • Burnt edges or undercooked centers.? Baking too long or at too high a temp → Check oven at 20 minutes, reduce temp if browning too fast.
    • Dough not rising enough.? Not enough rise → Let dough double in size, place in a warm corner.

    Spooky Bat-Shaped Calzones

    These playful bat-shaped calzones are crafted with chewy pizza dough filled with gooey mozzarella, tangy tomato sauce, and savory ham or pepperoni. Baked to golden perfection with crispy edges and fun wing and ear details, they turn a simple dinner into a festive, edible sculpture perfect for Halloween or a surprise treat. The aroma of baked bread and melted cheese makes them irresistible and fun to make.
    Prep Time 20 minutes
    Cook Time 25 minutes
    Total Time 45 minutes
    Servings: 6
    Course: Main Course
    Cuisine: American
    Calories: 280

    Ingredients
      

    • 1 1/2 cups warm water around 110°F, to activate yeast
    • 2 1/4 teaspoons active dry yeast for rising the dough
    • 1 teaspoon sugar to feed the yeast
    • 3 1/2 cups all-purpose flour for the dough
    • 1 teaspoon salt
    • 2 tablespoons olive oil for the dough
    • 1 cup mozzarella cheese shredded
    • 1/2 cup tomato sauce bright and slightly sweet
    • 1/2 cup ham or pepperoni sliced
    • 1 egg egg wash beaten, optional, for shine
    • Black olives or spinach for decoration eyes or details
    • Leftover dough for wings and ears cut out shapes

    Equipment

    • Mixing bowls
    • Rolling pin
    • Baking sheet
    • Parchment paper
    • Sharp knife or scissors
    • Fork

    Method
     

    1. In a large bowl, whisk warm water, yeast, and sugar. Let sit for 5 minutes until frothy.
    2. Add flour, salt, and olive oil to the yeast mixture. Stir until a shaggy dough forms.
    3. Knead the dough on a floured surface for about 8 minutes until smooth and elastic, feeling it become soft and pliable.
    4. Place the dough in a greased bowl, cover with a damp cloth, and let rise in a warm spot for 1 hour, until doubled in size.
    5. Preheat your oven to 390°F (200°C). Punch down the risen dough and divide into 6 equal portions.
    6. Roll each portion into a 6-inch circle using a rolling pin, maintaining even thickness.
    7. Spread a spoonful of tomato sauce on half of each circle, then top with mozzarella cheese, ham or pepperoni, and a small spoonful of sauce.
    8. Fold the dough over to create a semi-circle and pinch the edges together firmly, sealing the fillings inside.
    9. Cut out bat wings and ears from leftover dough with a sharp knife or scissors, then attach them to the calzones using a little water to help them stick.
    10. If desired, brush the tops with beaten egg for a shiny finish. Arrange the calzones on a parchment-lined baking sheet.
    11. Bake in the preheated oven for 20-25 minutes until golden brown and crispy, filling the kitchen with a warm, cheesy aroma.
    12. Remove from the oven, let rest for 5 minutes, then add small sliced olives or spinach for eyes and details. Serve warm and enjoy your spooky, cheesy treats!

    Notes

    Ensure the edges are well sealed to prevent filling leaks. Feel free to get creative with decorations—use olives for eyes or cut shapes for wings and ears. For extra flavor, sprinkle with herbs or parmesan before baking.
    These bat-shaped calzones aren’t just fun—they’re a heartfelt way to make dinner feel like a mini celebration. The crispy edges, gooey cheese, and playful shape make them perfect for a family night or a spooky gathering. Don’t be afraid to customize fillings or add a dash of hot sauce—these are your treats. Enjoy the messy joy of pulling apart these little bats and sharing a moment of kitchen chaos turned delight.

  • Bat-Shaped Calzones: A Spooky Twist on a Classic

    Bat-Shaped Calzones: A Spooky Twist on a Classic

    Baking anything in a shape that sparks a bit of childhood mischief feels like a secret rebellion. These bat-shaped calzones bring that playful spirit into your kitchen, especially when Halloween’s around the corner or you just want to surprise someone. They’re a little spooky, a little cheesy, and totally doable even on a busy weeknight. Plus, the smell of baking bread and melting cheese is a cheer in itself.

    Why These Bats Keep Coming Back to My Kitchen

    Because they turn a simple dinner into a playful adventure. The crispy edges and gooey insides are just a bonus. Plus, shaping these is oddly satisfying—like a tiny, edible sculpture. They remind me that cooking can be as much about fun as it is about flavor.

    Inside the Ingredients: What Makes These Calzones Special

    • Pizza dough: The blank canvas—chewy, golden, and perfect for shaping into spooky shapes.
    • Mozzarella cheese: Oozy, melty, stretches with a whisper of salty tang.
    • Tomato sauce: Bright, slightly sweet, with a hint of garlic—like a whisper of summer.
    • Ham or pepperoni: Adds a smoky richness, but veggie options work just as well.
    • Egg wash (optional): Gives a shiny finish, makes those tiny bat wings gleam.
    • Black olives or spinach (for decoration): Use to create eyes or other details—think contrast and fun.
    • Dough scraps: Save to cut out wings and ears—every piece counts for the spooky finish.

    Tools of the Bat-ty Trade

    • Rolling pin: Flattening the dough evenly.
    • Baking sheet: Cooking the calzones evenly in the oven.
    • Parchment paper: Preventing sticking and easy cleanup.
    • Sharp knife or scissors: Cutting out bat wings and ears.
    • Fork: Sealing the edges for a crimped finish.

    Step-by-step: Crafting your spooky bat calzones.

    Step 1: Mix warm water, yeast, and a pinch of sugar in a bowl. Let sit until frothy, about 5 minutes.

    Step 2: Add flour, salt, and olive oil to the yeast mixture. Stir until a shaggy dough forms.

    Step 3: Knead the dough on a floured surface for about 8 minutes until smooth and elastic.

    Step 4: Place in a greased bowl, cover with a damp cloth, and let rise in a warm spot for 1 hour, or until doubled in size.

    Step 5: Preheat oven to 200°C (390°F). Punch down the dough and divide into 6 equal pieces.

    Step 6: Roll each piece into a circle about 15cm (6 inches) in diameter.

    Step 7: Fill half of each circle with cheese and your choice of fillings. Fold over to create a semi-circle.

    Step 8: Seal the edges by pinching or crimping with a fork.

    Step 9: Cut out bat wings and ears from leftover dough and attach to the calzones with a little water.

    Step 10: Bake on a parchment-lined baking sheet for 20-25 minutes, until golden brown and crisp.

    Step 11: Remove from oven and let rest for 5 minutes before serving.

    Cooking checkpoints and tips to keep your bats flying straight.

    • Dough should be soft but not sticky; add more flour if it’s sticking.
    • Fillings should be moist but not drippy to prevent leaks.
    • Watch the oven; golden brown edges mean they’re done, not burnt.
    • Ensure the calzones are fully sealed to prevent filling from escaping during baking.

    Common Mistakes and How to Fix Them

    • Over-kneading the dough.? Dough is tough or dry → Add a splash of water and knead a bit more.
    • Filling too wet or overstuffed.? Filling leaks during baking → Ensure edges are well sealed, press firmly with a fork.
    • Burnt edges or undercooked centers.? Baking too long or at too high a temp → Check oven at 20 minutes, reduce temp if browning too fast.
    • Dough not rising enough.? Not enough rise → Let dough double in size, place in a warm corner.

    Spooky Bat-Shaped Calzones

    These playful bat-shaped calzones are made with chewy pizza dough filled with melty mozzarella, savory tomato sauce, and your choice of ham or pepperoni. Shaped into tiny bats with wings and ears, they bake to a crispy golden brown, with gooey insides and fun, spooky details that make dinner feel like a festive craft project.
    Prep Time 20 minutes
    Cook Time 25 minutes
    Total Time 45 minutes
    Servings: 6
    Course: Main Course
    Cuisine: International
    Calories: 350

    Ingredients
      

    • 1 ½ cups warm water about 110°F/43°C
    • 2 ¼ teaspoons active dry yeast
    • 1 teaspoon sugar
    • 3 cups all-purpose flour
    • 1 teaspoon salt
    • 2 tablespoons olive oil
    • 1 cup mozzarella cheese shredded
    • ½ cup tomato sauce
    • ½ cup ham or pepperoni chopped
    • 1 egg egg beaten, for egg wash (optional)
    • 4 black olives or spinach black olives or spinach for decoration
    • Dough scraps dough scraps for wings and ears

    Equipment

    • Mixing bowls
    • Baking sheet

    Method
     

    1. Mix warm water, yeast, and sugar in a bowl. Let sit until frothy, about 5 minutes, which indicates the yeast is active.
    2. Add flour, salt, and olive oil to the yeast mixture. Stir until a shaggy dough forms, then knead on a floured surface for about 8 minutes until smooth and elastic.
    3. Place the dough in a greased bowl, cover with a damp cloth, and let rise in a warm spot for 1 hour until doubled in size, filling your kitchen with a yeasty aroma.
    4. Preheat your oven to 200°C (390°F). Punch down the dough and divide it into 6 equal pieces for easy handling.
    5. Roll each piece into a 6-inch circle using a rolling pin, keeping the dough evenly thin for a crispy crust.
    6. Spread a spoonful of tomato sauce on half of each dough circle, then top with shredded mozzarella and your choice of ham or pepperoni.
    7. Fold the dough over to create a semi-circle and pinch or crimp the edges with a fork to seal in the fillings.
    8. Cut out bat wings and ears from the leftover dough scraps with a sharp knife or scissors, then attach them to the calzones with a little water for a spooky effect.
    9. Arrange the calzones on a parchment-lined baking sheet. Brush the tops with beaten egg for a shiny finish if desired.
    10. Bake in the preheated oven for 20-25 minutes, until golden brown and crispy, filling your kitchen with the smell of baked bread and melting cheese.
    11. Remove from the oven, let rest for 5 minutes, then decorate the eyes with sliced black olives or spinach to give your bats expressive faces. Serve warm and enjoy this fun, spooky dinner!

    Notes

    Ensure the edges are well sealed to prevent filling from leaking during baking. Feel free to get creative with decorations—tiny bat wings or ears made from scraps make the perfect spooky touch.
    These bat-shaped calzones aren’t just fun—they’re a heartfelt way to make dinner feel like a mini celebration. The crispy edges, gooey cheese, and playful shape make them perfect for a family night or a spooky gathering. Don’t be afraid to customize fillings or add a dash of hot sauce—these are your treats. Enjoy the messy joy of pulling apart these little bats and sharing a moment of kitchen chaos turned delight.

  • Bat-Shaped Calzones: A Spooky Twist on a Classic

    Bat-Shaped Calzones: A Spooky Twist on a Classic

    Baking anything in a shape that sparks a bit of childhood mischief feels like a secret rebellion. These bat-shaped calzones bring that playful spirit into your kitchen, especially when Halloween’s around the corner or you just want to surprise someone. They’re a little spooky, a little cheesy, and totally doable even on a busy weeknight. Plus, the smell of baking bread and melting cheese is a cheer in itself.

    Why These Bats Keep Coming Back to My Kitchen

    Because they turn a simple dinner into a playful adventure. The crispy edges and gooey insides are just a bonus. Plus, shaping these is oddly satisfying—like a tiny, edible sculpture. They remind me that cooking can be as much about fun as it is about flavor.

    Inside the Ingredients: What Makes These Calzones Special

    • Pizza dough: The blank canvas—chewy, golden, and perfect for shaping into spooky shapes.
    • Mozzarella cheese: Oozy, melty, stretches with a whisper of salty tang.
    • Tomato sauce: Bright, slightly sweet, with a hint of garlic—like a whisper of summer.
    • Ham or pepperoni: Adds a smoky richness, but veggie options work just as well.
    • Egg wash (optional): Gives a shiny finish, makes those tiny bat wings gleam.
    • Black olives or spinach (for decoration): Use to create eyes or other details—think contrast and fun.
    • Dough scraps: Save to cut out wings and ears—every piece counts for the spooky finish.

    Tools of the Bat-ty Trade

    • Rolling pin: Flattening the dough evenly.
    • Baking sheet: Cooking the calzones evenly in the oven.
    • Parchment paper: Preventing sticking and easy cleanup.
    • Sharp knife or scissors: Cutting out bat wings and ears.
    • Fork: Sealing the edges for a crimped finish.

    Step-by-step: Crafting your spooky bat calzones.

    Step 1: Mix warm water, yeast, and a pinch of sugar in a bowl. Let sit until frothy, about 5 minutes.

    Step 2: Add flour, salt, and olive oil to the yeast mixture. Stir until a shaggy dough forms.

    Step 3: Knead the dough on a floured surface for about 8 minutes until smooth and elastic.

    Step 4: Place in a greased bowl, cover with a damp cloth, and let rise in a warm spot for 1 hour, or until doubled in size.

    Step 5: Preheat oven to 200°C (390°F). Punch down the dough and divide into 6 equal pieces.

    Step 6: Roll each piece into a circle about 15cm (6 inches) in diameter.

    Step 7: Fill half of each circle with cheese and your choice of fillings. Fold over to create a semi-circle.

    Step 8: Seal the edges by pinching or crimping with a fork.

    Step 9: Cut out bat wings and ears from leftover dough and attach to the calzones with a little water.

    Step 10: Bake on a parchment-lined baking sheet for 20-25 minutes, until golden brown and crisp.

    Step 11: Remove from oven and let rest for 5 minutes before serving.

    Cooking checkpoints and tips to keep your bats flying straight.

    • Dough should be soft but not sticky; add more flour if it’s sticking.
    • Fillings should be moist but not drippy to prevent leaks.
    • Watch the oven; golden brown edges mean they’re done, not burnt.
    • Ensure the calzones are fully sealed to prevent filling from escaping during baking.

    Common Mistakes and How to Fix Them

    • Over-kneading the dough.? Dough is tough or dry → Add a splash of water and knead a bit more.
    • Filling too wet or overstuffed.? Filling leaks during baking → Ensure edges are well sealed, press firmly with a fork.
    • Burnt edges or undercooked centers.? Baking too long or at too high a temp → Check oven at 20 minutes, reduce temp if browning too fast.
    • Dough not rising enough.? Not enough rise → Let dough double in size, place in a warm corner.

    Spooky Bat-Shaped Calzones

    These playful bat-shaped calzones are made with chewy pizza dough filled with gooey mozzarella, tomato sauce, and savory fillings like ham or pepperoni. Baked until golden and crispy, their fun shapes and cheesy interiors make them a delightful and festive meal, perfect for Halloween or a fun family dinner. The process involves shaping, filling, sealing, and decorating the calzones to resemble bats, resulting in a charming and tasty treat.
    Prep Time 20 minutes
    Cook Time 25 minutes
    Total Time 45 minutes
    Servings: 6
    Course: Main Course
    Cuisine: American
    Calories: 320

    Ingredients
      

    • 1 ½ cups warm water around 110°F (43°C)
    • 2 ¼ teaspoons active dry yeast instant yeast works too
    • 1 teaspoon sugar to activate the yeast
    • 3 cups all-purpose flour plus extra for dusting
    • 1 teaspoon salt
    • 2 tablespoons olive oil
    • 1 cup shredded mozzarella cheese optional: for filling
    • ½ cup tomato sauce tomato sauce bright and slightly sweet
    • ½ cup ham or pepperoni sliced
    • 1 egg egg wash beaten, optional
    • Black olives or spinach for decoration to create eyes or details
    • Dough scraps for wings and ears save leftover dough

    Equipment

    • Mixing bowl
    • Rolling pin
    • Baking sheet
    • Parchment paper
    • Sharp knife or scissors
    • Fork

    Method
     

    1. Mix the warm water, yeast, and a pinch of sugar in a large bowl. Let sit for about 5 minutes until frothy—that’s how you know the yeast is active and bubbly.
    2. Add the flour, salt, and olive oil to the yeast mixture. Stir with a spoon or dough hook until a shaggy dough forms—that feels slightly sticky but holds together.
    3. Knead the dough on a floured surface for about 8 minutes until it becomes smooth, elastic, and springs back when pressed.
    4. Shape the dough into a ball, place it in a greased bowl, cover with a damp cloth, and let it rise in a warm spot for 1 hour until it doubles in size and feels puffy to the touch.
    5. Preheat your oven to 200°C (390°F). Punch down the risen dough to release excess air, then divide it into 6 equal pieces for shaping.
    6. Roll each piece into a circle about 15cm (6 inches) in diameter, using a rolling pin on a floured surface. The circles should be even and thin enough to fold easily.
    7. Spread a spoonful of tomato sauce on one half of each dough circle. Top with mozzarella cheese and slices of ham or pepperoni, leaving a small border around the edge.
    8. Fold the dough over the fillings to create a semi-circle, then pinch or crimp the edges with a fork to seal tightly and prevent leaks during baking.
    9. Cut out bat wings and ears from the leftover dough scraps using a sharp knife or scissors. Attach these to the calzones with a tiny dab of water to resemble bats’ wings and ears.
    10. Optional: Brush the tops of the calzones with beaten egg wash for a shiny finish. Place them on a parchment-lined baking sheet.
    11. Bake in the preheated oven for about 20-25 minutes until golden brown and crispy, with the wings and ears nicely baked. The house will fill with a warm, cheesy aroma, promising deliciousness.
    12. Remove from the oven, let rest for 5 minutes, then serve warm. Enjoy your adorable, cheesy bat calzones as a fun, festive meal or snack.

    Notes

    Ensure edges are sealed well to prevent filling leaks. Feel free to customize fillings with vegetables or different cheeses for variety. Using a sharp knife makes cutting out wings and ears easier and cleaner.
    These bat-shaped calzones aren’t just fun—they’re a heartfelt way to make dinner feel like a mini celebration. The crispy edges, gooey cheese, and playful shape make them perfect for a family night or a spooky gathering. Don’t be afraid to customize fillings or add a dash of hot sauce—these are your treats. Enjoy the messy joy of pulling apart these little bats and sharing a moment of kitchen chaos turned delight.

  • Bat-Shaped Calzones: A Spooky Twist on a Classic

    Bat-Shaped Calzones: A Spooky Twist on a Classic

    Baking anything in a shape that sparks a bit of childhood mischief feels like a secret rebellion. These bat-shaped calzones bring that playful spirit into your kitchen, especially when Halloween’s around the corner or you just want to surprise someone. They’re a little spooky, a little cheesy, and totally doable even on a busy weeknight. Plus, the smell of baking bread and melting cheese is a cheer in itself.

    Why These Bats Keep Coming Back to My Kitchen

    Because they turn a simple dinner into a playful adventure. The crispy edges and gooey insides are just a bonus. Plus, shaping these is oddly satisfying—like a tiny, edible sculpture. They remind me that cooking can be as much about fun as it is about flavor.

    Inside the Ingredients: What Makes These Calzones Special

    • Pizza dough: The blank canvas—chewy, golden, and perfect for shaping into spooky shapes.
    • Mozzarella cheese: Oozy, melty, stretches with a whisper of salty tang.
    • Tomato sauce: Bright, slightly sweet, with a hint of garlic—like a whisper of summer.
    • Ham or pepperoni: Adds a smoky richness, but veggie options work just as well.
    • Egg wash (optional): Gives a shiny finish, makes those tiny bat wings gleam.
    • Black olives or spinach (for decoration): Use to create eyes or other details—think contrast and fun.
    • Dough scraps: Save to cut out wings and ears—every piece counts for the spooky finish.

    Tools of the Bat-ty Trade

    • Rolling pin: Flattening the dough evenly.
    • Baking sheet: Cooking the calzones evenly in the oven.
    • Parchment paper: Preventing sticking and easy cleanup.
    • Sharp knife or scissors: Cutting out bat wings and ears.
    • Fork: Sealing the edges for a crimped finish.

    Step-by-step: Crafting your spooky bat calzones.

    Step 1: Mix warm water, yeast, and a pinch of sugar in a bowl. Let sit until frothy, about 5 minutes.

    Step 2: Add flour, salt, and olive oil to the yeast mixture. Stir until a shaggy dough forms.

    Step 3: Knead the dough on a floured surface for about 8 minutes until smooth and elastic.

    Step 4: Place in a greased bowl, cover with a damp cloth, and let rise in a warm spot for 1 hour, or until doubled in size.

    Step 5: Preheat oven to 200°C (390°F). Punch down the dough and divide into 6 equal pieces.

    Step 6: Roll each piece into a circle about 15cm (6 inches) in diameter.

    Step 7: Fill half of each circle with cheese and your choice of fillings. Fold over to create a semi-circle.

    Step 8: Seal the edges by pinching or crimping with a fork.

    Step 9: Cut out bat wings and ears from leftover dough and attach to the calzones with a little water.

    Step 10: Bake on a parchment-lined baking sheet for 20-25 minutes, until golden brown and crisp.

    Step 11: Remove from oven and let rest for 5 minutes before serving.

    Cooking checkpoints and tips to keep your bats flying straight.

    • Dough should be soft but not sticky; add more flour if it’s sticking.
    • Fillings should be moist but not drippy to prevent leaks.
    • Watch the oven; golden brown edges mean they’re done, not burnt.
    • Ensure the calzones are fully sealed to prevent filling from escaping during baking.

    Common Mistakes and How to Fix Them

    • Over-kneading the dough.? Dough is tough or dry → Add a splash of water and knead a bit more.
    • Filling too wet or overstuffed.? Filling leaks during baking → Ensure edges are well sealed, press firmly with a fork.
    • Burnt edges or undercooked centers.? Baking too long or at too high a temp → Check oven at 20 minutes, reduce temp if browning too fast.
    • Dough not rising enough.? Not enough rise → Let dough double in size, place in a warm corner.

    Spooky Bat-Shaped Calzones

    These playful bat-shaped calzones are made with chewy pizza dough filled with melty mozzarella, savory tomato sauce, and your choice of ham or pepperoni. Baked until golden and crispy, they feature fun wing and ear details created from leftover dough, making them an entertaining and delicious treat for Halloween or any fun dinner night. Their crispy edges and gooey insides make for a satisfying, edible sculpture that sparks joy in the kitchen.
    Prep Time 30 minutes
    Cook Time 25 minutes
    Total Time 55 minutes
    Servings: 6
    Course: Main Course
    Cuisine: American
    Calories: 350

    Ingredients
      

    • 1 1/2 cups warm water around 110°F (43°C)
    • 2 1/4 teaspoons dry active yeast
    • 1 teaspoon sugar to activate yeast
    • 3 1/2 cups all-purpose flour
    • 1 teaspoon salt
    • 2 tablespoons olive oil
    • 1 cup shredded mozzarella cheese for filling
    • 1/2 cup tomato sauce tomato sauce bright and slightly sweet
    • 1/2 cup diced ham or pepperoni smoky and savory
    • 1 egg egg beaten for egg wash (optional)
    • black olives or spinach for decoration for eyes or details contrast and fun
    • dough scraps for wings and ears dough scraps for shaping wings and ears

    Equipment

    • Rolling pin
    • Baking sheet
    • Parchment paper
    • Sharp knife or scissors
    • Fork

    Method
     

    1. Mix the warm water, yeast, and sugar in a bowl, then let sit until frothy, about 5 minutes. This activates the yeast and starts the dough.
    2. Add flour, salt, and olive oil to the yeast mixture. Stir until a shaggy dough forms, pulling together the ingredients.
    3. Knead the dough on a floured surface for about 8 minutes until it feels smooth, elastic, and slightly tacky.
    4. Place the dough in a greased bowl, cover with a damp cloth, and let rise in a warm spot for about 1 hour, or until doubled in size.
    5. Preheat your oven to 200°C (390°F). Punch down the dough to release air, then divide it into 6 equal pieces.
    6. Roll each dough piece into a 15cm (6-inch) circle using a rolling pin, ensuring even thickness.
    7. Spread a spoonful of tomato sauce on half of each circle, then sprinkle with mozzarella cheese and your choice of ham or pepperoni.
    8. Fold the dough over the filling to create a semi-circle, then seal the edges by pinching or crimping with a fork.
    9. Cut out bat wings and ears from the leftover dough scraps with a sharp knife or scissors, then attach to the calzones with a little water to secure.
    10. Place the shaped calzones on a parchment-lined baking sheet. Brush lightly with beaten egg for a shiny finish, if desired.
    11. Bake in the preheated oven for 20-25 minutes until golden brown and crispy, filling your kitchen with warm, cheesy aroma.
    12. Remove from the oven and let rest for 5 minutes. Decorate the eyes with sliced olives or spinach, creating fun expressions before serving.

    Notes

    Ensure the edges are well sealed to prevent fillings from escaping during baking. For extra shine, brush with egg wash before baking. Feel free to get creative with the decorations—think tiny wings or ears made from leftover dough for a spookier effect.
    These bat-shaped calzones aren’t just fun—they’re a heartfelt way to make dinner feel like a mini celebration. The crispy edges, gooey cheese, and playful shape make them perfect for a family night or a spooky gathering. Don’t be afraid to customize fillings or add a dash of hot sauce—these are your treats. Enjoy the messy joy of pulling apart these little bats and sharing a moment of kitchen chaos turned delight.

  • Bat-Shaped Calzones: A Spooky Twist on a Classic

    Bat-Shaped Calzones: A Spooky Twist on a Classic

    Baking anything in a shape that sparks a bit of childhood mischief feels like a secret rebellion. These bat-shaped calzones bring that playful spirit into your kitchen, especially when Halloween’s around the corner or you just want to surprise someone. They’re a little spooky, a little cheesy, and totally doable even on a busy weeknight. Plus, the smell of baking bread and melting cheese is a cheer in itself.

    Why These Bats Keep Coming Back to My Kitchen

    Because they turn a simple dinner into a playful adventure. The crispy edges and gooey insides are just a bonus. Plus, shaping these is oddly satisfying—like a tiny, edible sculpture. They remind me that cooking can be as much about fun as it is about flavor.

    Inside the Ingredients: What Makes These Calzones Special

    • Pizza dough: The blank canvas—chewy, golden, and perfect for shaping into spooky shapes.
    • Mozzarella cheese: Oozy, melty, stretches with a whisper of salty tang.
    • Tomato sauce: Bright, slightly sweet, with a hint of garlic—like a whisper of summer.
    • Ham or pepperoni: Adds a smoky richness, but veggie options work just as well.
    • Egg wash (optional): Gives a shiny finish, makes those tiny bat wings gleam.
    • Black olives or spinach (for decoration): Use to create eyes or other details—think contrast and fun.
    • Dough scraps: Save to cut out wings and ears—every piece counts for the spooky finish.

    Tools of the Bat-ty Trade

    • Rolling pin: Flattening the dough evenly.
    • Baking sheet: Cooking the calzones evenly in the oven.
    • Parchment paper: Preventing sticking and easy cleanup.
    • Sharp knife or scissors: Cutting out bat wings and ears.
    • Fork: Sealing the edges for a crimped finish.

    Step-by-step: Crafting your spooky bat calzones.

    Step 1: Mix warm water, yeast, and a pinch of sugar in a bowl. Let sit until frothy, about 5 minutes.

    Step 2: Add flour, salt, and olive oil to the yeast mixture. Stir until a shaggy dough forms.

    Step 3: Knead the dough on a floured surface for about 8 minutes until smooth and elastic.

    Step 4: Place in a greased bowl, cover with a damp cloth, and let rise in a warm spot for 1 hour, or until doubled in size.

    Step 5: Preheat oven to 200°C (390°F). Punch down the dough and divide into 6 equal pieces.

    Step 6: Roll each piece into a circle about 15cm (6 inches) in diameter.

    Step 7: Fill half of each circle with cheese and your choice of fillings. Fold over to create a semi-circle.

    Step 8: Seal the edges by pinching or crimping with a fork.

    Step 9: Cut out bat wings and ears from leftover dough and attach to the calzones with a little water.

    Step 10: Bake on a parchment-lined baking sheet for 20-25 minutes, until golden brown and crisp.

    Step 11: Remove from oven and let rest for 5 minutes before serving.

    Cooking checkpoints and tips to keep your bats flying straight.

    • Dough should be soft but not sticky; add more flour if it’s sticking.
    • Fillings should be moist but not drippy to prevent leaks.
    • Watch the oven; golden brown edges mean they’re done, not burnt.
    • Ensure the calzones are fully sealed to prevent filling from escaping during baking.

    Common Mistakes and How to Fix Them

    • Over-kneading the dough.? Dough is tough or dry → Add a splash of water and knead a bit more.
    • Filling too wet or overstuffed.? Filling leaks during baking → Ensure edges are well sealed, press firmly with a fork.
    • Burnt edges or undercooked centers.? Baking too long or at too high a temp → Check oven at 20 minutes, reduce temp if browning too fast.
    • Dough not rising enough.? Not enough rise → Let dough double in size, place in a warm corner.

    Spooky Bat-Shaped Calzones

    These playful bat-shaped calzones are made with chewy pizza dough filled with gooey mozzarella, tangy tomato sauce, and smoky ham or pepperoni. Baked until golden and crispy, their fun shape adds a whimsical touch to any dinner, especially around Halloween. The crispy edges contrast with the melty interior, making each bite both satisfying and festive.
    Prep Time 30 minutes
    Cook Time 25 minutes
    Total Time 55 minutes
    Servings: 6
    Course: Main Course
    Cuisine: American
    Calories: 350

    Ingredients
      

    • 1 package pizza dough store-bought or homemade
    • 1 cup mozzarella cheese shredded
    • 1/2 cup tomato sauce bright and slightly sweet
    • 1 cup ham or pepperoni sliced
    • 1 egg egg wash optional, for shine
    • few black olives or spinach for decoration to create eyes and details
    • leftover dough dough scraps for wings and ears

    Equipment

    • Mixing bowls
    • Baking sheet
    • Parchment paper
    • Rolling pin
    • Sharp knife or scissors
    • Fork
    • Damp cloth

    Method
     

    1. Mix warm water, yeast, and a pinch of sugar in a bowl. Let sit until frothy, about 5 minutes, while you prepare your workspace.
    2. Add flour, salt, and olive oil to the yeast mixture. Stir with a spoon or dough hook until a shaggy dough forms.
    3. Knead the dough on a floured surface for about 8 minutes until it becomes smooth, elastic, and slightly tacky to the touch.
    4. Place the dough in a greased bowl, cover with a damp cloth, and let it rise in a warm spot for about 1 hour, until it doubles in size.
    5. Preheat your oven to 200°C (390°F). Punch down the risen dough to release air, then divide it into 6 equal pieces.
    6. Roll each piece into a 15cm (6-inch) circle using a rolling pin, keeping the edges slightly thicker for sealing.
    7. Spread a spoonful of tomato sauce on half of each dough circle, then top with shredded mozzarella and slices of ham or pepperoni.
    8. Fold the dough over the fillings to form a semi-circle, then pinch or crimp the edges with a fork to seal tightly.
    9. Cut out bat wings and ears from leftover dough scraps with a sharp knife or scissors, then attach them to the calzones with a little water to resemble spooky bats.
    10. Optional: Brush the tops with beaten egg wash for a shiny finish. Place the calzones on a parchment-lined baking sheet.
    11. Bake in the preheated oven for 20-25 minutes, until golden brown and crispy, filling your kitchen with the tempting aroma of baked bread and cheese.
    12. Let the calzones rest for 5 minutes, then decorate with black olives or spinach for eyes, and enjoy your playful, cheesy bat-shaped treats!

    Notes

    Ensure edges are sealed well to prevent filling leaks. Feel free to get creative with decorations for a fun Halloween touch!
    These bat-shaped calzones aren’t just fun—they’re a heartfelt way to make dinner feel like a mini celebration. The crispy edges, gooey cheese, and playful shape make them perfect for a family night or a spooky gathering. Don’t be afraid to customize fillings or add a dash of hot sauce—these are your treats. Enjoy the messy joy of pulling apart these little bats and sharing a moment of kitchen chaos turned delight.

  • Bloody Red Velvet Cake: A Dark, Rich Spin on a Classic

    Bloody Red Velvet Cake: A Dark, Rich Spin on a Classic

    Red velvet cake often feels like a nostalgic throwback, but I love to twist it into something darker and more dramatic. The deep crimson hue isn’t just for show; it’s a canvas for bold flavors and a touch of mystery. Baking this cake is about embracing the chaos of mixing rich cocoa, tangy buttermilk, and a splash of vinegar — a combination that somehow makes everything more alive.

    Why This Cake Never Gets Old

    Every time I bake this, it’s like revisiting a secret recipe I’ve refined over years. The rich, velvety crumb, paired with a tangy cream cheese frosting, always takes me back to childhood celebrations and quiet moments of self-indulgence. It’s a cake that’s as much about the process as it is about the final bite, with the deep red hue reminding me of passion and a little bit of chaos.

    Inside the Red Velvet Realm

    • All-purpose flour: The backbone of the cake, providing structure; I like to sift it for a light crumb.
    • Unsweetened cocoa powder: Adds depth and that signature chocolate hint—go for natural, not Dutch-processed.
    • Buttermilk: Gives moisture and tang, balancing the sweetness—swap with sour milk if needed.
    • Vinegar: Activates baking soda with a zing of acidity—don’t skip this.
    • Vegetable oil: Keeps the cake moist and tender—can substitute with melted coconut oil for extra flavor.
    • Red food coloring: The showstopper—use gel for vibrant color without watering down the batter.
    • Eggs: Bind the batter and aerate—large, fresh eggs work best.

    Tools of the Crimson Trade

    • Mixing bowls: To combine wet and dry ingredients separately.
    • Electric mixer or whisk: To beat the eggs and blend the batter smoothly.
    • Cake pan (20cm round): Shape your cake evenly.
    • Parchment paper: Prevent sticking and easy removal.
    • Cooling rack: Cool the cake evenly and prevent sogginess.

    Step-by-Step to a Deep Crimson Delight

    Step 1: Preheat your oven to 180°C (350°F). Grease a 20cm (8-inch) round cake pan and line the bottom with parchment.

    Step 2: In a large bowl, sift together 250g all-purpose flour, 30g unsweetened cocoa powder, 1 tsp baking soda, and ½ tsp salt.

    Step 3: In another bowl, whisk 2 large eggs, 250ml buttermilk, 100ml vegetable oil, 1 tbsp white vinegar, and 2 tsp vanilla extract until well combined.

    Step 4: Gradually add the wet ingredients to the dry, mixing just until the batter is smooth and velvety, no lumps.

    Cooking Cues & Common Pitfalls

    • The batter should be glossy and smooth, not thick or lumpy.
    • The cake’s edges should just start to pull away from the pan when baked.
    • When poked gently, the center should bounce back, not stay wet or sink.
    • Use a toothpick or cake tester; it should come out clean when the cake is done.

    Troubleshooting the Crimson Path

    • Cake rises then collapses.? If the cake sinks in the middle, check oven temperature—may be too hot. Lower slightly and bake longer.
    • Over-torched edges.? If the edges burn, reduce oven heat or cover edges with foil halfway through baking.
    • Lumpy or dense texture.? For uneven crumb, mix batter just until combined—don’t overmix.
    • Frosting sliding or melting.? If frosting slides off, chill the cake for 30 minutes before frosting.

    Dark Red Velvet Cake

    This dark red velvet cake features a rich, velvety crumb with a deep crimson hue, achieved through a combination of cocoa, buttermilk, and food coloring. The process involves mixing wet and dry ingredients separately, then folding them together before baking to create a moist, tender texture. Topped with tangy cream cheese frosting, it’s a dramatic and indulgent dessert perfect for celebrations or quiet indulgence.
    Prep Time 20 minutes
    Cook Time 30 minutes
    Total Time 50 minutes
    Servings: 8
    Course: Main Course
    Cuisine: American
    Calories: 350

    Ingredients
      

    • 250 g all-purpose flour sifted
    • 30 g unsweetened cocoa powder natural, not Dutch-processed
    • 1 tsp baking soda
    • ½ tsp salt
    • 2 large eggs large, fresh
    • 250 ml buttermilk or sour milk
    • 100 ml vegetable oil can substitute with melted coconut oil
    • 1 tbsp white vinegar
    • 2 tsp vanilla extract
    • 2 tsp red food coloring gel preferred for vibrant color

    Equipment

    • Mixing bowls
    • Electric mixer or whisk
    • Cake pan (20cm round)
    • Parchment paper
    • Cooling rack

    Method
     

    1. Preheat your oven to 180°C (350°F). Grease a 20cm round cake pan and line the bottom with parchment paper to prevent sticking.
    2. Sift together the flour, cocoa powder, baking soda, and salt into a large mixing bowl. This ensures a light, airy crumb.
    3. In a separate bowl, whisk the eggs, buttermilk, vegetable oil, vinegar, and vanilla extract until the mixture is smooth and fragrant, about 1-2 minutes.
    4. Add the red food coloring to the wet mixture and stir until fully incorporated, achieving a vibrant crimson hue.
    5. Gradually pour the wet ingredients into the dry ingredients, folding gently with a spatula or using a mixer on low speed. Mix just until the batter is smooth and no lumps remain, being careful not to overmix.
    6. Pour the batter into your prepared cake pan, smoothing the top with a spatula to ensure even baking.
    7. Bake in the preheated oven for about 30 minutes, or until the edges are just starting to pull away from the pan and a toothpick inserted into the center comes out clean.
    8. Remove the cake from the oven and let it cool in the pan for 10 minutes, then transfer to a cooling rack and cool completely before frosting.
    9. Once cooled, slice the cake horizontally if layering, or serve directly. Top with tangy cream cheese frosting for a classic finish.

    Notes

    Ensure not to overmix the batter to keep the cake light. Use gel food coloring for vibrant, non-watered-down color. Chilling the cake before frosting helps prevent sliding or melting of the frosting.
    This cake isn’t just a dessert; it’s a statement. Its moist crumb and vibrant hue make it a showstopper at any gathering. Keep it simple, let the colors and flavors speak for themselves, and don’t shy away from experimenting with different frostings or toppings. Every bite should feel like a small rebellion—rich, bold, and unforgettable.

  • Bloody Red Velvet Cake: A Dark, Rich Spin on a Classic

    Bloody Red Velvet Cake: A Dark, Rich Spin on a Classic

    Red velvet cake often feels like a nostalgic throwback, but I love to twist it into something darker and more dramatic. The deep crimson hue isn’t just for show; it’s a canvas for bold flavors and a touch of mystery. Baking this cake is about embracing the chaos of mixing rich cocoa, tangy buttermilk, and a splash of vinegar — a combination that somehow makes everything more alive.

    Why This Cake Never Gets Old

    Every time I bake this, it’s like revisiting a secret recipe I’ve refined over years. The rich, velvety crumb, paired with a tangy cream cheese frosting, always takes me back to childhood celebrations and quiet moments of self-indulgence. It’s a cake that’s as much about the process as it is about the final bite, with the deep red hue reminding me of passion and a little bit of chaos.

    Inside the Red Velvet Realm

    • All-purpose flour: The backbone of the cake, providing structure; I like to sift it for a light crumb.
    • Unsweetened cocoa powder: Adds depth and that signature chocolate hint—go for natural, not Dutch-processed.
    • Buttermilk: Gives moisture and tang, balancing the sweetness—swap with sour milk if needed.
    • Vinegar: Activates baking soda with a zing of acidity—don’t skip this.
    • Vegetable oil: Keeps the cake moist and tender—can substitute with melted coconut oil for extra flavor.
    • Red food coloring: The showstopper—use gel for vibrant color without watering down the batter.
    • Eggs: Bind the batter and aerate—large, fresh eggs work best.

    Tools of the Crimson Trade

    • Mixing bowls: To combine wet and dry ingredients separately.
    • Electric mixer or whisk: To beat the eggs and blend the batter smoothly.
    • Cake pan (20cm round): Shape your cake evenly.
    • Parchment paper: Prevent sticking and easy removal.
    • Cooling rack: Cool the cake evenly and prevent sogginess.

    Step-by-Step to a Deep Crimson Delight

    Step 1: Preheat your oven to 180°C (350°F). Grease a 20cm (8-inch) round cake pan and line the bottom with parchment.

    Step 2: In a large bowl, sift together 250g all-purpose flour, 30g unsweetened cocoa powder, 1 tsp baking soda, and ½ tsp salt.

    Step 3: In another bowl, whisk 2 large eggs, 250ml buttermilk, 100ml vegetable oil, 1 tbsp white vinegar, and 2 tsp vanilla extract until well combined.

    Step 4: Gradually add the wet ingredients to the dry, mixing just until the batter is smooth and velvety, no lumps.

    Cooking Cues & Common Pitfalls

    • The batter should be glossy and smooth, not thick or lumpy.
    • The cake’s edges should just start to pull away from the pan when baked.
    • When poked gently, the center should bounce back, not stay wet or sink.
    • Use a toothpick or cake tester; it should come out clean when the cake is done.

    Troubleshooting the Crimson Path

    • Cake rises then collapses.? If the cake sinks in the middle, check oven temperature—may be too hot. Lower slightly and bake longer.
    • Over-torched edges.? If the edges burn, reduce oven heat or cover edges with foil halfway through baking.
    • Lumpy or dense texture.? For uneven crumb, mix batter just until combined—don’t overmix.
    • Frosting sliding or melting.? If frosting slides off, chill the cake for 30 minutes before frosting.

    Dark Red Velvet Cake

    This dark red velvet cake features a rich, velvety crumb with a deep crimson hue that’s both visually striking and delicious. The process involves mixing cocoa, buttermilk, and vinegar to create a moist, tender cake with a hint of tang, finished with a tangy cream cheese frosting. The final appearance is a dramatic, vibrant cake with a soft, crumbly texture that’s perfect for celebrations or indulgent moments.
    Prep Time 20 minutes
    Cook Time 30 minutes
    Total Time 50 minutes
    Servings: 8
    Course: Main Course
    Cuisine: American
    Calories: 420

    Ingredients
      

    • 250 g all-purpose flour sifted for lightness
    • 30 g unsweetened cocoa powder natural preferred
    • 1 tsp baking soda
    • 0.5 tsp salt
    • 2 large eggs fresh, large
    • 250 ml buttermilk for moisture and tang
    • 100 ml vegetable oil keeps cake moist
    • 1 tbsp white vinegar activates baking soda
    • 2 tsp vanilla extract
    • 2 tsp red food coloring gel preferred for vibrant color

    Equipment

    • Mixing bowls
    • Electric mixer or whisk
    • Cake pan (20cm round)
    • Parchment paper
    • Cooling rack

    Method
     

    1. Preheat your oven to 180°C (350°F). Grease a 20cm round cake pan and line the bottom with parchment paper to prevent sticking.
    2. Sift together the flour, cocoa powder, baking soda, and salt into a large mixing bowl. This creates a light, airy dry mixture that ensures a tender crumb.
    3. In a separate bowl, whisk the eggs until they are well combined and slightly frothy. Add the buttermilk, vegetable oil, white vinegar, vanilla extract, and red food coloring. Whisk until the mixture is smooth and vibrant red.
    4. Gradually pour the wet mixture into the dry ingredients, folding gently with a spatula or mixing on low speed. Mix just until the batter is glossy, smooth, and free of lumps—avoid overmixing to keep the cake light.
    5. Pour the batter into the prepared cake pan, spreading it evenly with a spatula. Tap the pan lightly on the counter to release any air bubbles and ensure an even surface.
    6. Bake in the preheated oven for about 30 minutes, or until the edges just start to pull away from the pan and a toothpick inserted into the center comes out clean. The cake will be firm but tender.
    7. Remove the cake from the oven and let it cool in the pan for 10 minutes. Then, transfer it to a cooling rack and cool completely before frosting to prevent melting.
    8. Once cooled, the cake’s deep crimson color and velvety texture are ready for frosting. Slice and serve to enjoy its rich, tender crumb with bold visual impact.

    Notes

    For best results, use gel food coloring to achieve a vibrant red hue without thinning the batter. Ensure the cake is fully cooled before frosting to prevent sliding or melting of the cream cheese topping.
    This cake isn’t just a dessert; it’s a statement. Its moist crumb and vibrant hue make it a showstopper at any gathering. Keep it simple, let the colors and flavors speak for themselves, and don’t shy away from experimenting with different frostings or toppings. Every bite should feel like a small rebellion—rich, bold, and unforgettable.

  • Bloody Red Velvet Cake: A Dark, Rich Spin on a Classic

    Bloody Red Velvet Cake: A Dark, Rich Spin on a Classic

    Red velvet cake often feels like a nostalgic throwback, but I love to twist it into something darker and more dramatic. The deep crimson hue isn’t just for show; it’s a canvas for bold flavors and a touch of mystery. Baking this cake is about embracing the chaos of mixing rich cocoa, tangy buttermilk, and a splash of vinegar — a combination that somehow makes everything more alive.

    Why This Cake Never Gets Old

    Every time I bake this, it’s like revisiting a secret recipe I’ve refined over years. The rich, velvety crumb, paired with a tangy cream cheese frosting, always takes me back to childhood celebrations and quiet moments of self-indulgence. It’s a cake that’s as much about the process as it is about the final bite, with the deep red hue reminding me of passion and a little bit of chaos.

    Inside the Red Velvet Realm

    • All-purpose flour: The backbone of the cake, providing structure; I like to sift it for a light crumb.
    • Unsweetened cocoa powder: Adds depth and that signature chocolate hint—go for natural, not Dutch-processed.
    • Buttermilk: Gives moisture and tang, balancing the sweetness—swap with sour milk if needed.
    • Vinegar: Activates baking soda with a zing of acidity—don’t skip this.
    • Vegetable oil: Keeps the cake moist and tender—can substitute with melted coconut oil for extra flavor.
    • Red food coloring: The showstopper—use gel for vibrant color without watering down the batter.
    • Eggs: Bind the batter and aerate—large, fresh eggs work best.

    Tools of the Crimson Trade

    • Mixing bowls: To combine wet and dry ingredients separately.
    • Electric mixer or whisk: To beat the eggs and blend the batter smoothly.
    • Cake pan (20cm round): Shape your cake evenly.
    • Parchment paper: Prevent sticking and easy removal.
    • Cooling rack: Cool the cake evenly and prevent sogginess.

    Step-by-Step to a Deep Crimson Delight

    Step 1: Preheat your oven to 180°C (350°F). Grease a 20cm (8-inch) round cake pan and line the bottom with parchment.

    Step 2: In a large bowl, sift together 250g all-purpose flour, 30g unsweetened cocoa powder, 1 tsp baking soda, and ½ tsp salt.

    Step 3: In another bowl, whisk 2 large eggs, 250ml buttermilk, 100ml vegetable oil, 1 tbsp white vinegar, and 2 tsp vanilla extract until well combined.

    Step 4: Gradually add the wet ingredients to the dry, mixing just until the batter is smooth and velvety, no lumps.

    Cooking Cues & Common Pitfalls

    • The batter should be glossy and smooth, not thick or lumpy.
    • The cake’s edges should just start to pull away from the pan when baked.
    • When poked gently, the center should bounce back, not stay wet or sink.
    • Use a toothpick or cake tester; it should come out clean when the cake is done.

    Troubleshooting the Crimson Path

    • Cake rises then collapses.? If the cake sinks in the middle, check oven temperature—may be too hot. Lower slightly and bake longer.
    • Over-torched edges.? If the edges burn, reduce oven heat or cover edges with foil halfway through baking.
    • Lumpy or dense texture.? For uneven crumb, mix batter just until combined—don’t overmix.
    • Frosting sliding or melting.? If frosting slides off, chill the cake for 30 minutes before frosting.

    Deep Crimson Red Velvet Cake

    This red velvet cake features a rich, velvety crumb with a dramatic deep crimson hue, achieved through the perfect blend of cocoa, buttermilk, and food coloring. The cake is baked until tender and moist, then layered with tangy cream cheese frosting for a luscious finish. Its striking appearance and luxurious texture make it a memorable centerpiece for any celebration.
    Prep Time 20 minutes
    Cook Time 30 minutes
    Total Time 50 minutes
    Servings: 8
    Course: Main Course
    Cuisine: American
    Calories: 350

    Ingredients
      

    • 250 g all-purpose flour sifted
    • 30 g unsweetened cocoa powder natural, not Dutch-processed
    • 1 tsp baking soda
    • 0.5 tsp salt
    • 2 large eggs large, fresh
    • 250 ml buttermilk or sour milk
    • 100 ml vegetable oil or melted coconut oil
    • 1 tbsp white vinegar
    • 2 tsp vanilla extract
    • 2 tsp red food coloring gel preferred for vibrant color

    Equipment

    • Mixing bowls
    • Electric mixer or whisk
    • Cake pan (20cm round)
    • Parchment paper
    • Cooling rack

    Method
     

    1. Preheat your oven to 180°C (350°F). Grease your 20cm round cake pan and line the bottom with parchment paper to prevent sticking.
    2. Sift together the flour, cocoa powder, baking soda, and salt into a large mixing bowl. This ensures a light, airy crumb.
    3. In a separate bowl, whisk the eggs, buttermilk, vegetable oil, vinegar, and vanilla extract until the mixture is smooth and slightly frothy, filling your kitchen with a warm aroma.
    4. Add the red food coloring to the wet mixture and stir until the color is evenly distributed, turning a vibrant crimson hue.
    5. Gradually pour the wet ingredients into the dry ingredients, gently folding with a spatula or mixing on low speed until just combined and the batter is silky and smooth, with no lumps.
    6. Pour the batter into your prepared cake pan, smoothing the top with the back of a spatula for an even surface.
    7. Bake in the preheated oven for approximately 30 minutes, or until a toothpick inserted into the center comes out clean and the edges start to pull away from the pan.
    8. Remove the cake from the oven and let it cool in the pan for 10 minutes. Then, transfer it to a cooling rack to cool completely, which helps set the texture and prevents sogginess.
    9. Once cooled, slice the cake horizontally if layering, or serve as is. Decorate with cream cheese frosting for a classic look, but enjoy its deep crimson color and velvety crumb as is.

    Notes

    For an extra vibrant color, use gel food coloring and add a few drops more if needed. Avoid overmixing after adding wet ingredients to keep the cake light and tender.
    This cake isn’t just a dessert; it’s a statement. Its moist crumb and vibrant hue make it a showstopper at any gathering. Keep it simple, let the colors and flavors speak for themselves, and don’t shy away from experimenting with different frostings or toppings. Every bite should feel like a small rebellion—rich, bold, and unforgettable.

  • Bloody Red Velvet Cake: A Dark, Rich Spin on a Classic

    Bloody Red Velvet Cake: A Dark, Rich Spin on a Classic

    Red velvet cake often feels like a nostalgic throwback, but I love to twist it into something darker and more dramatic. The deep crimson hue isn’t just for show; it’s a canvas for bold flavors and a touch of mystery. Baking this cake is about embracing the chaos of mixing rich cocoa, tangy buttermilk, and a splash of vinegar — a combination that somehow makes everything more alive.

    Why This Cake Never Gets Old

    Every time I bake this, it’s like revisiting a secret recipe I’ve refined over years. The rich, velvety crumb, paired with a tangy cream cheese frosting, always takes me back to childhood celebrations and quiet moments of self-indulgence. It’s a cake that’s as much about the process as it is about the final bite, with the deep red hue reminding me of passion and a little bit of chaos.

    Inside the Red Velvet Realm

    • All-purpose flour: The backbone of the cake, providing structure; I like to sift it for a light crumb.
    • Unsweetened cocoa powder: Adds depth and that signature chocolate hint—go for natural, not Dutch-processed.
    • Buttermilk: Gives moisture and tang, balancing the sweetness—swap with sour milk if needed.
    • Vinegar: Activates baking soda with a zing of acidity—don’t skip this.
    • Vegetable oil: Keeps the cake moist and tender—can substitute with melted coconut oil for extra flavor.
    • Red food coloring: The showstopper—use gel for vibrant color without watering down the batter.
    • Eggs: Bind the batter and aerate—large, fresh eggs work best.

    Tools of the Crimson Trade

    • Mixing bowls: To combine wet and dry ingredients separately.
    • Electric mixer or whisk: To beat the eggs and blend the batter smoothly.
    • Cake pan (20cm round): Shape your cake evenly.
    • Parchment paper: Prevent sticking and easy removal.
    • Cooling rack: Cool the cake evenly and prevent sogginess.

    Step-by-Step to a Deep Crimson Delight

    Step 1: Preheat your oven to 180°C (350°F). Grease a 20cm (8-inch) round cake pan and line the bottom with parchment.

    Step 2: In a large bowl, sift together 250g all-purpose flour, 30g unsweetened cocoa powder, 1 tsp baking soda, and ½ tsp salt.

    Step 3: In another bowl, whisk 2 large eggs, 250ml buttermilk, 100ml vegetable oil, 1 tbsp white vinegar, and 2 tsp vanilla extract until well combined.

    Step 4: Gradually add the wet ingredients to the dry, mixing just until the batter is smooth and velvety, no lumps.

    Cooking Cues & Common Pitfalls

    • The batter should be glossy and smooth, not thick or lumpy.
    • The cake’s edges should just start to pull away from the pan when baked.
    • When poked gently, the center should bounce back, not stay wet or sink.
    • Use a toothpick or cake tester; it should come out clean when the cake is done.

    Troubleshooting the Crimson Path

    • Cake rises then collapses.? If the cake sinks in the middle, check oven temperature—may be too hot. Lower slightly and bake longer.
    • Over-torched edges.? If the edges burn, reduce oven heat or cover edges with foil halfway through baking.
    • Lumpy or dense texture.? For uneven crumb, mix batter just until combined—don’t overmix.
    • Frosting sliding or melting.? If frosting slides off, chill the cake for 30 minutes before frosting.

    Dark Red Velvet Cake

    This dark red velvet cake features a velvety crumb with a deep crimson hue, achieved through a blend of cocoa, buttermilk, and vibrant food coloring. The process involves mixing rich ingredients to create a smooth batter, which is baked to perfection and finished with a tangy cream cheese frosting. The final cake boasts a moist, tender texture with a striking appearance, perfect for dramatic celebrations or indulgent treats.
    Prep Time 20 minutes
    Cook Time 30 minutes
    Total Time 50 minutes
    Servings: 8
    Course: Main Course
    Cuisine: American
    Calories: 450

    Ingredients
      

    • 250 g all-purpose flour sifted
    • 30 g unsweetened cocoa powder natural, not Dutch-processed
    • 1 tsp baking soda
    • ½ tsp salt
    • 2 large eggs large, fresh
    • 250 ml buttermilk
    • 100 ml vegetable oil
    • 1 tbsp white vinegar
    • 2 tsp vanilla extract
    • 2 tsp red food coloring gel preferred for vibrant color

    Equipment

    • Mixing bowls
    • Electric mixer or whisk
    • Cake pan (20cm round)
    • Parchment paper
    • Cooling rack

    Method
     

    1. Preheat your oven to 180°C (350°F). Grease the cake pan and line the bottom with parchment paper.
    2. Sift together the flour, cocoa powder, baking soda, and salt into a large mixing bowl. This creates a light, airy dry mixture.
    3. In a separate bowl, whisk the eggs, buttermilk, vegetable oil, vinegar, and vanilla extract until the mixture is smooth and slightly frothy, filling your kitchen with a warm aroma.
    4. Add the red food coloring to the wet mixture, stirring until the color is evenly distributed, giving the batter a deep crimson hue.
    5. Gradually pour the wet mixture into the dry ingredients, folding gently with a spatula or mixing on low speed until just combined and smooth, avoiding overmixing.
    6. Pour the batter into the prepared cake pan, smoothing the top with a spatula to ensure even baking.
    7. Bake in the preheated oven for about 30 minutes, or until a toothpick inserted into the center comes out clean and the edges start to pull away from the pan.
    8. Remove the cake from the oven and let it cool in the pan for 10 minutes. Then, transfer to a cooling rack and cool completely before frosting.
    9. Once cooled, frost with tangy cream cheese frosting for a perfect finish. Slice to reveal a moist, velvety crumb with a striking red color.

    Notes

    For an extra vibrant color, use gel food coloring. Ensure the cake is fully cooled before frosting to prevent sliding or melting.
    This cake isn’t just a dessert; it’s a statement. Its moist crumb and vibrant hue make it a showstopper at any gathering. Keep it simple, let the colors and flavors speak for themselves, and don’t shy away from experimenting with different frostings or toppings. Every bite should feel like a small rebellion—rich, bold, and unforgettable.

  • Bloody Red Velvet Cake: A Dark, Rich Spin on a Classic

    Bloody Red Velvet Cake: A Dark, Rich Spin on a Classic

    Red velvet cake often feels like a nostalgic throwback, but I love to twist it into something darker and more dramatic. The deep crimson hue isn’t just for show; it’s a canvas for bold flavors and a touch of mystery. Baking this cake is about embracing the chaos of mixing rich cocoa, tangy buttermilk, and a splash of vinegar — a combination that somehow makes everything more alive.

    Why This Cake Never Gets Old

    Every time I bake this, it’s like revisiting a secret recipe I’ve refined over years. The rich, velvety crumb, paired with a tangy cream cheese frosting, always takes me back to childhood celebrations and quiet moments of self-indulgence. It’s a cake that’s as much about the process as it is about the final bite, with the deep red hue reminding me of passion and a little bit of chaos.

    Inside the Red Velvet Realm

    • All-purpose flour: The backbone of the cake, providing structure; I like to sift it for a light crumb.
    • Unsweetened cocoa powder: Adds depth and that signature chocolate hint—go for natural, not Dutch-processed.
    • Buttermilk: Gives moisture and tang, balancing the sweetness—swap with sour milk if needed.
    • Vinegar: Activates baking soda with a zing of acidity—don’t skip this.
    • Vegetable oil: Keeps the cake moist and tender—can substitute with melted coconut oil for extra flavor.
    • Red food coloring: The showstopper—use gel for vibrant color without watering down the batter.
    • Eggs: Bind the batter and aerate—large, fresh eggs work best.

    Tools of the Crimson Trade

    • Mixing bowls: To combine wet and dry ingredients separately.
    • Electric mixer or whisk: To beat the eggs and blend the batter smoothly.
    • Cake pan (20cm round): Shape your cake evenly.
    • Parchment paper: Prevent sticking and easy removal.
    • Cooling rack: Cool the cake evenly and prevent sogginess.

    Step-by-Step to a Deep Crimson Delight

    Step 1: Preheat your oven to 180°C (350°F). Grease a 20cm (8-inch) round cake pan and line the bottom with parchment.

    Step 2: In a large bowl, sift together 250g all-purpose flour, 30g unsweetened cocoa powder, 1 tsp baking soda, and ½ tsp salt.

    Step 3: In another bowl, whisk 2 large eggs, 250ml buttermilk, 100ml vegetable oil, 1 tbsp white vinegar, and 2 tsp vanilla extract until well combined.

    Step 4: Gradually add the wet ingredients to the dry, mixing just until the batter is smooth and velvety, no lumps.

    Cooking Cues & Common Pitfalls

    • The batter should be glossy and smooth, not thick or lumpy.
    • The cake’s edges should just start to pull away from the pan when baked.
    • When poked gently, the center should bounce back, not stay wet or sink.
    • Use a toothpick or cake tester; it should come out clean when the cake is done.

    Troubleshooting the Crimson Path

    • Cake rises then collapses.? If the cake sinks in the middle, check oven temperature—may be too hot. Lower slightly and bake longer.
    • Over-torched edges.? If the edges burn, reduce oven heat or cover edges with foil halfway through baking.
    • Lumpy or dense texture.? For uneven crumb, mix batter just until combined—don’t overmix.
    • Frosting sliding or melting.? If frosting slides off, chill the cake for 30 minutes before frosting.

    Dark Red Velvet Cake

    This rich and dramatic dark red velvet cake blends deep cocoa with tangy buttermilk, creating a velvety crumb with a striking crimson hue. The process involves mixing wet and dry ingredients, baking until golden, and finishing with a tangy cream cheese frosting for a luscious, indulgent dessert with a moist, tender texture and vibrant appearance.
    Prep Time 20 minutes
    Cook Time 30 minutes
    Total Time 50 minutes
    Servings: 8
    Course: Main Course
    Cuisine: American
    Calories: 420

    Ingredients
      

    • 250 g all-purpose flour sifted for a light crumb
    • 30 g unsweetened cocoa powder natural cocoa preferred
    • 1 tsp baking soda
    • 0.5 tsp salt
    • 2 large eggs fresh, at room temperature
    • 250 ml buttermilk or sour milk
    • 100 ml vegetable oil can substitute with melted coconut oil
    • 1 tbsp white vinegar
    • 2 tsp vanilla extract
    • 2 tsp red food coloring gel preferred for vibrancy

    Equipment

    • Mixing bowls
    • Electric mixer or whisk
    • 20cm round cake pan
    • Parchment paper
    • Cooling rack

    Method
     

    1. Preheat your oven to 180°C (350°F). Grease your 20cm round cake pan and line the bottom with parchment paper to prevent sticking.
    2. Sift together the flour, cocoa powder, baking soda, and salt in a large mixing bowl until evenly combined. This ensures a light, airy crumb.
    3. In a separate bowl, whisk the eggs, buttermilk, vegetable oil, vinegar, and vanilla extract until the mixture is smooth and fragrant, about 1-2 minutes.
    4. Gradually pour the wet mixture into the dry ingredients, folding gently with a spatula or beating with an electric mixer on low speed. Mix until the batter is glossy, smooth, and free of lumps, about 2-3 minutes.
    5. Add the red food coloring to the batter and mix until the color is evenly distributed, resulting in a deep crimson hue.
    6. Pour the batter into your prepared cake pan, spreading evenly with a spatula for a flat, level surface.
    7. Bake in the preheated oven for about 30 minutes, or until the top is set and a toothpick inserted in the center comes out clean. Your kitchen will fill with a rich cocoa aroma.
    8. Remove the cake from the oven and let it cool in the pan for 10 minutes, then transfer to a cooling rack to cool completely. The cake should feel moist and tender to the touch.
    9. Once cooled, carefully slice the cake horizontally if layering, or serve as is. Frost with tangy cream cheese frosting for the perfect finishing touch.
    10. Enjoy your vibrant, velvety dark red velvet cake, perfect for celebrations or a decadent treat.
    This cake isn’t just a dessert; it’s a statement. Its moist crumb and vibrant hue make it a showstopper at any gathering. Keep it simple, let the colors and flavors speak for themselves, and don’t shy away from experimenting with different frostings or toppings. Every bite should feel like a small rebellion—rich, bold, and unforgettable.