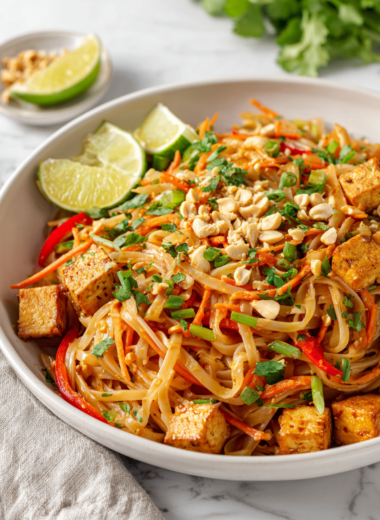
Category: Main Course

  • Bat-Shaped Calzones: A Spooky Twist on a Classic

    Bat-Shaped Calzones: A Spooky Twist on a Classic

    Baking anything in a shape that sparks a bit of childhood mischief feels like a secret rebellion. These bat-shaped calzones bring that playful spirit into your kitchen, especially when Halloween’s around the corner or you just want to surprise someone. They’re a little spooky, a little cheesy, and totally doable even on a busy weeknight. Plus, the smell of baking bread and melting cheese is a cheer in itself.

    Why These Bats Keep Coming Back to My Kitchen

    Because they turn a simple dinner into a playful adventure. The crispy edges and gooey insides are just a bonus. Plus, shaping these is oddly satisfying—like a tiny, edible sculpture. They remind me that cooking can be as much about fun as it is about flavor.

    Inside the Ingredients: What Makes These Calzones Special

    • Pizza dough: The blank canvas—chewy, golden, and perfect for shaping into spooky shapes.
    • Mozzarella cheese: Oozy, melty, stretches with a whisper of salty tang.
    • Tomato sauce: Bright, slightly sweet, with a hint of garlic—like a whisper of summer.
    • Ham or pepperoni: Adds a smoky richness, but veggie options work just as well.
    • Egg wash (optional): Gives a shiny finish, makes those tiny bat wings gleam.
    • Black olives or spinach (for decoration): Use to create eyes or other details—think contrast and fun.
    • Dough scraps: Save to cut out wings and ears—every piece counts for the spooky finish.

    Tools of the Bat-ty Trade

    • Rolling pin: Flattening the dough evenly.
    • Baking sheet: Cooking the calzones evenly in the oven.
    • Parchment paper: Preventing sticking and easy cleanup.
    • Sharp knife or scissors: Cutting out bat wings and ears.
    • Fork: Sealing the edges for a crimped finish.

    Step-by-step: Crafting your spooky bat calzones.

    Step 1: Mix warm water, yeast, and a pinch of sugar in a bowl. Let sit until frothy, about 5 minutes.

    Step 2: Add flour, salt, and olive oil to the yeast mixture. Stir until a shaggy dough forms.

    Step 3: Knead the dough on a floured surface for about 8 minutes until smooth and elastic.

    Step 4: Place in a greased bowl, cover with a damp cloth, and let rise in a warm spot for 1 hour, or until doubled in size.

    Step 5: Preheat oven to 200°C (390°F). Punch down the dough and divide into 6 equal pieces.

    Step 6: Roll each piece into a circle about 15cm (6 inches) in diameter.

    Step 7: Fill half of each circle with cheese and your choice of fillings. Fold over to create a semi-circle.

    Step 8: Seal the edges by pinching or crimping with a fork.

    Step 9: Cut out bat wings and ears from leftover dough and attach to the calzones with a little water.

    Step 10: Bake on a parchment-lined baking sheet for 20-25 minutes, until golden brown and crisp.

    Step 11: Remove from oven and let rest for 5 minutes before serving.

    Cooking checkpoints and tips to keep your bats flying straight.

    • Dough should be soft but not sticky; add more flour if it’s sticking.
    • Fillings should be moist but not drippy to prevent leaks.
    • Watch the oven; golden brown edges mean they’re done, not burnt.
    • Ensure the calzones are fully sealed to prevent filling from escaping during baking.

    Common Mistakes and How to Fix Them

    • Over-kneading the dough.? Dough is tough or dry → Add a splash of water and knead a bit more.
    • Filling too wet or overstuffed.? Filling leaks during baking → Ensure edges are well sealed, press firmly with a fork.
    • Burnt edges or undercooked centers.? Baking too long or at too high a temp → Check oven at 20 minutes, reduce temp if browning too fast.
    • Dough not rising enough.? Not enough rise → Let dough double in size, place in a warm corner.

    Spooky Bat-Shaped Calzones

    These playful bat-shaped calzones are crafted with chewy pizza dough filled with gooey mozzarella, tangy tomato sauce, and savory ham or pepperoni. Baked to golden perfection with crispy edges and fun wing and ear details, they turn a simple dinner into a festive, edible sculpture perfect for Halloween or a surprise treat. The aroma of baked bread and melted cheese makes them irresistible and fun to make.
    Prep Time 20 minutes
    Cook Time 25 minutes
    Total Time 45 minutes
    Servings: 6
    Course: Main Course
    Cuisine: American
    Calories: 280

    Ingredients
      

    • 1 1/2 cups warm water around 110°F, to activate yeast
    • 2 1/4 teaspoons active dry yeast for rising the dough
    • 1 teaspoon sugar to feed the yeast
    • 3 1/2 cups all-purpose flour for the dough
    • 1 teaspoon salt
    • 2 tablespoons olive oil for the dough
    • 1 cup mozzarella cheese shredded
    • 1/2 cup tomato sauce bright and slightly sweet
    • 1/2 cup ham or pepperoni sliced
    • 1 egg egg wash beaten, optional, for shine
    • Black olives or spinach for decoration eyes or details
    • Leftover dough for wings and ears cut out shapes

    Equipment

    • Mixing bowls
    • Rolling pin
    • Baking sheet
    • Parchment paper
    • Sharp knife or scissors
    • Fork

    Method
     

    1. In a large bowl, whisk warm water, yeast, and sugar. Let sit for 5 minutes until frothy.
    2. Add flour, salt, and olive oil to the yeast mixture. Stir until a shaggy dough forms.
    3. Knead the dough on a floured surface for about 8 minutes until smooth and elastic, feeling it become soft and pliable.
    4. Place the dough in a greased bowl, cover with a damp cloth, and let rise in a warm spot for 1 hour, until doubled in size.
    5. Preheat your oven to 390°F (200°C). Punch down the risen dough and divide into 6 equal portions.
    6. Roll each portion into a 6-inch circle using a rolling pin, maintaining even thickness.
    7. Spread a spoonful of tomato sauce on half of each circle, then top with mozzarella cheese, ham or pepperoni, and a small spoonful of sauce.
    8. Fold the dough over to create a semi-circle and pinch the edges together firmly, sealing the fillings inside.
    9. Cut out bat wings and ears from leftover dough with a sharp knife or scissors, then attach them to the calzones using a little water to help them stick.
    10. If desired, brush the tops with beaten egg for a shiny finish. Arrange the calzones on a parchment-lined baking sheet.
    11. Bake in the preheated oven for 20-25 minutes until golden brown and crispy, filling the kitchen with a warm, cheesy aroma.
    12. Remove from the oven, let rest for 5 minutes, then add small sliced olives or spinach for eyes and details. Serve warm and enjoy your spooky, cheesy treats!

    Notes

    Ensure the edges are well sealed to prevent filling leaks. Feel free to get creative with decorations—use olives for eyes or cut shapes for wings and ears. For extra flavor, sprinkle with herbs or parmesan before baking.
    These bat-shaped calzones aren’t just fun—they’re a heartfelt way to make dinner feel like a mini celebration. The crispy edges, gooey cheese, and playful shape make them perfect for a family night or a spooky gathering. Don’t be afraid to customize fillings or add a dash of hot sauce—these are your treats. Enjoy the messy joy of pulling apart these little bats and sharing a moment of kitchen chaos turned delight.

  • Bat-Shaped Calzones: A Spooky Twist on a Classic

    Bat-Shaped Calzones: A Spooky Twist on a Classic

    Baking anything in a shape that sparks a bit of childhood mischief feels like a secret rebellion. These bat-shaped calzones bring that playful spirit into your kitchen, especially when Halloween’s around the corner or you just want to surprise someone. They’re a little spooky, a little cheesy, and totally doable even on a busy weeknight. Plus, the smell of baking bread and melting cheese is a cheer in itself.

    Why These Bats Keep Coming Back to My Kitchen

    Because they turn a simple dinner into a playful adventure. The crispy edges and gooey insides are just a bonus. Plus, shaping these is oddly satisfying—like a tiny, edible sculpture. They remind me that cooking can be as much about fun as it is about flavor.

    Inside the Ingredients: What Makes These Calzones Special

    • Pizza dough: The blank canvas—chewy, golden, and perfect for shaping into spooky shapes.
    • Mozzarella cheese: Oozy, melty, stretches with a whisper of salty tang.
    • Tomato sauce: Bright, slightly sweet, with a hint of garlic—like a whisper of summer.
    • Ham or pepperoni: Adds a smoky richness, but veggie options work just as well.
    • Egg wash (optional): Gives a shiny finish, makes those tiny bat wings gleam.
    • Black olives or spinach (for decoration): Use to create eyes or other details—think contrast and fun.
    • Dough scraps: Save to cut out wings and ears—every piece counts for the spooky finish.

    Tools of the Bat-ty Trade

    • Rolling pin: Flattening the dough evenly.
    • Baking sheet: Cooking the calzones evenly in the oven.
    • Parchment paper: Preventing sticking and easy cleanup.
    • Sharp knife or scissors: Cutting out bat wings and ears.
    • Fork: Sealing the edges for a crimped finish.

    Step-by-step: Crafting your spooky bat calzones.

    Step 1: Mix warm water, yeast, and a pinch of sugar in a bowl. Let sit until frothy, about 5 minutes.

    Step 2: Add flour, salt, and olive oil to the yeast mixture. Stir until a shaggy dough forms.

    Step 3: Knead the dough on a floured surface for about 8 minutes until smooth and elastic.

    Step 4: Place in a greased bowl, cover with a damp cloth, and let rise in a warm spot for 1 hour, or until doubled in size.

    Step 5: Preheat oven to 200°C (390°F). Punch down the dough and divide into 6 equal pieces.

    Step 6: Roll each piece into a circle about 15cm (6 inches) in diameter.

    Step 7: Fill half of each circle with cheese and your choice of fillings. Fold over to create a semi-circle.

    Step 8: Seal the edges by pinching or crimping with a fork.

    Step 9: Cut out bat wings and ears from leftover dough and attach to the calzones with a little water.

    Step 10: Bake on a parchment-lined baking sheet for 20-25 minutes, until golden brown and crisp.

    Step 11: Remove from oven and let rest for 5 minutes before serving.

    Cooking checkpoints and tips to keep your bats flying straight.

    • Dough should be soft but not sticky; add more flour if it’s sticking.
    • Fillings should be moist but not drippy to prevent leaks.
    • Watch the oven; golden brown edges mean they’re done, not burnt.
    • Ensure the calzones are fully sealed to prevent filling from escaping during baking.

    Common Mistakes and How to Fix Them

    • Over-kneading the dough.? Dough is tough or dry → Add a splash of water and knead a bit more.
    • Filling too wet or overstuffed.? Filling leaks during baking → Ensure edges are well sealed, press firmly with a fork.
    • Burnt edges or undercooked centers.? Baking too long or at too high a temp → Check oven at 20 minutes, reduce temp if browning too fast.
    • Dough not rising enough.? Not enough rise → Let dough double in size, place in a warm corner.

    Spooky Bat-Shaped Calzones

    These playful bat-shaped calzones are made with chewy pizza dough filled with melty mozzarella, savory tomato sauce, and your choice of ham or pepperoni. Shaped into tiny bats with wings and ears, they bake to a crispy golden brown, with gooey insides and fun, spooky details that make dinner feel like a festive craft project.
    Prep Time 20 minutes
    Cook Time 25 minutes
    Total Time 45 minutes
    Servings: 6
    Course: Main Course
    Cuisine: International
    Calories: 350

    Ingredients
      

    • 1 ½ cups warm water about 110°F/43°C
    • 2 ¼ teaspoons active dry yeast
    • 1 teaspoon sugar
    • 3 cups all-purpose flour
    • 1 teaspoon salt
    • 2 tablespoons olive oil
    • 1 cup mozzarella cheese shredded
    • ½ cup tomato sauce
    • ½ cup ham or pepperoni chopped
    • 1 egg egg beaten, for egg wash (optional)
    • 4 black olives or spinach black olives or spinach for decoration
    • Dough scraps dough scraps for wings and ears

    Equipment

    • Mixing bowls
    • Baking sheet

    Method
     

    1. Mix warm water, yeast, and sugar in a bowl. Let sit until frothy, about 5 minutes, which indicates the yeast is active.
    2. Add flour, salt, and olive oil to the yeast mixture. Stir until a shaggy dough forms, then knead on a floured surface for about 8 minutes until smooth and elastic.
    3. Place the dough in a greased bowl, cover with a damp cloth, and let rise in a warm spot for 1 hour until doubled in size, filling your kitchen with a yeasty aroma.
    4. Preheat your oven to 200°C (390°F). Punch down the dough and divide it into 6 equal pieces for easy handling.
    5. Roll each piece into a 6-inch circle using a rolling pin, keeping the dough evenly thin for a crispy crust.
    6. Spread a spoonful of tomato sauce on half of each dough circle, then top with shredded mozzarella and your choice of ham or pepperoni.
    7. Fold the dough over to create a semi-circle and pinch or crimp the edges with a fork to seal in the fillings.
    8. Cut out bat wings and ears from the leftover dough scraps with a sharp knife or scissors, then attach them to the calzones with a little water for a spooky effect.
    9. Arrange the calzones on a parchment-lined baking sheet. Brush the tops with beaten egg for a shiny finish if desired.
    10. Bake in the preheated oven for 20-25 minutes, until golden brown and crispy, filling your kitchen with the smell of baked bread and melting cheese.
    11. Remove from the oven, let rest for 5 minutes, then decorate the eyes with sliced black olives or spinach to give your bats expressive faces. Serve warm and enjoy this fun, spooky dinner!

    Notes

    Ensure the edges are well sealed to prevent filling from leaking during baking. Feel free to get creative with decorations—tiny bat wings or ears made from scraps make the perfect spooky touch.
    These bat-shaped calzones aren’t just fun—they’re a heartfelt way to make dinner feel like a mini celebration. The crispy edges, gooey cheese, and playful shape make them perfect for a family night or a spooky gathering. Don’t be afraid to customize fillings or add a dash of hot sauce—these are your treats. Enjoy the messy joy of pulling apart these little bats and sharing a moment of kitchen chaos turned delight.

  • Bat-Shaped Calzones: A Spooky Twist on a Classic

    Bat-Shaped Calzones: A Spooky Twist on a Classic

    Baking anything in a shape that sparks a bit of childhood mischief feels like a secret rebellion. These bat-shaped calzones bring that playful spirit into your kitchen, especially when Halloween’s around the corner or you just want to surprise someone. They’re a little spooky, a little cheesy, and totally doable even on a busy weeknight. Plus, the smell of baking bread and melting cheese is a cheer in itself.

    Why These Bats Keep Coming Back to My Kitchen

    Because they turn a simple dinner into a playful adventure. The crispy edges and gooey insides are just a bonus. Plus, shaping these is oddly satisfying—like a tiny, edible sculpture. They remind me that cooking can be as much about fun as it is about flavor.

    Inside the Ingredients: What Makes These Calzones Special

    • Pizza dough: The blank canvas—chewy, golden, and perfect for shaping into spooky shapes.
    • Mozzarella cheese: Oozy, melty, stretches with a whisper of salty tang.
    • Tomato sauce: Bright, slightly sweet, with a hint of garlic—like a whisper of summer.
    • Ham or pepperoni: Adds a smoky richness, but veggie options work just as well.
    • Egg wash (optional): Gives a shiny finish, makes those tiny bat wings gleam.
    • Black olives or spinach (for decoration): Use to create eyes or other details—think contrast and fun.
    • Dough scraps: Save to cut out wings and ears—every piece counts for the spooky finish.

    Tools of the Bat-ty Trade

    • Rolling pin: Flattening the dough evenly.
    • Baking sheet: Cooking the calzones evenly in the oven.
    • Parchment paper: Preventing sticking and easy cleanup.
    • Sharp knife or scissors: Cutting out bat wings and ears.
    • Fork: Sealing the edges for a crimped finish.

    Step-by-step: Crafting your spooky bat calzones.

    Step 1: Mix warm water, yeast, and a pinch of sugar in a bowl. Let sit until frothy, about 5 minutes.

    Step 2: Add flour, salt, and olive oil to the yeast mixture. Stir until a shaggy dough forms.

    Step 3: Knead the dough on a floured surface for about 8 minutes until smooth and elastic.

    Step 4: Place in a greased bowl, cover with a damp cloth, and let rise in a warm spot for 1 hour, or until doubled in size.

    Step 5: Preheat oven to 200°C (390°F). Punch down the dough and divide into 6 equal pieces.

    Step 6: Roll each piece into a circle about 15cm (6 inches) in diameter.

    Step 7: Fill half of each circle with cheese and your choice of fillings. Fold over to create a semi-circle.

    Step 8: Seal the edges by pinching or crimping with a fork.

    Step 9: Cut out bat wings and ears from leftover dough and attach to the calzones with a little water.

    Step 10: Bake on a parchment-lined baking sheet for 20-25 minutes, until golden brown and crisp.

    Step 11: Remove from oven and let rest for 5 minutes before serving.

    Cooking checkpoints and tips to keep your bats flying straight.

    • Dough should be soft but not sticky; add more flour if it’s sticking.
    • Fillings should be moist but not drippy to prevent leaks.
    • Watch the oven; golden brown edges mean they’re done, not burnt.
    • Ensure the calzones are fully sealed to prevent filling from escaping during baking.

    Common Mistakes and How to Fix Them

    • Over-kneading the dough.? Dough is tough or dry → Add a splash of water and knead a bit more.
    • Filling too wet or overstuffed.? Filling leaks during baking → Ensure edges are well sealed, press firmly with a fork.
    • Burnt edges or undercooked centers.? Baking too long or at too high a temp → Check oven at 20 minutes, reduce temp if browning too fast.
    • Dough not rising enough.? Not enough rise → Let dough double in size, place in a warm corner.

    Spooky Bat-Shaped Calzones

    These playful bat-shaped calzones are made with chewy pizza dough filled with gooey mozzarella, tomato sauce, and savory fillings like ham or pepperoni. Baked until golden and crispy, their fun shapes and cheesy interiors make them a delightful and festive meal, perfect for Halloween or a fun family dinner. The process involves shaping, filling, sealing, and decorating the calzones to resemble bats, resulting in a charming and tasty treat.
    Prep Time 20 minutes
    Cook Time 25 minutes
    Total Time 45 minutes
    Servings: 6
    Course: Main Course
    Cuisine: American
    Calories: 320

    Ingredients
      

    • 1 ½ cups warm water around 110°F (43°C)
    • 2 ¼ teaspoons active dry yeast instant yeast works too
    • 1 teaspoon sugar to activate the yeast
    • 3 cups all-purpose flour plus extra for dusting
    • 1 teaspoon salt
    • 2 tablespoons olive oil
    • 1 cup shredded mozzarella cheese optional: for filling
    • ½ cup tomato sauce tomato sauce bright and slightly sweet
    • ½ cup ham or pepperoni sliced
    • 1 egg egg wash beaten, optional
    • Black olives or spinach for decoration to create eyes or details
    • Dough scraps for wings and ears save leftover dough

    Equipment

    • Mixing bowl
    • Rolling pin
    • Baking sheet
    • Parchment paper
    • Sharp knife or scissors
    • Fork

    Method
     

    1. Mix the warm water, yeast, and a pinch of sugar in a large bowl. Let sit for about 5 minutes until frothy—that’s how you know the yeast is active and bubbly.
    2. Add the flour, salt, and olive oil to the yeast mixture. Stir with a spoon or dough hook until a shaggy dough forms—that feels slightly sticky but holds together.
    3. Knead the dough on a floured surface for about 8 minutes until it becomes smooth, elastic, and springs back when pressed.
    4. Shape the dough into a ball, place it in a greased bowl, cover with a damp cloth, and let it rise in a warm spot for 1 hour until it doubles in size and feels puffy to the touch.
    5. Preheat your oven to 200°C (390°F). Punch down the risen dough to release excess air, then divide it into 6 equal pieces for shaping.
    6. Roll each piece into a circle about 15cm (6 inches) in diameter, using a rolling pin on a floured surface. The circles should be even and thin enough to fold easily.
    7. Spread a spoonful of tomato sauce on one half of each dough circle. Top with mozzarella cheese and slices of ham or pepperoni, leaving a small border around the edge.
    8. Fold the dough over the fillings to create a semi-circle, then pinch or crimp the edges with a fork to seal tightly and prevent leaks during baking.
    9. Cut out bat wings and ears from the leftover dough scraps using a sharp knife or scissors. Attach these to the calzones with a tiny dab of water to resemble bats’ wings and ears.
    10. Optional: Brush the tops of the calzones with beaten egg wash for a shiny finish. Place them on a parchment-lined baking sheet.
    11. Bake in the preheated oven for about 20-25 minutes until golden brown and crispy, with the wings and ears nicely baked. The house will fill with a warm, cheesy aroma, promising deliciousness.
    12. Remove from the oven, let rest for 5 minutes, then serve warm. Enjoy your adorable, cheesy bat calzones as a fun, festive meal or snack.

    Notes

    Ensure edges are sealed well to prevent filling leaks. Feel free to customize fillings with vegetables or different cheeses for variety. Using a sharp knife makes cutting out wings and ears easier and cleaner.
    These bat-shaped calzones aren’t just fun—they’re a heartfelt way to make dinner feel like a mini celebration. The crispy edges, gooey cheese, and playful shape make them perfect for a family night or a spooky gathering. Don’t be afraid to customize fillings or add a dash of hot sauce—these are your treats. Enjoy the messy joy of pulling apart these little bats and sharing a moment of kitchen chaos turned delight.

  • Bat-Shaped Calzones: A Spooky Twist on a Classic

    Bat-Shaped Calzones: A Spooky Twist on a Classic

    Baking anything in a shape that sparks a bit of childhood mischief feels like a secret rebellion. These bat-shaped calzones bring that playful spirit into your kitchen, especially when Halloween’s around the corner or you just want to surprise someone. They’re a little spooky, a little cheesy, and totally doable even on a busy weeknight. Plus, the smell of baking bread and melting cheese is a cheer in itself.

    Why These Bats Keep Coming Back to My Kitchen

    Because they turn a simple dinner into a playful adventure. The crispy edges and gooey insides are just a bonus. Plus, shaping these is oddly satisfying—like a tiny, edible sculpture. They remind me that cooking can be as much about fun as it is about flavor.

    Inside the Ingredients: What Makes These Calzones Special

    • Pizza dough: The blank canvas—chewy, golden, and perfect for shaping into spooky shapes.
    • Mozzarella cheese: Oozy, melty, stretches with a whisper of salty tang.
    • Tomato sauce: Bright, slightly sweet, with a hint of garlic—like a whisper of summer.
    • Ham or pepperoni: Adds a smoky richness, but veggie options work just as well.
    • Egg wash (optional): Gives a shiny finish, makes those tiny bat wings gleam.
    • Black olives or spinach (for decoration): Use to create eyes or other details—think contrast and fun.
    • Dough scraps: Save to cut out wings and ears—every piece counts for the spooky finish.

    Tools of the Bat-ty Trade

    • Rolling pin: Flattening the dough evenly.
    • Baking sheet: Cooking the calzones evenly in the oven.
    • Parchment paper: Preventing sticking and easy cleanup.
    • Sharp knife or scissors: Cutting out bat wings and ears.
    • Fork: Sealing the edges for a crimped finish.

    Step-by-step: Crafting your spooky bat calzones.

    Step 1: Mix warm water, yeast, and a pinch of sugar in a bowl. Let sit until frothy, about 5 minutes.

    Step 2: Add flour, salt, and olive oil to the yeast mixture. Stir until a shaggy dough forms.

    Step 3: Knead the dough on a floured surface for about 8 minutes until smooth and elastic.

    Step 4: Place in a greased bowl, cover with a damp cloth, and let rise in a warm spot for 1 hour, or until doubled in size.

    Step 5: Preheat oven to 200°C (390°F). Punch down the dough and divide into 6 equal pieces.

    Step 6: Roll each piece into a circle about 15cm (6 inches) in diameter.

    Step 7: Fill half of each circle with cheese and your choice of fillings. Fold over to create a semi-circle.

    Step 8: Seal the edges by pinching or crimping with a fork.

    Step 9: Cut out bat wings and ears from leftover dough and attach to the calzones with a little water.

    Step 10: Bake on a parchment-lined baking sheet for 20-25 minutes, until golden brown and crisp.

    Step 11: Remove from oven and let rest for 5 minutes before serving.

    Cooking checkpoints and tips to keep your bats flying straight.

    • Dough should be soft but not sticky; add more flour if it’s sticking.
    • Fillings should be moist but not drippy to prevent leaks.
    • Watch the oven; golden brown edges mean they’re done, not burnt.
    • Ensure the calzones are fully sealed to prevent filling from escaping during baking.

    Common Mistakes and How to Fix Them

    • Over-kneading the dough.? Dough is tough or dry → Add a splash of water and knead a bit more.
    • Filling too wet or overstuffed.? Filling leaks during baking → Ensure edges are well sealed, press firmly with a fork.
    • Burnt edges or undercooked centers.? Baking too long or at too high a temp → Check oven at 20 minutes, reduce temp if browning too fast.
    • Dough not rising enough.? Not enough rise → Let dough double in size, place in a warm corner.

    Spooky Bat-Shaped Calzones

    These playful bat-shaped calzones are made with chewy pizza dough filled with melty mozzarella, savory tomato sauce, and your choice of ham or pepperoni. Baked until golden and crispy, they feature fun wing and ear details created from leftover dough, making them an entertaining and delicious treat for Halloween or any fun dinner night. Their crispy edges and gooey insides make for a satisfying, edible sculpture that sparks joy in the kitchen.
    Prep Time 30 minutes
    Cook Time 25 minutes
    Total Time 55 minutes
    Servings: 6
    Course: Main Course
    Cuisine: American
    Calories: 350

    Ingredients
      

    • 1 1/2 cups warm water around 110°F (43°C)
    • 2 1/4 teaspoons dry active yeast
    • 1 teaspoon sugar to activate yeast
    • 3 1/2 cups all-purpose flour
    • 1 teaspoon salt
    • 2 tablespoons olive oil
    • 1 cup shredded mozzarella cheese for filling
    • 1/2 cup tomato sauce tomato sauce bright and slightly sweet
    • 1/2 cup diced ham or pepperoni smoky and savory
    • 1 egg egg beaten for egg wash (optional)
    • black olives or spinach for decoration for eyes or details contrast and fun
    • dough scraps for wings and ears dough scraps for shaping wings and ears

    Equipment

    • Rolling pin
    • Baking sheet
    • Parchment paper
    • Sharp knife or scissors
    • Fork

    Method
     

    1. Mix the warm water, yeast, and sugar in a bowl, then let sit until frothy, about 5 minutes. This activates the yeast and starts the dough.
    2. Add flour, salt, and olive oil to the yeast mixture. Stir until a shaggy dough forms, pulling together the ingredients.
    3. Knead the dough on a floured surface for about 8 minutes until it feels smooth, elastic, and slightly tacky.
    4. Place the dough in a greased bowl, cover with a damp cloth, and let rise in a warm spot for about 1 hour, or until doubled in size.
    5. Preheat your oven to 200°C (390°F). Punch down the dough to release air, then divide it into 6 equal pieces.
    6. Roll each dough piece into a 15cm (6-inch) circle using a rolling pin, ensuring even thickness.
    7. Spread a spoonful of tomato sauce on half of each circle, then sprinkle with mozzarella cheese and your choice of ham or pepperoni.
    8. Fold the dough over the filling to create a semi-circle, then seal the edges by pinching or crimping with a fork.
    9. Cut out bat wings and ears from the leftover dough scraps with a sharp knife or scissors, then attach to the calzones with a little water to secure.
    10. Place the shaped calzones on a parchment-lined baking sheet. Brush lightly with beaten egg for a shiny finish, if desired.
    11. Bake in the preheated oven for 20-25 minutes until golden brown and crispy, filling your kitchen with warm, cheesy aroma.
    12. Remove from the oven and let rest for 5 minutes. Decorate the eyes with sliced olives or spinach, creating fun expressions before serving.

    Notes

    Ensure the edges are well sealed to prevent fillings from escaping during baking. For extra shine, brush with egg wash before baking. Feel free to get creative with the decorations—think tiny wings or ears made from leftover dough for a spookier effect.
    These bat-shaped calzones aren’t just fun—they’re a heartfelt way to make dinner feel like a mini celebration. The crispy edges, gooey cheese, and playful shape make them perfect for a family night or a spooky gathering. Don’t be afraid to customize fillings or add a dash of hot sauce—these are your treats. Enjoy the messy joy of pulling apart these little bats and sharing a moment of kitchen chaos turned delight.

  • Bat-Shaped Calzones: A Spooky Twist on a Classic

    Bat-Shaped Calzones: A Spooky Twist on a Classic

    Baking anything in a shape that sparks a bit of childhood mischief feels like a secret rebellion. These bat-shaped calzones bring that playful spirit into your kitchen, especially when Halloween’s around the corner or you just want to surprise someone. They’re a little spooky, a little cheesy, and totally doable even on a busy weeknight. Plus, the smell of baking bread and melting cheese is a cheer in itself.

    Why These Bats Keep Coming Back to My Kitchen

    Because they turn a simple dinner into a playful adventure. The crispy edges and gooey insides are just a bonus. Plus, shaping these is oddly satisfying—like a tiny, edible sculpture. They remind me that cooking can be as much about fun as it is about flavor.

    Inside the Ingredients: What Makes These Calzones Special

    • Pizza dough: The blank canvas—chewy, golden, and perfect for shaping into spooky shapes.
    • Mozzarella cheese: Oozy, melty, stretches with a whisper of salty tang.
    • Tomato sauce: Bright, slightly sweet, with a hint of garlic—like a whisper of summer.
    • Ham or pepperoni: Adds a smoky richness, but veggie options work just as well.
    • Egg wash (optional): Gives a shiny finish, makes those tiny bat wings gleam.
    • Black olives or spinach (for decoration): Use to create eyes or other details—think contrast and fun.
    • Dough scraps: Save to cut out wings and ears—every piece counts for the spooky finish.

    Tools of the Bat-ty Trade

    • Rolling pin: Flattening the dough evenly.
    • Baking sheet: Cooking the calzones evenly in the oven.
    • Parchment paper: Preventing sticking and easy cleanup.
    • Sharp knife or scissors: Cutting out bat wings and ears.
    • Fork: Sealing the edges for a crimped finish.

    Step-by-step: Crafting your spooky bat calzones.

    Step 1: Mix warm water, yeast, and a pinch of sugar in a bowl. Let sit until frothy, about 5 minutes.

    Step 2: Add flour, salt, and olive oil to the yeast mixture. Stir until a shaggy dough forms.

    Step 3: Knead the dough on a floured surface for about 8 minutes until smooth and elastic.

    Step 4: Place in a greased bowl, cover with a damp cloth, and let rise in a warm spot for 1 hour, or until doubled in size.

    Step 5: Preheat oven to 200°C (390°F). Punch down the dough and divide into 6 equal pieces.

    Step 6: Roll each piece into a circle about 15cm (6 inches) in diameter.

    Step 7: Fill half of each circle with cheese and your choice of fillings. Fold over to create a semi-circle.

    Step 8: Seal the edges by pinching or crimping with a fork.

    Step 9: Cut out bat wings and ears from leftover dough and attach to the calzones with a little water.

    Step 10: Bake on a parchment-lined baking sheet for 20-25 minutes, until golden brown and crisp.

    Step 11: Remove from oven and let rest for 5 minutes before serving.

    Cooking checkpoints and tips to keep your bats flying straight.

    • Dough should be soft but not sticky; add more flour if it’s sticking.
    • Fillings should be moist but not drippy to prevent leaks.
    • Watch the oven; golden brown edges mean they’re done, not burnt.
    • Ensure the calzones are fully sealed to prevent filling from escaping during baking.

    Common Mistakes and How to Fix Them

    • Over-kneading the dough.? Dough is tough or dry → Add a splash of water and knead a bit more.
    • Filling too wet or overstuffed.? Filling leaks during baking → Ensure edges are well sealed, press firmly with a fork.
    • Burnt edges or undercooked centers.? Baking too long or at too high a temp → Check oven at 20 minutes, reduce temp if browning too fast.
    • Dough not rising enough.? Not enough rise → Let dough double in size, place in a warm corner.

    Spooky Bat-Shaped Calzones

    These playful bat-shaped calzones are made with chewy pizza dough filled with gooey mozzarella, tangy tomato sauce, and smoky ham or pepperoni. Baked until golden and crispy, their fun shape adds a whimsical touch to any dinner, especially around Halloween. The crispy edges contrast with the melty interior, making each bite both satisfying and festive.
    Prep Time 30 minutes
    Cook Time 25 minutes
    Total Time 55 minutes
    Servings: 6
    Course: Main Course
    Cuisine: American
    Calories: 350

    Ingredients
      

    • 1 package pizza dough store-bought or homemade
    • 1 cup mozzarella cheese shredded
    • 1/2 cup tomato sauce bright and slightly sweet
    • 1 cup ham or pepperoni sliced
    • 1 egg egg wash optional, for shine
    • few black olives or spinach for decoration to create eyes and details
    • leftover dough dough scraps for wings and ears

    Equipment

    • Mixing bowls
    • Baking sheet
    • Parchment paper
    • Rolling pin
    • Sharp knife or scissors
    • Fork
    • Damp cloth

    Method
     

    1. Mix warm water, yeast, and a pinch of sugar in a bowl. Let sit until frothy, about 5 minutes, while you prepare your workspace.
    2. Add flour, salt, and olive oil to the yeast mixture. Stir with a spoon or dough hook until a shaggy dough forms.
    3. Knead the dough on a floured surface for about 8 minutes until it becomes smooth, elastic, and slightly tacky to the touch.
    4. Place the dough in a greased bowl, cover with a damp cloth, and let it rise in a warm spot for about 1 hour, until it doubles in size.
    5. Preheat your oven to 200°C (390°F). Punch down the risen dough to release air, then divide it into 6 equal pieces.
    6. Roll each piece into a 15cm (6-inch) circle using a rolling pin, keeping the edges slightly thicker for sealing.
    7. Spread a spoonful of tomato sauce on half of each dough circle, then top with shredded mozzarella and slices of ham or pepperoni.
    8. Fold the dough over the fillings to form a semi-circle, then pinch or crimp the edges with a fork to seal tightly.
    9. Cut out bat wings and ears from leftover dough scraps with a sharp knife or scissors, then attach them to the calzones with a little water to resemble spooky bats.
    10. Optional: Brush the tops with beaten egg wash for a shiny finish. Place the calzones on a parchment-lined baking sheet.
    11. Bake in the preheated oven for 20-25 minutes, until golden brown and crispy, filling your kitchen with the tempting aroma of baked bread and cheese.
    12. Let the calzones rest for 5 minutes, then decorate with black olives or spinach for eyes, and enjoy your playful, cheesy bat-shaped treats!

    Notes

    Ensure edges are sealed well to prevent filling leaks. Feel free to get creative with decorations for a fun Halloween touch!
    These bat-shaped calzones aren’t just fun—they’re a heartfelt way to make dinner feel like a mini celebration. The crispy edges, gooey cheese, and playful shape make them perfect for a family night or a spooky gathering. Don’t be afraid to customize fillings or add a dash of hot sauce—these are your treats. Enjoy the messy joy of pulling apart these little bats and sharing a moment of kitchen chaos turned delight.

  • Black Pasta with Squid Ink: A Deep Dive into the Sea’s Richness

    Black Pasta with Squid Ink: A Deep Dive into the Sea’s Richness

    Squid ink pasta is a wild card in the kitchen. It’s not everyday you get to cook with something that’s as theatrical as it is delicious. I love how it turns a simple meal into an event, a little adventure from the ocean’s depths right onto your plate.
    The process is straightforward but requires a bit of attention—like everything worth doing. It’s about coaxing flavor out of that inky richness and balancing it with bright lemon and fresh herbs. That’s where the magic happens.

    Why This Dish Will Keep Calling You Back

    The ocean’s richness, the striking visual, and the simple act of stirring that ink into pasta make every bite feel like a quiet rebellion against blandness. It’s a dish that demands your attention, yet rewards with deep, smoky, citrusy notes that linger. I find myself returning to it when I want to reconnect with the sea, or just need a reminder that cooking is about discovery, not perfection.

    Breaking Down the Key Ingredients

    • Black pasta (squid ink pasta): The base, rich in flavor and striking in appearance, cooked to al dente for perfect texture.
    • Squid ink: Offers a briny, smoky depth—think of it as the ocean’s secret ingredient that turns ordinary pasta into something extraordinary.
    • Garlic: Adds pungency and warmth, balancing the ink’s intensity.
    • White wine: Lifts the flavors with a clean, bright acidity that reduces to a rich, glossy sauce.
    • Lemon juice: A splash brightens the ink’s earthiness, making the dish lively and fresh.
    • Chili flakes: A pinch for warmth and a subtle kick—adjust to your heat tolerance.
    • Parsley: Fresh herbs add a pop of color and herbal freshness, balancing the briny depths.

    Tools of the Trade for Perfect Black Pasta

    • Large pot: Boils the pasta evenly and quickly.
    • Deep skillet or sauté pan: Creates a space for the ink sauce to develop and coat the pasta.
    • Tongs or pasta spoon: Helps toss the pasta gently without breaking it.
    • Measuring spoons and cups: Ensures accurate seasoning and liquids.
    • Knife and chopping board: Prepares garlic and herbs efficiently.

    Mastering the Art of Making Black Pasta with Squid Ink

    Step 1: Bring a large pot of water to a rolling boil, salt generously. It should taste like the sea, about 10g salt per liter.

    Step 2: Add the black pasta, cook according to package—about 8-10 minutes—until al dente.

    Step 3: Meanwhile, heat a splash of olive oil in a deep skillet over medium heat, about 160°C (320°F).

    Step 4: Add minced garlic and a pinch of chili flakes; cook until fragrant, about 1 minute, watch for the garlic to turn golden.

    Step 5: Stir in squid ink, cook for 30 seconds, then add a splash of white wine. Let it reduce slightly, about 2 minutes.

    Step 6: Drain pasta, save some cooking water. Toss pasta into the ink sauce, loosen with a bit of reserved water to coat evenly.

    Step 7: Finish with a squeeze of lemon, chopped parsley, and a drizzle of olive oil. Serve immediately.

    Cooking Checks and Tips to Keep in Mind

    • The pasta should be cooked to al dente; it offers a slight resistance when bitten.
    • The ink sauce should be glossy and cling to the pasta, not watery or oily.
    • Smell for that smoky, garlicky aroma—if it’s not fragrant, cook the garlic longer.
    • The sauce should crackle slightly when you add the wine—if not, increase the heat a bit.

    Avoid These Common Pitfalls with Squid Ink Pasta

    • Burning garlic.? Reduce heat if garlic burns; it should be fragrant, not bitter.
    • Sauce sticking too tightly or becoming gritty.? Add a splash more water if the sauce is too thick; it should coat but not clump.
    • Overcooked, mushy pasta.? Cook pasta slightly less than al dente if you plan to toss it back into hot sauce.
    • Inky clumps.? If ink clumps, stir vigorously or add a touch more wine to loosen.

    Squid Ink Pasta with Lemon and Herbs

    This striking dish features black squid ink pasta coated in a glossy, smoky ink sauce, balanced with bright lemon and fresh parsley. The process involves cooking the pasta to al dente, creating a fragrant garlic and chili oil base, and gently tossing everything together for a vibrant, visually dramatic meal with a rich, smoky flavor and lively citrus notes.
    Prep Time 10 minutes
    Cook Time 15 minutes
    Total Time 25 minutes
    Servings: 4
    Course: Main Course
    Cuisine: Seafood
    Calories: 450

    Ingredients
      

    • 400 g black squid ink pasta preferably fresh or high-quality dried
    • 2 cloves garlic minced
    • 1 teaspoon chili flakes adjust to taste
    • 60 ml white wine preferably dry
    • 1 lemon lemon juiced
    • 2 tablespoons olive oil extra virgin preferred
    • 2 tablespoons chopped fresh parsley for garnish
    • to taste salt for cooking pasta and seasoning

    Equipment

    • Large pot
    • Deep skillet or sauté pan
    • Tongs or pasta spoon
    • Measuring spoons and cups
    • Knife and chopping board

    Method
     

    1. Bring a large pot of salted water to a rolling boil, adding enough salt to taste like the sea.
    2. Add the squid ink pasta to the boiling water and cook for about 8-10 minutes, stirring occasionally until al dente with a slight resistance when bitten.
    3. While the pasta cooks, heat olive oil in a deep skillet over medium heat until it shimmers and begins to gently crackle.
    4. Add the minced garlic and chili flakes to the hot oil, cooking for about 1 minute until fragrant and golden, making sure not to burn the garlic.
    5. Stir in the squid ink, cooking for 30 seconds until it darkens and becomes fragrant, then pour in the white wine, allowing it to bubble and reduce slightly for about 2 minutes.
    6. Drain the pasta, reserving a cup of the cooking water, then add the pasta directly into the ink sauce in the skillet.
    7. Toss the pasta gently with tongs to coat it evenly with the sauce, loosening it with a splash of the reserved cooking water if needed to achieve a glossy, clingy sauce.
    8. Squeeze the fresh lemon juice over the pasta and sprinkle with chopped parsley, then toss again to incorporate the bright flavors.
    9. Finish with a drizzle of olive oil, taste and adjust salt or chili flakes if desired, then serve immediately for the best flavor and texture.

    Notes

    Ensure not to burn the garlic; keep the heat moderate. Use the reserved pasta water to adjust the sauce consistency if it becomes too thick or sticky. Serve immediately for optimal flavor and appearance.
    This dish isn’t just about the dramatic color; it’s a celebration of the ocean’s depth and mystery. The briny, smoky ink paired with perfectly cooked pasta creates a harmony that’s both intense and comforting. It’s a recipe that asks you to slow down, savor each step, and really taste the sea in your own kitchen. Play with the ingredients—add a touch more lemon or a sprinkle of chili—to make it your own.

  • Black Pasta with Squid Ink: A Deep Dive into the Sea’s Richness

    Black Pasta with Squid Ink: A Deep Dive into the Sea’s Richness

    Squid ink pasta is a wild card in the kitchen. It’s not everyday you get to cook with something that’s as theatrical as it is delicious. I love how it turns a simple meal into an event, a little adventure from the ocean’s depths right onto your plate.
    The process is straightforward but requires a bit of attention—like everything worth doing. It’s about coaxing flavor out of that inky richness and balancing it with bright lemon and fresh herbs. That’s where the magic happens.

    Why This Dish Will Keep Calling You Back

    The ocean’s richness, the striking visual, and the simple act of stirring that ink into pasta make every bite feel like a quiet rebellion against blandness. It’s a dish that demands your attention, yet rewards with deep, smoky, citrusy notes that linger. I find myself returning to it when I want to reconnect with the sea, or just need a reminder that cooking is about discovery, not perfection.

    Breaking Down the Key Ingredients

    • Black pasta (squid ink pasta): The base, rich in flavor and striking in appearance, cooked to al dente for perfect texture.
    • Squid ink: Offers a briny, smoky depth—think of it as the ocean’s secret ingredient that turns ordinary pasta into something extraordinary.
    • Garlic: Adds pungency and warmth, balancing the ink’s intensity.
    • White wine: Lifts the flavors with a clean, bright acidity that reduces to a rich, glossy sauce.
    • Lemon juice: A splash brightens the ink’s earthiness, making the dish lively and fresh.
    • Chili flakes: A pinch for warmth and a subtle kick—adjust to your heat tolerance.
    • Parsley: Fresh herbs add a pop of color and herbal freshness, balancing the briny depths.

    Tools of the Trade for Perfect Black Pasta

    • Large pot: Boils the pasta evenly and quickly.
    • Deep skillet or sauté pan: Creates a space for the ink sauce to develop and coat the pasta.
    • Tongs or pasta spoon: Helps toss the pasta gently without breaking it.
    • Measuring spoons and cups: Ensures accurate seasoning and liquids.
    • Knife and chopping board: Prepares garlic and herbs efficiently.

    Mastering the Art of Making Black Pasta with Squid Ink

    Step 1: Bring a large pot of water to a rolling boil, salt generously. It should taste like the sea, about 10g salt per liter.

    Step 2: Add the black pasta, cook according to package—about 8-10 minutes—until al dente.

    Step 3: Meanwhile, heat a splash of olive oil in a deep skillet over medium heat, about 160°C (320°F).

    Step 4: Add minced garlic and a pinch of chili flakes; cook until fragrant, about 1 minute, watch for the garlic to turn golden.

    Step 5: Stir in squid ink, cook for 30 seconds, then add a splash of white wine. Let it reduce slightly, about 2 minutes.

    Step 6: Drain pasta, save some cooking water. Toss pasta into the ink sauce, loosen with a bit of reserved water to coat evenly.

    Step 7: Finish with a squeeze of lemon, chopped parsley, and a drizzle of olive oil. Serve immediately.

    Cooking Checks and Tips to Keep in Mind

    • The pasta should be cooked to al dente; it offers a slight resistance when bitten.
    • The ink sauce should be glossy and cling to the pasta, not watery or oily.
    • Smell for that smoky, garlicky aroma—if it’s not fragrant, cook the garlic longer.
    • The sauce should crackle slightly when you add the wine—if not, increase the heat a bit.

    Avoid These Common Pitfalls with Squid Ink Pasta

    • Burning garlic.? Reduce heat if garlic burns; it should be fragrant, not bitter.
    • Sauce sticking too tightly or becoming gritty.? Add a splash more water if the sauce is too thick; it should coat but not clump.
    • Overcooked, mushy pasta.? Cook pasta slightly less than al dente if you plan to toss it back into hot sauce.
    • Inky clumps.? If ink clumps, stir vigorously or add a touch more wine to loosen.

    Squid Ink Pasta with Lemon and Herbs

    Squid ink pasta is a striking dish that combines the ocean’s depth with bright citrus and fresh herbs. The process involves cooking the pasta to al dente, then creating a glossy ink sauce with garlic, white wine, and lemon, which coats the pasta beautifully. The final dish has a smoky, briny flavor with a lively, citrusy finish and a vibrant black appearance.
    Prep Time 15 minutes
    Cook Time 20 minutes
    Total Time 35 minutes
    Servings: 4
    Course: Main Course
    Cuisine: Seafood
    Calories: 480

    Ingredients
      

    • 400 g black pasta (squid ink pasta) preferably fresh or dried
    • 2 cloves garlic minced
    • 1 pinch chili flakes adjust to taste
    • 120 ml white wine preferably dry
    • 1 tablespoon lemon juice
    • 2 tablespoons olive oil
    • 1/4 cup chopped parsley fresh
    • to taste salt for water and seasoning

    Equipment

    • Large pot
    • Deep skillet or sauté pan
    • Tongs or pasta spoon
    • Measuring spoons and cups
    • Knife and chopping board

    Method
     

    1. Bring a large pot of salted water to a rolling boil, tasting like the sea. Add the black pasta and cook according to package instructions, about 8-10 minutes, until al dente. Drain, reserving a cup of cooking water.
    2. While the pasta cooks, heat olive oil in a deep skillet over medium heat until shimmering and warm, about 160°C (320°F).
    3. Add minced garlic and chili flakes to the skillet. Sauté for about 1 minute until fragrant and golden, listening for a gentle sizzling sound. The garlic should turn a light golden hue.
    4. Stir in the squid ink, cooking for 30 seconds, which will deepen the color and aroma. Pour in the white wine and let it bubble and reduce slightly for about 2 minutes, creating a glossy, fragrant sauce.
    5. Add the drained pasta into the skillet with the ink sauce. Toss gently with tongs or a pasta spoon to coat each strand evenly, adding a splash of reserved pasta water if needed to loosen the sauce and achieve a silky, glossy finish.
    6. Finish the dish by squeezing fresh lemon juice over the pasta, then sprinkle with chopped parsley. Drizzle a little extra olive oil for richness, then give everything a final toss.
    7. Serve immediately on warm plates, showcasing the striking black color contrasted with vibrant green herbs and bright lemon. Enjoy the smoky, briny flavor with a citrus kick in every bite!

    Notes

    Ensure not to burn the garlic; cook until fragrant. Adjust chili flakes to your heat preference. Use reserved pasta water to perfect the sauce’s consistency. Serve immediately for the best flavor and texture.
    This dish isn’t just about the dramatic color; it’s a celebration of the ocean’s depth and mystery. The briny, smoky ink paired with perfectly cooked pasta creates a harmony that’s both intense and comforting. It’s a recipe that asks you to slow down, savor each step, and really taste the sea in your own kitchen. Play with the ingredients—add a touch more lemon or a sprinkle of chili—to make it your own.

  • Black Pasta with Squid Ink: A Deep Dive into the Sea’s Richness

    Black Pasta with Squid Ink: A Deep Dive into the Sea’s Richness

    Squid ink pasta is a wild card in the kitchen. It’s not everyday you get to cook with something that’s as theatrical as it is delicious. I love how it turns a simple meal into an event, a little adventure from the ocean’s depths right onto your plate.
    The process is straightforward but requires a bit of attention—like everything worth doing. It’s about coaxing flavor out of that inky richness and balancing it with bright lemon and fresh herbs. That’s where the magic happens.

    Why This Dish Will Keep Calling You Back

    The ocean’s richness, the striking visual, and the simple act of stirring that ink into pasta make every bite feel like a quiet rebellion against blandness. It’s a dish that demands your attention, yet rewards with deep, smoky, citrusy notes that linger. I find myself returning to it when I want to reconnect with the sea, or just need a reminder that cooking is about discovery, not perfection.

    Breaking Down the Key Ingredients

    • Black pasta (squid ink pasta): The base, rich in flavor and striking in appearance, cooked to al dente for perfect texture.
    • Squid ink: Offers a briny, smoky depth—think of it as the ocean’s secret ingredient that turns ordinary pasta into something extraordinary.
    • Garlic: Adds pungency and warmth, balancing the ink’s intensity.
    • White wine: Lifts the flavors with a clean, bright acidity that reduces to a rich, glossy sauce.
    • Lemon juice: A splash brightens the ink’s earthiness, making the dish lively and fresh.
    • Chili flakes: A pinch for warmth and a subtle kick—adjust to your heat tolerance.
    • Parsley: Fresh herbs add a pop of color and herbal freshness, balancing the briny depths.

    Tools of the Trade for Perfect Black Pasta

    • Large pot: Boils the pasta evenly and quickly.
    • Deep skillet or sauté pan: Creates a space for the ink sauce to develop and coat the pasta.
    • Tongs or pasta spoon: Helps toss the pasta gently without breaking it.
    • Measuring spoons and cups: Ensures accurate seasoning and liquids.
    • Knife and chopping board: Prepares garlic and herbs efficiently.

    Mastering the Art of Making Black Pasta with Squid Ink

    Step 1: Bring a large pot of water to a rolling boil, salt generously. It should taste like the sea, about 10g salt per liter.

    Step 2: Add the black pasta, cook according to package—about 8-10 minutes—until al dente.

    Step 3: Meanwhile, heat a splash of olive oil in a deep skillet over medium heat, about 160°C (320°F).

    Step 4: Add minced garlic and a pinch of chili flakes; cook until fragrant, about 1 minute, watch for the garlic to turn golden.

    Step 5: Stir in squid ink, cook for 30 seconds, then add a splash of white wine. Let it reduce slightly, about 2 minutes.

    Step 6: Drain pasta, save some cooking water. Toss pasta into the ink sauce, loosen with a bit of reserved water to coat evenly.

    Step 7: Finish with a squeeze of lemon, chopped parsley, and a drizzle of olive oil. Serve immediately.

    Cooking Checks and Tips to Keep in Mind

    • The pasta should be cooked to al dente; it offers a slight resistance when bitten.
    • The ink sauce should be glossy and cling to the pasta, not watery or oily.
    • Smell for that smoky, garlicky aroma—if it’s not fragrant, cook the garlic longer.
    • The sauce should crackle slightly when you add the wine—if not, increase the heat a bit.

    Avoid These Common Pitfalls with Squid Ink Pasta

    • Burning garlic.? Reduce heat if garlic burns; it should be fragrant, not bitter.
    • Sauce sticking too tightly or becoming gritty.? Add a splash more water if the sauce is too thick; it should coat but not clump.
    • Overcooked, mushy pasta.? Cook pasta slightly less than al dente if you plan to toss it back into hot sauce.
    • Inky clumps.? If ink clumps, stir vigorously or add a touch more wine to loosen.

    Squid Ink Pasta with Lemon and Herbs

    This striking black pasta is cooked to al dente and coated in a rich, smoky squid ink sauce infused with garlic, white wine, and a splash of lemon. Bright herbs like parsley add freshness, while chili flakes provide a subtle heat, creating a dish that’s both theatrical and deeply flavorful with a glossy, inviting appearance.
    Prep Time 10 minutes
    Cook Time 15 minutes
    Total Time 25 minutes
    Servings: 2
    Course: Main Course
    Cuisine: Seafood
    Calories: 450

    Ingredients
      

    • 200 g black (squid ink) pasta preferably fresh or high-quality dried
    • 1 clove garlic minced
    • 1 pinch chili flakes adjust to taste
    • 60 ml white wine preferably dry
    • 1 tablespoon lemon juice freshly squeezed
    • 2 tablespoons olive oil
    • 2 tablespoons chopped parsley fresh
    • to taste salt for boiling water and seasoning

    Equipment

    • Large pot
    • Deep skillet or sauté pan
    • Tongs or pasta spoon
    • Measuring spoons and cups
    • Knife and chopping board

    Method
     

    1. Bring a large pot of water to a rolling boil, then add generously salted water until it tastes like the sea. Add the black pasta and cook for about 8-10 minutes, until al dente, watching for it to turn a deep black color and become firm yet tender.
    2. While the pasta cooks, heat olive oil in a deep skillet over medium heat until shimmering and warm, about 1 minute. Add the minced garlic and chili flakes, cooking gently until fragrant and garlic turns a light golden, about 30 seconds to 1 minute.
    3. Stir in the squid ink, cooking it with the garlic for 30 seconds until well incorporated and fragrant, then pour in the white wine. Let the mixture simmer and reduce slightly for about 2 minutes, until the sauce starts to thicken and becomes glossy.
    4. Drain the pasta, reserving a small cup of the cooking water in case you need to loosen the sauce later. Add the drained pasta directly into the skillet with the ink sauce, tossing gently with tongs to coat each strand evenly. If the sauce feels too thick, add a splash of the reserved pasta water to loosen and help it cling beautifully.
    5. Squeeze in the lemon juice, then sprinkle with chopped parsley. Give everything a gentle toss to combine, allowing the bright citrus and fresh herbs to lift the briny, smoky flavors of the ink.
    6. Serve immediately, with an extra drizzle of olive oil if desired, and enjoy the striking visual and deep, smoky, citrusy flavors of this special dish.
    This dish isn’t just about the dramatic color; it’s a celebration of the ocean’s depth and mystery. The briny, smoky ink paired with perfectly cooked pasta creates a harmony that’s both intense and comforting. It’s a recipe that asks you to slow down, savor each step, and really taste the sea in your own kitchen. Play with the ingredients—add a touch more lemon or a sprinkle of chili—to make it your own.

  • Halloween Pasta: A Spooky Twist on Comfort Food

    Halloween Pasta: A Spooky Twist on Comfort Food

    This Halloween pasta isn’t just about the spooky face—though that’s a big part—it’s about embracing the chaos of the season. The smell of garlic and tomatoes bubbling up, the playful assembly of mozzarella eyes, it all feels like childhood in the kitchen. I love how easy it is to turn simple ingredients into something that makes kids and adults laugh.

    Cooking this dish is a reminder that food can be messy and beautiful at the same time. It’s about the joy of creating something a little goofy, a little spooky, and totally delicious. Plus, it’s perfect for last-minute parties or a fun family dinner that breaks the usual routine.

    Why I keep making this spooky pasta

    It’s unpredictable how the eyes turn out—sometimes perfect, sometimes hilariously lopsided. That unpredictability keeps me returning, craving the chaos and the laughs. Plus, it’s a dish I can throw together in under 30 minutes, perfect for last-minute guests or a quick Halloween treat.

    Breaking down the spooky ingredients

    • Pasta: Long, slender spaghetti or fettuccine works best to mimic creepy tendrils or worms.
    • Mozzarella: Fresh mozzarella balls are perfect for the eyeballs—soft, gooey, and mild.
    • Tomato sauce: Rich, smoky, and slightly sweet—sets the spooky mood.
    • Olives or cherry tomatoes: Use for pupils; their vivid color makes the eyes pop.
    • Herbs and chili flakes: Add brightness and a hint of heat to balance the richness.
    • Garlic and onions: Base aromatics that develop a savory, fragrant foundation.
    • Olive oil: For sautéing and adding depth to the sauce.

    Tools of the spooky trade

    • Large pot: To boil the pasta to perfect al dente.
    • Skillet or frying pan: For simmering the sauce and assembling the eyeballs.
    • Slotted spoon: To drain pasta without breaking it.
    • Small spoon or melon baller: To create or place the mozzarella ‘eyeballs’.
    • Sharp knife: To cut and arrange ingredients precisely.

    Step-by-step guide to crafting your spooky pasta

    Step 1: Start by boiling a large pot of salted water, aim for a rolling boil at 100°C (212°F).

    Step 2: Cook your pasta until just al dente, about 8-10 minutes, then drain and set aside, reserving a cup of pasta water.

    Step 3: In a skillet, heat olive oil over medium heat, about 160°C (320°F).

    Step 4: Add minced garlic and diced onions, sauté until fragrant, about 2 minutes.

    Step 5: Stir in tomato sauce and a splash of pasta water, simmer until thickened, around 5 minutes.

    Step 6: Use a spoon to create two large ‘eyeballs’ with mozzarella balls, nestled into the sauce.

    Step 7: Add black olives or cherry tomatoes as pupils, pressing gently into the cheese.

    Step 8: Toss cooked pasta into the sauce, coat well, and heat through for 2-3 minutes.

    Step 9: Finish with a sprinkle of chopped herbs and a dash of chili flakes for extra flair.

    Step 10: Plate the pasta, arranging the ‘eyeballs’ and ‘pupils’ for a spooky effect.

    Cooking checkpoints and tips for spooky success

    • Ensure pasta is just shy of al dente; it’ll finish cooking in the sauce.
    • Watch for the cheese to melt and bubble, signaling perfect ‘eyeball’ placement.
    • The sauce should be thick enough to cling to pasta without being gloopy.
    • Check the color of the sauce; it should be rich and vibrant, not dull or burnt.
    • Use a sharp knife to test the doneness of the pasta if unsure.

    Common pitfalls and how to dodge them

    • Overcooked pasta that turns gluey.? Use a timer to prevent overcooking the pasta, which turns mushy.
    • Sauce burning or sticking to the pan.? Keep an eye on the sauce to avoid burning or sticking.
    • Mozzarella splitting or cracking.? Handle mozzarella gently to avoid breaking the ‘eyeballs’.
    • Underseasoned or bland sauce.? Taste the sauce before serving to adjust seasoning.

    Spooky Halloween Pasta

    This playful Halloween pasta features long, tender spaghetti coated in a rich tomato sauce, topped with mozzarella ‘eyeballs’ and pupils made from olives or cherry tomatoes. The dish is assembled with fun, messy touches that evoke spooky tendrils and creepy eyes, resulting in a visually striking, delicious meal perfect for last-minute parties and family dinners. Its final appearance is colorful, goofy, and inviting, with bubbling cheese and vibrant toppings that delight both kids and adults.
    Prep Time 10 minutes
    Cook Time 20 minutes
    Total Time 30 minutes
    Servings: 4
    Course: Main Course
    Cuisine: American
    Calories: 520

    Ingredients
      

    • 12 oz spaghetti or fettuccine long, slender pasta
    • 2 cups tomato sauce rich and flavorful
    • 3 cloves garlic minced
    • 1 medium onion diced
    • 2 tablespoons olive oil
    • 8 oz fresh mozzarella balls for eyeballs
    • 4 pieces black olives or cherry tomatoes for pupils
    • to taste chopped herbs like basil or parsley
    • to taste chili flakes for extra heat

    Equipment

    • Large pot
    • Skillet or frying pan
    • Slotted spoon
    • Small spoon or melon baller
    • Sharp Knife

    Method
     

    1. Bring a large pot of salted water to a rolling boil. Add the pasta and cook until just al dente, about 8-10 minutes, then drain, reserving a cup of pasta water.
    2. Heat olive oil in a skillet over medium heat until shimmering. Add the minced garlic and diced onion, sautéing until fragrant and translucent, about 2 minutes. The kitchen fills with a savory aroma and the ingredients sizzle softly.
    3. Pour in the tomato sauce and add a splash of reserved pasta water. Stir everything together and simmer for about 5 minutes until the sauce thickens slightly and develops a rich color.
    4. Use a small spoon or melon baller to carefully carve out two mozzarella balls to resemble large eyeballs. Gently nestle these into the simmering sauce, allowing them to soften and start melting slightly, giving a gooey, spooky effect.
    5. Press a black olive or cherry tomato into each mozzarella ball to create the pupils, pressing gently to secure them in place. The vivid contrast makes the eyes pop and adds to the spooky vibe.
    6. Add the cooked pasta to the sauce and toss well to coat, heating everything together for 2-3 minutes until the pasta is heated through and coated in the flavorful sauce. You should hear a slight bubbling as it heats.
    7. Sprinkle chopped herbs and chili flakes over the pasta for brightness and a hint of heat. Mix gently to distribute evenly, watching the colors brighten and the spices sprinkle down.
    8. Transfer the spooky pasta to serving plates, arranging the mozzarella ‘eyeballs’ and pupils to create a fun, eerie display. Let everyone marvel at the playful, gooey eyes before digging in.

    Notes

    Use fresh mozzarella for the best gooey effect. Be gentle when handling the mozzarella to prevent splitting. Adjust seasoning to taste before serving for optimal flavor.
    Once plated, this Halloween pasta becomes a playful centerpiece that sparks conversations and giggles. It’s not just about the visual; the smoky tomato sauce paired with creamy mozzarella makes every bite satisfying. Feel free to tweak the ‘eyeballs’ with different cheese or add extra veggies for more texture. The chaos of assembling these spooky faces is part of the fun, and the result is a dish that’s as memorable as it is tasty.

  • Halloween Pasta: A Spooky Twist on Comfort Food

    Halloween Pasta: A Spooky Twist on Comfort Food

    This Halloween pasta isn’t just about the spooky face—though that’s a big part—it’s about embracing the chaos of the season. The smell of garlic and tomatoes bubbling up, the playful assembly of mozzarella eyes, it all feels like childhood in the kitchen. I love how easy it is to turn simple ingredients into something that makes kids and adults laugh.

    Cooking this dish is a reminder that food can be messy and beautiful at the same time. It’s about the joy of creating something a little goofy, a little spooky, and totally delicious. Plus, it’s perfect for last-minute parties or a fun family dinner that breaks the usual routine.

    Why I keep making this spooky pasta

    It’s unpredictable how the eyes turn out—sometimes perfect, sometimes hilariously lopsided. That unpredictability keeps me returning, craving the chaos and the laughs. Plus, it’s a dish I can throw together in under 30 minutes, perfect for last-minute guests or a quick Halloween treat.

    Breaking down the spooky ingredients

    • Pasta: Long, slender spaghetti or fettuccine works best to mimic creepy tendrils or worms.
    • Mozzarella: Fresh mozzarella balls are perfect for the eyeballs—soft, gooey, and mild.
    • Tomato sauce: Rich, smoky, and slightly sweet—sets the spooky mood.
    • Olives or cherry tomatoes: Use for pupils; their vivid color makes the eyes pop.
    • Herbs and chili flakes: Add brightness and a hint of heat to balance the richness.
    • Garlic and onions: Base aromatics that develop a savory, fragrant foundation.
    • Olive oil: For sautéing and adding depth to the sauce.

    Tools of the spooky trade

    • Large pot: To boil the pasta to perfect al dente.
    • Skillet or frying pan: For simmering the sauce and assembling the eyeballs.
    • Slotted spoon: To drain pasta without breaking it.
    • Small spoon or melon baller: To create or place the mozzarella ‘eyeballs’.
    • Sharp knife: To cut and arrange ingredients precisely.

    Step-by-step guide to crafting your spooky pasta

    Step 1: Start by boiling a large pot of salted water, aim for a rolling boil at 100°C (212°F).

    Step 2: Cook your pasta until just al dente, about 8-10 minutes, then drain and set aside, reserving a cup of pasta water.

    Step 3: In a skillet, heat olive oil over medium heat, about 160°C (320°F).

    Step 4: Add minced garlic and diced onions, sauté until fragrant, about 2 minutes.

    Step 5: Stir in tomato sauce and a splash of pasta water, simmer until thickened, around 5 minutes.

    Step 6: Use a spoon to create two large ‘eyeballs’ with mozzarella balls, nestled into the sauce.

    Step 7: Add black olives or cherry tomatoes as pupils, pressing gently into the cheese.

    Step 8: Toss cooked pasta into the sauce, coat well, and heat through for 2-3 minutes.

    Step 9: Finish with a sprinkle of chopped herbs and a dash of chili flakes for extra flair.

    Step 10: Plate the pasta, arranging the ‘eyeballs’ and ‘pupils’ for a spooky effect.

    Cooking checkpoints and tips for spooky success

    • Ensure pasta is just shy of al dente; it’ll finish cooking in the sauce.
    • Watch for the cheese to melt and bubble, signaling perfect ‘eyeball’ placement.
    • The sauce should be thick enough to cling to pasta without being gloopy.
    • Check the color of the sauce; it should be rich and vibrant, not dull or burnt.
    • Use a sharp knife to test the doneness of the pasta if unsure.

    Common pitfalls and how to dodge them

    • Overcooked pasta that turns gluey.? Use a timer to prevent overcooking the pasta, which turns mushy.
    • Sauce burning or sticking to the pan.? Keep an eye on the sauce to avoid burning or sticking.
    • Mozzarella splitting or cracking.? Handle mozzarella gently to avoid breaking the ‘eyeballs’.
    • Underseasoned or bland sauce.? Taste the sauce before serving to adjust seasoning.

    Spooky Halloween Pasta

    This fun and festive Halloween pasta features long, al dente spaghetti coated in a rich tomato sauce, topped with mozzarella ‘eyeballs’ and vibrant pupils to create a spooky, playful dish. The assembly involves simple techniques like boiling, sautéing, and gentle shaping, resulting in a dish with a combination of tender pasta, gooey cheese, and colorful, spooky toppings that appeal to both kids and adults alike.
    Prep Time 10 minutes
    Cook Time 20 minutes
    Total Time 30 minutes
    Servings: 4
    Course: Main Course
    Cuisine: Halloween
    Calories: 520

    Ingredients
      

    • 400 g spaghetti or fettuccine long, slender pasta
    • 2 cups tomato sauce rich and flavorful
    • 200 g fresh mozzarella balls for eyeballs
    • 1 cup black olives or cherry tomatoes for pupils
    • 2 cloves garlic minced
    • 1 medium onion diced
    • 2 tbsp olive oil
    • to taste chopped herbs and chili flakes for garnish and flavor

    Equipment

    • Large pot
    • Skillet or frying pan
    • Slotted spoon
    • Small spoon or melon baller
    • Sharp Knife

    Method
     

    1. Bring a large pot of salted water to a rolling boil, then add the pasta and cook until just al dente, about 8-10 minutes. Drain, reserving a cup of pasta water, and set aside.
    2. In a skillet, heat olive oil over medium heat until shimmering, and add the minced garlic and diced onion. Sauté for about 2 minutes until fragrant and translucent, filling the kitchen with a savory aroma.
    3. Pour in the tomato sauce and add a splash of reserved pasta water to loosen the sauce slightly. Simmer for about 5 minutes until thickened and bubbling, creating a rich, fragrant base.
    4. Use a small spoon or melon baller to gently shape mozzarella into two large ‘eyeballs’ and nestle them into the sauce, pressing lightly so they stay in place.
    5. Add black olives or cherry tomatoes as pupils by pressing them gently into the mozzarella, creating spooky, colorful eyes.
    6. Toss the cooked pasta into the sauce, stirring gently to coat each strand evenly. Cook for another 2-3 minutes until heated through and well coated.
    7. Sprinkle chopped herbs and chili flakes over the top for a burst of fresh flavor and a touch of heat, adding vibrant color and spice.
    8. Arrange the mozzarella ‘eyeballs’ and pupils on the pasta for a spooky, playful presentation. Serve immediately while the cheese is gooey and the sauce is bubbling.

    Notes

    Ensure pasta is slightly undercooked so it finishes absorbing flavor in the sauce. Handle mozzarella gently to maintain the eyeball shape. Use fresh ingredients for the best visual and flavor impact.
    Once plated, this Halloween pasta becomes a playful centerpiece that sparks conversations and giggles. It’s not just about the visual; the smoky tomato sauce paired with creamy mozzarella makes every bite satisfying. Feel free to tweak the ‘eyeballs’ with different cheese or add extra veggies for more texture. The chaos of assembling these spooky faces is part of the fun, and the result is a dish that’s as memorable as it is tasty.