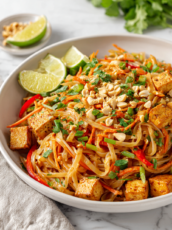
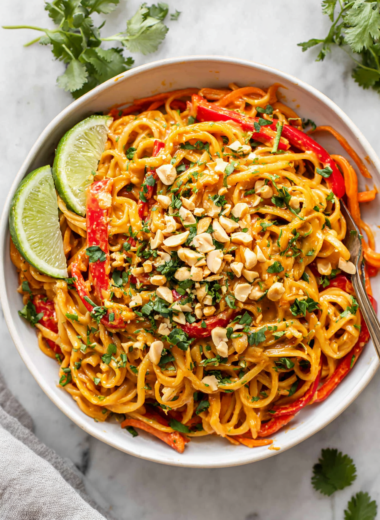
Blog

  • Peach Slushie: The Frozen Summer Escape You Didn’t Know You Needed

    Peach Slushie: The Frozen Summer Escape You Didn’t Know You Needed

    One of my favorite childhood memories is sneaking into the kitchen during the C&O summer months, hunting for ripe peaches and trying to replicate the sweet, icy drinks I saw my parents enjoy. That nostalgia fuels my obsession with perfecting simple, fruit-forward frozen treats that instantly transport my mind to lazy afternoons in the sun. Today’s peach slushie isn’t just a drink—it’s a portal to those carefree days.

    What makes this peach slushie different? It’s all about the texture—the way the icy peaches melt on your tongue, releasing bursts of juicy flavor with every sip. Using just a handful of ingredients, you can craft a frozen delight that’s sweet, tangy, and refreshingly cool, perfect for beating the summer heat or elevating your brunch game. This recipe celebrates the pure, unadulterated joy of biting into a ripe, luscious peach—frozen, but full of life.

    Peach Slushie

    The peach slushie is a frozen beverage made by blending ripe peaches with ice and a touch of sweetener, resulting in a smooth, icy drink with a vibrant orange hue. Its soft, crushed-ice texture melts in the mouth, releasing juicy, fruit-forward flavors perfect for hot summer days.
    Prep Time 10 minutes
    Total Time 10 minutes
    Servings: 2
    Course: Main Course
    Cuisine: Summer
    Calories: 120

    Ingredients
      

    • 4 providing ½ cup ripe peaches peeled and pitted
    • 1 cup ice cubes preferably crushed or small pieces
    • 2 tablespoons honey or agave syrup adjust to taste
    • ½ cup water or lemon-lime soda for a lighter, fizzy touch

    Equipment

    • Blender
    • Knife

    Method
     

    1. Slice the ripe peaches into smaller chunks, making it easier for the blender to process.
    2. Add the peach slices, ice cubes, honey, and water (or soda) into the blender jar.
    3. Secure the lid on the blender and blend on high speed until the mixture is smooth, icy, and frothy—about 30-45 seconds. You should see a vibrant orange color and a consistency similar to thick slush.
    4. Stop the blender and check the texture—if it’s too thick, add a splash more water or soda and blend briefly to thin it out.
    5. Pour the chilled peach slushie into glasses, using a spoon to guide it if necessary.
    6. Optional: garnish with a peach slice or a sprig of mint for a colorful, fragrant finish.
    7. Serve immediately to enjoy the icy, juicy refreshment at its best.

    As the seasons shift, a peach slushie offers a sweet, chilled reprieve from the heat, with the bonus of reminding us of summer’s simple pleasures. It’s perfect for spontaneous gatherings or quiet afternoons by the window, watching the world slow down. So next time you find yourself craving something cold and fruity, reach for those peaches and let your blender do the magic.

    Creating this slushie is quick, forgiving, and always a hit. It’s a reminder that some of the best treats are rooted in ingredients that are just waiting to be rediscovered. Stay cool, savor the moment, and enjoy the burst of sunshine with every sip of this frozen peach delight.

  • Whispering Fall: The Magic of Roasted Pumpkin Soup

    Whispering Fall: The Magic of Roasted Pumpkin Soup

    As the leaves turn fiery orange and the air hints at a chill, my kitchen becomes a sanctuary of warm aromas. This roasted pumpkin soup isn’t just a dish; it’s a whisper of autumn’s embrace, with a smoky depth that surprises and comforts. The scent of caramelized pumpkin mingling with sage and a dash of nutmeg transforms simple ingredients into a cozy ritual.

    What makes this recipe special is how it captures the fleeting beauty of fall in every creamy spoonful. It’s a moment of nostalgia, a celebration of harvest season that feels both timeless and refreshingly simple. Perfect for nights when gratitude for cozy home-cooked meals is the only thing on the menu.

    Even better—this soup works with pumpkin from your local farm or a can, making it a flexible fall staple. The process of roasting enhances the pumpkin’s natural sweetness, turning ordinary into extraordinary with just a few pantry staples. It’s a dish that feels like a warm hug, yet is quick enough to whip up after a busy day.

    Roasted Pumpkin Soup

    This roasted pumpkin soup is made by baking pumpkin until caramelized, then blending it into a smooth, creamy purée. The final dish has a velvety texture with a warm, smoky flavor, accented by sage and subtle nutmeg. It is served hot, with an inviting, golden-orange appearance.
    Prep Time 15 minutes
    Cook Time 45 minutes
    Total Time 1 hour
    Servings: 4
    Course: Main Course
    Cuisine: American
    Calories: 200

    Ingredients
      

    • 1 large pumpkin about 2 pounds, peeled and cubed
    • 2 tablespoons olive oil for roasting and sautéing
    • 1 small onion chopped
    • 2 cloves garlic minced
    • 4 cups vegetable broth
    • 1/2 teaspoon nutmeg ground
    • fresh sage leaves for garnish and flavor
    • to taste salt and pepper for seasoning

    Equipment

    • Baking sheet
    • Blender or immersion blender
    • Chef’s knife
    • Soup pot
    • Wooden spoon

    Method
     

    1. Preheat your oven to 400°F (200°C). Spread the cubed pumpkin on a baking sheet, drizzle with olive oil, and toss to coat evenly. Roast until the pumpkin is tender and caramelized around the edges, about 25-30 minutes.
    2. While the pumpkin roasts, heat a tablespoon of olive oil in a soup pot over medium heat. Add the chopped onion and sauté until it becomes soft and translucent, about 5 minutes, filling the kitchen with a gentle aroma.
    3. Add the minced garlic to the onions and cook for another minute until fragrant, stirring constantly to prevent burning.
    4. Pour in the vegetable broth and bring to a gentle simmer, allowing the flavors to meld for about 10 minutes.
    5. Transfer the roasted pumpkin into the blender or use an immersion blender directly in the pot. Carefully blend until smooth and velvety, adding more broth if needed to reach desired consistency.
    6. Stir the ground nutmeg into the soup and season with salt and pepper to taste. Reheat gently if needed, until hot and fragrant.
    7. Garnish each serving with fresh sage leaves for added aroma and visual appeal. Serve hot and enjoy the comforting fall flavors.

    Notes

    For a creamier texture, stir in a splash of cream or coconut milk before serving. You can also add a pinch of red pepper flakes for a touch of heat.

    As you ladle this pumpkin soup into bowls, the velvety texture and roasted notes make each sip feel like a small celebration. It’s a reminder that the simplest ingredients can yield the most comforting results, especially when tailored with love and a touch of fall magic.

    Whenever the season shifts and it feels like the world slows down, this soup offers a moment of quiet joy. Enjoy it alongside crusty bread and a good book, letting the cozy flavors linger long after the last spoonful. There’s something inherently peaceful about coming home to a warm, hearty bowl of fall’s bounty.

  • Hidden Gem: Roasted Butternut & Carrot Soup for Cozy Days

    Hidden Gem: Roasted Butternut & Carrot Soup for Cozy Days

    As the leaves turn and there’s a slight chill in the air, I long for hearty, warming bowls that feel like a cozy hug. This roasted butternut squash and carrot soup is a secret little treasure in my fall kitchen arsenal. Its sweet, caramelized aroma fills the room, wrapping you in comforting nostalgia with every simmer.

    What sets this soup apart is its deep, layered flavor, achieved through simple roasting. The process unlocks a richness from the vegetables that can’t be mimicked by boiling alone. Plus, it’s a breeze to prepare on busy days when you crave something wholesome but quick to make.

    Roasted Butternut Squash and Carrot Soup

    This roasted butternut squash and carrot soup is made by caramelizing the vegetables through roasting, which deepens their natural sweetness. After roasting, the vegetables are blended until smooth to create a velvety, warm-colored soup with a rich, hearty texture. The process highlights the caramelized flavor and creamy consistency characteristic of this comforting dish.
    Prep Time 15 minutes
    Cook Time 40 minutes
    Total Time 55 minutes
    Servings: 4
    Course: Main Course
    Cuisine: comfort food
    Calories: 180

    Ingredients
      

    • 1 lb butternut squash peeled, seeded, and cut into chunks
    • 3 medium carrots peeled and sliced
    • 2 tablespoons olive oil for roasting
    • 1 small onion diced
    • 2 cloves garlic minced
    • 4 cups vegetable broth
    • 1 teaspoon ground cumin
    • to taste salt and pepper

    Equipment

    • Baking sheet
    • Blender or immersion blender
    • Chef’s knife
    • Cutting board
    • Large pot

    Method
     

    1. Preheat your oven to 400°F (200°C) and spread the butternut squash chunks and sliced carrots on a baking sheet. Drizzle with olive oil, sprinkle with salt and pepper, and toss to coat evenly.
    2. Roast the vegetables in the oven for about 25-30 minutes, until they are tender and caramelized around the edges with a sweet aroma filling the kitchen.
    3. Meanwhile, in a large pot, sauté the diced onion and minced garlic in a tablespoon of olive oil over medium heat until the onion becomes translucent and fragrant—about 5 minutes.
    4. Add the roasted vegetables to the pot with the sautéed aromatics, then pour in the vegetable broth and stir in ground cumin. Bring the mixture to a gentle simmer.
    5. Using an immersion blender or a regular blender, blend the soup until completely smooth and creamy—be cautious blending hot liquids, and do so in batches if necessary.
    6. Return the pureed soup to the heat and taste for seasoning, adjusting with salt and pepper as needed. Once heated through, ladle into bowls.
    7. Serve the soup hot, garnished with a drizzle of olive oil or fresh herbs if desired, and enjoy its rich, velvety texture and sweet roasted flavor.

    This soup isn’t just about satisfying hunger; it’s a celebration of seasonal produce at its peak. When the air gets crisper and the daylight wanes, this dish makes the perfect centerpiece for a quiet weekend meal.

    Its creamy texture and sweet undertones make it feel indulgent without guilt. A small bowl before dinner could become your new holiday tradition, or a quick weekday pick-me-up. Either way, it’s a comforting reminder of the simple joys of home cooking.

  • The Hidden Cultures of Chili Bowls: A Flavor Journey

    The Hidden Cultures of Chili Bowls: A Flavor Journey

    So, gather ingredients that may seem unconventional, and let’s craft a chili that defies borders. Perfect for a chilly night, or when you want a meal that sparks conversation and curiosity. This chili isn’t just about warmth, it’s about awakening your senses and tasting the world from your cozy haven.

    Global Fusion Chili

    This chili combines an array of unconventional ingredients, brought together through simmering and gradual flavor development. Chopped vegetables, beans, and spices meld into a hearty, thick stew with a rich, aromatic appearance, showcasing a complex blend of flavors and textures.
    Prep Time 15 minutes
    Cook Time 45 minutes
    Total Time 1 minute
    Servings: 4
    Course: Main Course
    Cuisine: Fusion
    Calories: 250

    Ingredients
      

    • 1 tablespoon olive oil
    • 1 medium onion diced
    • 3 cloves garlic minced
    • 1 cup bell pepper chopped
    • 1 cup carrots diced
    • 1 can black beans drained and rinsed
    • 1 can corn kernels drained
    • 1 can diced tomatoes with juice
    • 2 tablespoons chili powder
    • 1 teaspoon cumin
    • 0.5 teaspoon paprika
    • 2 cups vegetable broth
    • to taste salt and pepper

    Equipment

    • Large pot or Dutch oven
    • Stirring spoon

    Method
     

    1. Heat a tablespoon of olive oil in a large pot over medium heat until shimmering. Add diced onion and cook, stirring occasionally, until translucent and fragrant, about 5 minutes.
      1 tablespoon olive oil, 1 medium onion
    2. Add minced garlic and cook for 30 seconds more until fragrant, making sure it doesn’t burn. The garlic should release a savory aroma.
      3 cloves garlic
    3. Stir in chopped bell pepper and diced carrots, cooking for another 3–4 minutes until the vegetables start to soften and brighten in color.
      1 cup bell pepper, 1 cup carrots
    4. Add the drained black beans, corn, and diced tomatoes with their juice to the pot. Stir well to combine all the ingredients and let the mixture simmer for about 5 minutes.
      1 can black beans, 1 can corn kernels, 1 can diced tomatoes
    5. Sprinkle in chili powder, cumin, and paprika, stirring thoroughly to evenly coat the vegetables and legumes with spices. Let this cook for 1–2 minutes to toast the spices slightly.
      2 tablespoons chili powder, 1 teaspoon cumin, 0.5 teaspoon paprika
    6. Pour in the vegetable broth and bring the mixture to a gentle boil. Reduce the heat to low and let it simmer uncovered for 30–35 minutes, stirring occasionally, until the chili thickens and flavors meld.
      2 cups vegetable broth
    7. Taste the chili and season with salt and pepper as needed. Adjust seasoning to your preference for a balanced and flavorful dish.
      to taste salt and pepper
    8. Once the chili has thickened and the vegetables are tender, ladle it into bowls. Serve hot, optionally garnished with fresh herbs or a dollop of sour cream for extra richness.
    As the flavors meld and the aroma fills your kitchen, you’ll appreciate the stories behind each ingredient. Cooking like this reminds us that food is a bridge, connecting cultures and creating new memories with every spoonful.

  • Unusual Blue Raspberry Slushie: A Nostalgic Chill with a Twist

    Unusual Blue Raspberry Slushie: A Nostalgic Chill with a Twist

    Exploring the vibrant world of frozen treats often takes us down familiar paths, but today I want to share a slice of childhood nostalgia with an unexpected twist. The blue raspberry slushie isn’t just a favorite; it’s a sensory adventure wrapped in shimmering blue, bursting with a tart and sweet flavor that feels like capturing a summer sunset in a glass.

    This recipe goes beyond the typical by incorporating a hint of lime and a dash of mint, elevating it from simple refreshment to an exhilarating palate-pleaser. As the weather shifts, this icy delight becomes not just a treat but a celebration of the fleeting, sparkling moments of warm days and cool breezes.

    Blue Raspberry Lime Mint Slushie

    This blue raspberry slushie is a frozen beverage that combines tart and sweet flavors with a shimmering blue hue. Blended with lime juice and fresh mint, it offers a refreshing, icy texture that melts smoothly in the mouth and evokes a summer sunset. The final result is a vibrant, icy drink with a bright, flavorful profile.
    Prep Time 10 minutes
    Total Time 10 minutes
    Servings: 2
    Course: Main Course
    Cuisine: beverage
    Calories: 120

    Ingredients
      

    • 2 cups frozen blue raspberry fruit
    • 1 cup ice cubes
    • 1/2 cup lime juice freshly squeezed
    • 1 tbsp honey or simple syrup optional for added sweetness
    • 8 fresh mint leaves mint roughly chopped

    Equipment

    • Blender
    • Measuring cups and spoons

    Method
     

    1. Add the frozen blue raspberry fruit, ice cubes, lime juice, honey (if using), and chopped mint leaves to the blender.
    2. Secure the lid and blend on high speed until the mixture is smooth and ice is fully crushed, about 30-40 seconds. You’ll see the mixture turn a vibrant blue with tiny ice shards.
    3. Stop the blender and check the consistency; it should be thick, icy, and scoopable. If needed, add a splash more lime juice or a little water and blend briefly to loosen.
    4. Pour the slushie into chilled glasses, ensuring an even, vibrant blue color with a slightly frosty top.
    5. Garnish with additional mint leaves or a lime wedge for a colorful finishing touch.
    6. Serve immediately with a straw or spoon and enjoy the refreshing burst of tart and sweet flavor in every sip.

    When you craft this blue raspberry slushie, you’re reliving a piece of carefree summer afternoons, but with a new zing of lime and mint freshness. It’s perfect for spontaneous get-togethers or a solo escape into sweet, icy relief on a hot day.

    Enjoy the bright shimmer of blue and the crisp, tart finish that makes this recipe stand out. It’s a simple pleasure that breathes new life into a childhood favorite, turning it into a refreshing ode to season’s change and playful moments.

  • Spooky Chromatic Chaos: Crafting the Perfect Halloween Brain Jello Mold

    Spooky Chromatic Chaos: Crafting the Perfect Halloween Brain Jello Mold

    As the leaves turn crisp and the nights grow eerily quiet, I find myself craving something both playful and a bit grotesque. The Halloween Brain Jello Mold is not just a dessert; it1s a sensory adventure that invites ghouls and gourmets alike to indulge in its squishy, vibrant spectacle. The moment you unmold it, the room fills with a sweet, gelatinous aroma that whispers of mystery and mischief.

    What draws me most is how this eerie dish transforms a simple ingredient list into a spectacle of slimy, brain-like texture. It1s perfect for those who love a dash of chaos on their dessert table, all while enjoying the process of creating a mini horror scene in your own kitchen. Plus, it hides a surprise element—hidden flavors lurking beneath the spooky exterior.

    Halloween Brain Jello Mold

    The Halloween Brain Jello Mold is a gelatin dessert crafted to resemble a grotesque, brain-like organ with a squishy texture and vibrant appearance. It involves dissolving flavored gelatin, pouring it into a mold, and allowing it to set until firm, resulting in a visually striking, semi-opaque and textured final product.
    Prep Time 20 minutes
    Cook Time 10 minutes
    Total Time 30 minutes
    Servings: 8
    Course: Main Course
    Cuisine: American
    Calories: 50

    Ingredients
      

    • 3 cups fruit juice or flavored water for dissolving gelatin
    • 3 packs unflavored gelatin powder for setting the mold
    • 1 cup fruit juice or flavored syrup for flavoring and coloring
    • 1 cup water hot, to dissolve gelatin
    • food coloring red or pink food coloring optional for vivid effect

    Equipment

    • Mixing bowls
    • Saucepan
    • Mold or brain-shaped silicone mold
    • Whisk
    • Measuring cups and spoons

    Method
     

    1. In a mixing bowl, pour the fruit juice and sprinkle the unflavored gelatin powder evenly over the surface. Let it sit for 5 minutes to allow the gelatin to bloom and soften.
    2. Meanwhile, heat water in a saucepan until just boiling, then pour it over the bloomed gelatin mixture. Whisk vigorously until all the gelatin is completely dissolved and the mixture is smooth and transparent.
    3. Add the fruit juice or flavored syrup to the dissolved gelatin mixture for extra flavor and color. If desired, add a few drops of red or pink food coloring, then whisk until evenly blended.
    4. Pour the gelatin mixture into your brain-shaped mold, filling it carefully to avoid air bubbles and to define the intricate brain ridges.
    5. Place the mold in the refrigerator and chill for at least 4 hours, or until the gelatin is fully set and has a firm, yet squishy, consistency.
    6. Once set, gently unmold the gelatin by inverting the mold onto a serving plate, and carefully peel away the silicone mold to reveal your spooky, brain-like creation.
    7. For an extra gory effect, add dollops of whipped cream, food-colored gels, or edible blood-like syrup around and on top of the brain.
    8. Slice into portions to showcase the brain-like internal texture, and serve immediately for a fun, spooky treat perfect for Halloween parties.

    Notes

    Ensure the mold is fully chilled before unmolding to prevent sticking. Use food coloring sparingly for vivid effects. Consider adding gummy worms or edible eyes for extra creepiness.

    This creepy-cute mold is a fantastic conversation piece that amps up any spooky celebration. Its wildly vibrant color and tactile texture make it a memorable visual and taste experience. As the season of tricks and treats kicks into high gear, this gelatinous wonder reminds us that a little macabre can make the festivities more fun.

    Whether you serve it up at a children1s party or surprise your friends with your gross-out skills, the Halloween Brain Jello is a guaranteed hit. It1s a playful reminder that sometimes, the best decorations are edible, colorful, and just a touch disgusting. Enjoy creating your own gooey masterpiece—your guests will love the chaos.

  • Unexpected Delights: Cozy Fall Casseroles with a Twist

    Unexpected Delights: Cozy Fall Casseroles with a Twist

    As the leaves turn and the air grows crisp, I find myself craving more than just baked apples and pumpkin lattes. I love how fall invites us to experiment with hearty casseroles that bring unexpected ingredients to the table. These recipes make me smile because they blend seasonal flavors with a dash of creativity, perfect for those chilly evenings.

    What excites me most is the chance to surprise my family with a dish that looks familiar but tastes totally new. I enjoy discovering secret ingredients that deepen the rooty, smoky, and sweet notes of a fall-inspired casserole. It’s about turning simple ingredients into something memorable—comfort food with a twist, right in the heart of autumn.

    Fall-Inspired Sweet Potato and Sage Casserole

    This casserole features mashed sweet potatoes combined with aromatic sage, baked until golden and slightly crispy on top. The dish has a creamy, smooth interior with a savory, herbaceous crust, making it a comforting yet flavorful centerpiece for crisp autumn evenings.
    Prep Time 15 minutes
    Cook Time 45 minutes
    Total Time 1 hour
    Servings: 4
    Course: Main Course
    Cuisine: American
    Calories: 250

    Ingredients
      

    • 2 pounds sweet potatoes peeled and cubed
    • 2 tablespoons unsalted butter melted
    • 1/4 cup milk warm
    • 1 teaspoon fresh sage chopped
    • 1/2 teaspoon salt
    • 1/4 teaspoon black pepper
    • 1/2 cup grated Parmesan cheese
    • 1/2 cup Panko breadcrumbs
    • 1 tablespoon olive oil

    Equipment

    • Stockpot
    • Mixing bowl
    • masher or fork
    • Baking Dish

    Method
     

    1. Place sweet potatoes in a large pot and cover with water. Bring to a boil over medium-high heat and cook until tender, about 15 minutes. Drain well and set aside.
    2. Transfer the cooked sweet potatoes to a mixing bowl. Mash them thoroughly with a potato masher or fork until smooth.
    3. Add melted butter, warm milk, chopped sage, salt, and pepper to the mashed sweet potatoes. Stir until well combined and creamy.
    4. Pour the sweet potato mixture into a greased baking dish, spreading it into an even layer.
    5. In a small bowl, combine grated Parmesan cheese, Panko breadcrumbs, and olive oil. Mix until the breadcrumbs are coated and crumbly.
    6. Sprinkle the breadcrumb mixture evenly over the top of the sweet potato layer.
    7. Place the baking dish in an oven preheated to 375°F (190°C). Bake for about 30 minutes, or until the top is golden brown and crispy.
    8. Remove from the oven and let it cool for a few minutes before serving. The top should be crunchy and the inside creamy and flavorful.

    Notes

    For an extra burst of flavor, sprinkle some chopped fresh thyme or drizzle with honey before baking.

    Embracing these unique casseroles makes the season even more special. They’re perfect for busy weeknights or lazy weekends when you want something warm and unexpected. With each spoonful, I feel a little more connected to the flavors of fall, tucked into a dish that’s as inviting as a crackling fire.

    Sometimes, all you need is a comforting plate with a surprise element to brighten the day. These recipes remind me that fall is about change and discovery—both in nature and in the kitchen. So, gather your ingredients and let this cozy season inspire your next culinary adventure.

  • Spooktacular Mummy Meatballs: The Halloween Party Hit

    Spooktacular Mummy Meatballs: The Halloween Party Hit

    For the past few Halloween seasons, I’ve noticed that many hosts turn to the same old spooky snacks. But this year, I wanted to bring a little chaos to my appetizer table. Enter my homemade mummy meatballs, where every bite is a festive surprise wrapped in gooey cheese bandages.

    These little monsters are more than just a treat; they’ve become a charming tradition in my house, reminiscent of childhood nightmares and childhood garlic smells mingling in the oven. The secret? A savory blend of seasoned beef, crispy edges, and those adorable, googly cheese eyes that make everyone smile.

    Homemade Mummy Meatballs

    These mummy meatballs are baked or fried beef meatballs wrapped in gooey cheese strips to resemble mummies, with googly cheese eyes adding a playful touch. The dish features seasoned ground beef with a crispy exterior and cheesy, gooey interior, finished with whimsical decoration for a festive appearance.
    Prep Time 20 minutes
    Cook Time 20 minutes
    Total Time 40 minutes
    Servings: 4
    Course: Main Course
    Cuisine: Halloween, Party Food
    Calories: 250

    Ingredients
      

    • 1 lb ground beef preferably 80% lean
    • 1 cup bread crumbs for binding
    • 1 egg egg to help bind the mixture
    • 1 tsp garlic powder for flavor
    • 1 tsp onion powder adds depth of flavor
    • 1/2 tsp salt seasoning
    • 1/4 tsp black pepper to taste
    • 2 oz cheddar cheese for wrapping and melting
    • 1 cup shredded mozzarella cheese for gooey mummy wrappings
    • small handful googly cheese eyes available at baking or candy stores

    Equipment

    • Mixing bowl
    • Baking Sheet or Frying Pan
    • Cooking Twine or Toothpicks
    • Cheese Grater
    • Small Saucepan

    Method
     

    1. Preheat your oven to 400°F (200°C) and line a baking sheet with parchment paper or lightly grease it.
    2. In a large mixing bowl, combine the ground beef, breadcrumbs, egg, garlic powder, onion powder, salt, and black pepper. Mix everything until well incorporated but do not overmix to keep the meat tender.
    3. Use your hands to roll the mixture into 12 equally-sized meatballs, about 1.5 inches each, and place them evenly spaced on the prepared baking sheet.
    4. Bake the meatballs in the preheated oven for 15-20 minutes, until they are cooked through and have a golden exterior. Alternatively, fry them in a skillet until browned and cooked fully.
    5. While the meatballs are baking, grate the cheddar cheese and melt it gently in a small saucepan over low heat, stirring until smooth.
    6. Once the meatballs are cooked, let them cool slightly so they’re easier to handle. Then, carefully cut a small slit at the top of each meatball and gently slide a small piece of melted cheddar cheese into the opening to mimic a mummy’s bandage.
    7. Wrap shredded mozzarella cheese around each meatball, creating thin strips that resemble mummy wrappings. Position the strips unevenly to give a ragged, spooky look.
    8. Press a googly cheese eye onto each meatball just above the mozzarella wraps, giving the mummy a playful, googly-eyed expression.
    9. Arrange the finished mummy meatballs on a platter, and serve them warm or at room temperature for a spooky, fun appetizer.

    Notes

    Ensure the cheese is not too hot when placing the eyes to prevent melting them. For a fun variation, add tiny pretzel sticks for mummy arms.
    As the evening winds down, I find that the smell of garlic, herbs, and roasted meat still lingers in my kitchen air. Cooking these mummy meatballs is my way of turning a simple dish into a fun-filled project that gets everyone excited.

    This recipe is perfect for creating a lively, spooky atmosphere, whether at a Halloween party or a family dinner. The playful presentation sparks joy, and the savory flavors keep everyone coming back for more. Food doesn’t have to be fancy to bring people together; sometimes, it just needs a little creepiness and plenty of cheese.

  • Unearth the Spooky Charm of Halloween Graveyard Pudding Cups

    Unearth the Spooky Charm of Halloween Graveyard Pudding Cups

    As autumn leaves swirl outside, I find myself craving creative ways to make Halloween treats stand out. This year, I stumbled upon a strange idea: transforming pudding cups into eerie graveyard scenes. The ghastly ground, tiny tombstones, and ghostly extras make dessert both terrifying and adorable.

    Involving a little chaos and lots of fun, this project turned into a spooky craft that doubles as a sweet finale. It’s perfect for kids’ parties or haunting family dinners. Plus, it always surprises guests—who knew pudding could look so hauntingly real?

    Halloween Graveyard Pudding Cups

    This dessert features creamy pudding layered with crushed cookies to resemble dirt, topped with miniature tombstones and ghostly decorations to create a spooky graveyard scene. The final appearance is eerie and whimsical, with textured layers and themed edible embellishments that make the treat visually striking.
    Prep Time 20 minutes
    Total Time 20 minutes
    Servings: 6
    Course: Main Course
    Cuisine: Halloween
    Calories: 250

    Ingredients
      

    • 1 pack vanilla pudding mix or pre-made vanilla pudding
    • 2 cups cold milk for preparing pudding
    • 1 cup cookie crumbs graham crackers or chocolate cookies, crushed finely
    • 6 pieces gummy ghosts or marshmallows for decoration
    • 6 pieces tombstone cookies or candies pretzel sticks, chocolate bars with carved tombstones, or graham crackers
    • Black decorative icing as needed for drawing on tombstones

    Equipment

    • Mixing bowls
    • Whisk
    • Measuring cups and spoons
    • Serving cups or small jars
    • Spoon or piping bag

    Method
     

    1. Begin by preparing the vanilla pudding according to the package instructions, whisking the mix into cold milk until smooth and thickened. Once ready, transfer it to a bowl and chill in the refrigerator for at least 10 minutes.
    2. Crush graham crackers or chocolate cookies into fine crumbs using a plastic bag and rolling pin, or a food processor. This will serve as the dirt layer for your graveyard scene.
    3. Scoop a layer of the chilled pudding into each serving cup or jar, filling about a third of the way up. Smooth the top with the back of a spoon.
    4. Sprinkle a generous layer of cookie crumbs over the pudding to resemble earth or dirt. This adds texture and a spooky ground effect.
    5. Create small tombstones by inserting chocolate cookies or candies into the cookie crumb layer, or place pretzel sticks upright as grave markers.
    6. Decorate the scene with gummy ghosts or marshmallows to appear as floating spirits hovering over the graveyard.
    7. Top each cup with a final layer of pudding, covering the decorations and creating a smooth surface.
    8. Use black icing to draw spooky details or messages on the tombstone candies or cookies for extra effect.
    9. Ensure all decorations are securely in place, then chill the pudding cups for additional 10 minutes to set the scene.
    10. Serve these hauntingly cute graveyard puddings chilled, and enjoy their spooky, textured appearance with friends or family.
    These Graveyard Pudding Cups offer a playful twist on traditional Halloween desserts. They’re simple enough for little hands to help with and impressive enough to wow any ghoulish gathering.

    As the night gets colder and the costumes come out, having a treat that’s both festive and delicious adds a special touch. The mix of chocolate richness and creepy decor makes this dessert a memorable part of your spooky celebrations, sparking giggles and grins all around.

  • Spooky Smiles: Halloween Mummy Hot Dogs with a Fun Twist

    Spooky Smiles: Halloween Mummy Hot Dogs with a Fun Twist

    Halloween is the perfect time to embrace playful, slightly spooky treats that bring joy to both kids and adults. This year, I decided to dress up classic hot dogs in adorable mummy wraps, turning our snack into a miniature homage to vintage horror movies—minus the screams. The aroma of warm bread and sizzling sausages fills the kitchen, setting a cozy, festive scene.

    What makes these Mummy Hot Dogs special is how effortlessly they combine creepy with cute. They’re a quick, satisfying project that transforms simple ingredients into a fun centerpiece for any Halloween gathering. Plus, they’re guaranteed to make little ones giggle and grown-ups nostalgic for childhood costume parties.

    Mummy Hot Dogs

    Mummy Hot Dogs are a fun snack made by wrapping cooked hot dogs in strips of pastry or dough, resembling mummies. The hot dogs are baked until the pastry is golden and crispy, with small eyes placed on top for a playful, spooky appearance. The final dish features a crunchy exterior with tender sausages inside, perfect for festive gatherings.
    Prep Time 10 minutes
    Cook Time 15 minutes
    Total Time 25 minutes
    Servings: 8
    Course: Main Course
    Cuisine: Halloween
    Calories: 250

    Ingredients
      

    • 8 pieces hot dogs preferably all-beef or your choice
    • 1 roll puff pastry dough thawed if frozen
    • 1 egg egg beaten, for egg wash
    • 8 small small candies or edible eyes for the mummy’s eyes

    Equipment

    • Baking sheet
    • Parchment paper
    • Sharp Knife
    • Small spoon or toothpick

    Method
     

    1. Preheat your oven to 400°F (200°C) and line a baking sheet with parchment paper.
    2. Unroll the puff pastry and cut it into thin strips, about 1/4 inch wide. This creates the bandages for your mummies.
    3. Wrap each hot dog with the pastry strips in a crisscross pattern, leaving some space at the top for the ‘face’ and a pair of eyes. Be sure to overlap the strips to mimic mummy bandages.
    4. Place the wrapped hot dogs onto the prepared baking sheet, spacing them evenly apart.
    5. Brush the pastry with the beaten egg to give it a shiny, golden finish.
    6. Bake in the preheated oven for about 12-15 minutes, or until the pastry is puffed up and golden brown.
    7. Remove the hot dogs from the oven and let them cool slightly. Carefully place small candies or edible eyes onto the top of the pastry to create a spooky face.
    8. Serve immediately while the pastry is crispy and the hot dogs are warm inside, perfect for a fun Halloween treat!

    Notes

    For extra creepiness, add small strips of black olives or pepper strips as eyebrows or scars.

    These Mummy Hot Dogs aren’t just a treat—they’re a quick celebration of the holiday’s spirit. As they bake, the smell of toasted bread mingles with savory sausage, creating an irresistible aroma that pulls everyone to the table.

    Enjoy their silly, spooky charm and how they turn an ordinary gathering into something memorable. Sometimes, it’s the simplest recipes that become the most cherished memories—especially when they look this delightfully spooky.