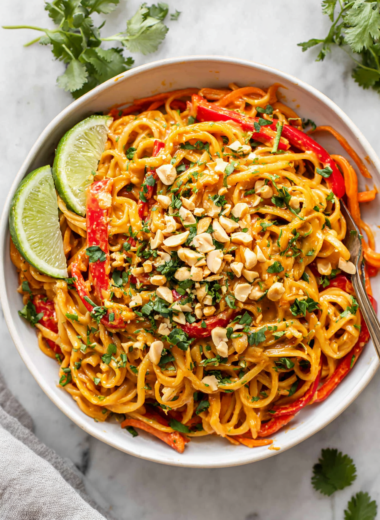
Category: Main Course

  • The Hidden Art of a Perfect Chili: A Quiet Food Revolution

    The Hidden Art of a Perfect Chili: A Quiet Food Revolution

    Many chili recipes boast of spice levels and hearty textures, but I believe the real magic lies in the subtle balance of flavors that often go unnoticed. As someone who’s spent endless afternoons trying to perfect that comforting yet complex bowl, I’ve discovered that the devil is in the details. This recipe is not just about filling but about respecting each ingredient’s voice in the symphony.

    Cooking chili is akin to conducting a slow dance—each step needs patience and appreciation for the layers, from smoky paprika to the gentle warmth of cumin. I’ve crafted this version over countless kitchens and my favorite old cast-iron pot always demands respect. It’s a recipe that whispers stories of lazy Sundays and lively family gatherings alike.

    Classic Hearty Chili

    This chili recipe combines ground meat, beans, and tomatoes simmered with spices to create a thick, flavorful stew. The dish features a balanced mix of smoky, spicy, and savory elements, resulting in a comforting, rustic texture with a rich sauce coating each ingredient. It’s ideal for slow cooking to develop deep flavors and tender textures.
    Prep Time 15 minutes
    Cook Time 45 minutes
    Total Time 1 hour
    Servings: 4
    Course: Main Course
    Cuisine: American
    Calories: 350

    Ingredients
      

    • 1 lb ground beef or turkey or any preferred ground meat
    • 1 large yellow onion diced
    • 3 cloves garlic minced
    • 1 tbsp smoked paprika
    • 1 tsp cumin
    • 1 can (14 oz) diced tomatoes
    • 1 can (15 oz) black beans drained and rinsed
    • 1 cup vegetable broth
    • 1 tbsp olive oil
    • to taste salt and black pepper

    Equipment

    • Large Dutch oven or heavy-bottomed pot
    • Wooden spoon or heatproof spatula

    Method
     

    1. Heat the olive oil in a large heavy-bottomed pot over medium heat until shimmering. Add the diced onion and cook, stirring occasionally, until softened and translucent, about 5 minutes.
    2. Add the minced garlic and cook for another 30 seconds until fragrant, stirring constantly to prevent burning.
    3. Stir in the ground meat, breaking it apart with a spoon, and cook until browned all over, about 8 minutes. Drain any excess fat if necessary.
    4. Sprinkle in the smoked paprika and cumin, stirring well to coat the meat and aromatics evenly. Let them cook for a minute until fragrant and coated with spices.
    5. Add the diced tomatoes with their juices and stir to combine, letting the mixture simmer gently and develop flavor for about 5 minutes.
    6. Pour in the vegetable broth and bring the mixture to a gentle boil, then reduce the heat to low and cover partially. Let it simmer for 20 minutes to deepen the flavors.
    7. Stir in the drained black beans and cook uncovered for an additional 5 minutes, allowing the chili to thicken slightly and the flavors to meld.
    8. Taste the chili and season with salt and black pepper as needed, stirring well to distribute the seasonings evenly.
    9. Remove from heat once the chili has thickened to your liking and is bubbling with rich aromas.
    10. Serve the chili hot in bowls, garnished with your favorite toppings if desired, and enjoy its hearty, layered textures.
    This chili isn’t just a dish; it’s an experience that invites cherished moments and nostalgic aromas to fill your home. It’s perfect for cozy evenings when a bowl can warm your hands and your heart. Sometimes, the simplest recipes hold the greatest stories, simmered slowly, tasted thoughtfully.

    As the flavors meld and the scent of spices fills your space, you’ll realize this isn’t just about eating. It’s about rediscovering the joy in slow cooking and the comfort of something truly homemade. Whatever your week has lacked, this dish will bring a bit of warmth and a pinch of joy.

  • Revive Your Winter Days with a Classic Chicken Noodle Soup Twist

    Revive Your Winter Days with a Classic Chicken Noodle Soup Twist

    As the chilly days settle in, I find myself craving something familiar yet new—something that warms both stomach and soul. Chicken noodle soup is a timeless comfort, but today I add a twist: a hint of toasted garlic and fresh herbs that elevate the simple broth. It’s the aroma of garlic sizzling that pulls everyone to the kitchen, ready for a bowl.

    This recipe isn’t just for cold nights; it’s a celebration of homey chaos. I love how gooey the noodles get when they soak up all that savory broth, a little messy but absolutely worth it. It’s my go-to when I want to fuss less but still serve something hearty and satisfying.

    Chicken Noodle Soup with Toasted Garlic and Fresh Herbs

    This chicken noodle soup is made by simmering chicken, vegetables, and herbs in a savory broth, then adding cooked noodles and toasted garlic for extra flavor. The dish has a comforting, hearty texture with tender chicken and slightly chewy noodles, finished with aromatic herbs and crispy garlic topping.
    Prep Time 15 minutes
    Cook Time 30 minutes
    Total Time 45 minutes
    Servings: 4
    Course: Main Course
    Cuisine: comfort food
    Calories: 320

    Ingredients
      

    • 1 lb boneless, skinless chicken breasts cut into bite-sized pieces
    • 2 carrots carrots peeled and sliced
    • 2 celery stalks celery stalks sliced
    • 4 cloves garlic minced
    • 1 large onion chopped
    • 8 cups chicken broth
    • 2 cups egg noodles uncooked
    • 2 tablespoons olive oil
    • 1 teaspoon dried thyme
    • 1/4 cup fresh parsley chopped
    • 3 cloves garlic sliced thin for toasting

    Equipment

    • Large pot
    • Skillet
    • Knife
    • Cutting board
    • Ladle

    Method
     

    1. Heat olive oil in a large pot over medium heat. Add the chopped onion, carrots, and celery, and cook until vegetables are tender and the onion is translucent, about 5 minutes.
    2. Add the minced garlic and dried thyme to the pot, cooking for another minute until fragrant. Stir constantly to prevent burning.
    3. Pour in the chicken broth and bring the mixture to a boil. Once boiling, add the chicken pieces and reduce heat to a gentle simmer. Cook until chicken is cooked through, about 10 minutes.
    4. Add the uncooked egg noodles to the broth and cook until tender, about 8 minutes. Stir occasionally to prevent sticking.
    5. Meanwhile, heat a small skillet over medium-low heat. Add sliced garlic and toast until golden brown and crispy, about 2-3 minutes. Remove from heat to prevent burning.
    6. Once the noodles are cooked and the chicken is tender, stir in chopped parsley and check the seasoning. Adjust salt and pepper if needed.
    7. Serve the soup hot, garnished with the crispy toasted garlic on top for extra flavor and texture.

    Notes

    For extra flavor, sauté vegetables longer or add a squeeze of lemon before serving.

    In the end, this chicken noodle soup reminds me that comfort food doesn’t have to be boring. It’s a dish that embraces imperfections and celebrates flavors that tell a story. Each spoonful brings a wave of warmth that’s perfect for sharing or savoring quietly on a busy day.

    As the season shifts, I find myself returning to this recipe more often. It’s a reminder that some classics gain new life when you bring your own favorite twists to the table. And honestly, it’s the little smells—garlic, chicken, fresh herbs—that make every pot feel like a cozy retreat.

  • Spooky Glee: Halloween Eyeball Pasta with Meatball “Eyeballs”

    Spooky Glee: Halloween Eyeball Pasta with Meatball “Eyeballs”

    Halloween is the one night when chaos and creativity blend into the perfect excuse for some culinary mischief. This Eyeball Pasta isn’t just a feast for the taste buds, but a visual nightmare (in the best way). Combining savory meatballs with a grotesque, eyeball-like appearance makes dinner both a conversation starter and a journey into fun.

    As a food blogger with a soft spot for the spooky season, I sought a dish that satisfies my love for theatrical eats and nostalgic flavors. The mix of familiar spaghetti or pasta and the chilling twist of ‘eyeball’ meatballs turns a simple meal into an event. Plus, the smell of bubbling marinara coupled with the sight of googly eyes always sparks joy at the dinner table.

    WHY I LOVE THIS RECIPE?

    • The chaotic charm turns any dinner into a party, especially for kids or the Halloween host.
    • Crafting tiny meatballs as eyeballs adds a playful, hands-on element to cooking.
    • The mixture of tangy tomato sauce and savory meat is addictive and comforting.
    • The visual gore makes spooky storytelling more immersive while eating.
    • It’s a delightful way to indulge in seasonal fun without too much fuss.

    AVOID MY DISASTER (You’re Welcome)

    • FORGOT to chill the meatball mixture—ended with sticky hands and misshapen eyeballs. Chill for 30 minutes!
    • DUMPED too much mozzarella—ended with a greasy mess that overwhelmed the dish. Use sparingly!
    • OVER‑TORCHED the eye centers—got burnt edges; bake at 375°F instead of broiling.
    • MISSED the googly eye mount—meatball slipped off. Use a toothpick to stabilize.

    QUICK FIXES THAT SAVE YOUR DAY

    • When eyes fall apart, splash on extra sauce and hit with fresh basil for extra flavor.
    • Patch a cracked meatball by gently pressing the sides with a damp spoon.
    • Shield the eyeballs from over-browning by tenting with foil midway through baking.
    • If spaghetti is too dry, stir in a splash of pasta water for a silky coat.
    • When in doubt, add a pinch of smoked paprika for depth and a spooky shimmer.

    Eyeball Pasta

    Eyeball Pasta features small, meatball-like spheres with a creepy, eyeball appearance nestled in a bed of tomato sauce and pasta. The dish combines baked or pan-fried meatballs with a vibrant marinara, topped with googly eyes for a spooky effect, resulting in a fun and visually striking meal with a tender, saucy texture.
    Prep Time 20 minutes
    Cook Time 30 minutes
    Total Time 50 minutes
    Servings: 4
    Course: Main Course
    Cuisine: Halloween
    Calories: 450

    Ingredients
      

    • 1 pound ground beef or turkey or chicken
    • 1 cup breadcrumbs plain or Italian seasoned
    • 1 egg egg
    • 2 cloves garlic minced
    • 1 cup marinara sauce preferably homemade or high-quality jarred
    • 1 cup mozzarella cheese shredded, use sparingly
    • 24 pieces googly eyes food-safe, small-sized
    • to taste salt and pepper
    • 1 tablespoon olive oil for browning

    Equipment

    • Mixing bowl
    • Baking sheet
    • Large pot
    • Skillet
    • Spoon

    Method
     

    1. Preheat your oven to 375°F (190°C). In a large mixing bowl, combine ground beef, breadcrumbs, egg, minced garlic, salt, and pepper. Mix everything together until well incorporated, then chill the mixture for about 10-15 minutes to make shaping easier.
    2. Once chilled, shape the meat mixture into small, round balls about the size of a golf ball—these will be your eyeballs. Place them on a baking sheet lined with parchment paper.
    3. Bake the meatballs in the preheated oven for 15-20 minutes, or until they are cooked through and lightly golden on the outside. While they bake, heat a tablespoon of olive oil in a skillet over medium heat and lightly brown the meatballs for added flavor, if desired.
    4. Meanwhile, warm the marinara sauce in a large pot until bubbling gently. Once ready, add the cooked (browned or baked) meatballs to the sauce, spooning some sauce over them to infuse flavor.
    5. Cook the pasta of your choice in boiling salted water according to package instructions. Drain and set aside. Toss the pasta with a bit of the warm marinara sauce to coat evenly.
    6. Arrange the sauced pasta on a serving plate or bowl. Place each meatball on top of the pasta, spacing them out evenly. This creates a spooky, eyeball-like effect.
    7. Top each meatball with a small amount of shredded mozzarella, and carefully press a googly eye into the center of each meatball to mimic an eyeball. If needed, stabilize the eyes with a toothpick.
    8. Optional: Tuck some fresh basil or sprinkle extra herbs around the dish for added contrast and flavor. Serve immediately so the eyes stay in place and the dish remains warm.

    Notes

    Chill the meat mixture before shaping to prevent sticking. Be careful not to overuse mozzarella to avoid greasiness. Use a toothpick to secure googly eyes for a more stable presentation.

    There’s something wildly satisfying about creating a dish that is both playful and tasty, especially when it honors the festive spirit of Halloween. This eyeball pasta isn’t just a meal—it’s a mini horror show turned culinary delight, perfect for seasonal gatherings.

    Every time I make it, I’m reminded how food can transform an ordinary night into a memorable event. The mix of a little chaos, a pinch of nostalgia, and a lot of fun makes this dish a seasonal staple. As the scent of marinara and roasted meatballs fills the air, I know that Halloween has officially arrived at the dinner table.

  • Hidden Twist: A Deconstructed Eggplant Parmesan Adventure

    Hidden Twist: A Deconstructed Eggplant Parmesan Adventure

    Eggplant Parmesan often gets a bad rap for being too greasy or too heavy. But what if I told you there’s a way to reimagine this classic using a deconstructed approach? By breaking it apart, you focus on each flavor and texture, creating a vibrant, fresh experience with every bite.

    This recipe was born out of a desire to let eggplant’s natural earthiness shine through, complemented by a bright tomato sauce and crispy bites. It’s perfect for those who want comfort food with a modern twist, or for anyone seeking a lighter, more colorful take on a familiar dish.

    With layers of textures and bursts of flavor, this version makes traditional eggplant Parmesan feel like a whole new culinary adventure. Plus, it’s a fun way to impress guests with something familiar yet unexpectedly exciting.

    Deconstructed Eggplant Parmesan

    This dish reimagines traditional eggplant Parmesan by breaking it into separate components, highlighting each ingredient’s natural flavors. It features roasted eggplant, a vibrant tomato sauce, and crispy elements, resulting in a colorful plate with varied textures and fresh appeal.
    Prep Time 20 minutes
    Cook Time 30 minutes
    Total Time 50 minutes
    Servings: 4
    Course: Main Course
    Cuisine: Italian
    Calories: 320

    Ingredients
      

    • 2 medium eggplants sliced into 1/2 inch thick rounds
    • 2 cups tomato sauce fresh or store-bought
    • 1 cup panko breadcrumbs for crumbling and crisping
    • 1/4 cup grated Parmesan cheese optional, for added flavor
    • 2 large eggs beaten
    • 1/2 cup all-purpose flour for dredging
    • 2 tablespoons olive oil for roasting and frying
    • to taste salt and pepper for seasoning
    • fresh basil leaves basil for garnish

    Equipment

    • Baking sheet
    • Skillet
    • Spatula

    Method
     

    1. Preheat your oven to 400°F (200°C). Arrange the eggplant slices on a baking sheet, brush with olive oil, and season with salt and pepper. Roast for about 20-25 minutes until they are golden brown and slightly crispy around the edges.
    2. While the eggplant roasts, prepare your dredging stations: place flour in a shallow bowl, beaten eggs in another, and mix panko breadcrumbs with Parmesan cheese in a third bowl.
    3. Once the eggplant slices are cooled slightly, lightly dredge each piece first in the flour, then dip in the beaten eggs, and finally coat well in the breadcrumb-Parmesan mixture, pressing gently to adhere.
    4. Heat a tablespoon of olive oil in a skillet over medium heat. Fry the breaded eggplant slices for 2-3 minutes on each side until crispy and golden brown. Remove to a paper-towel-lined plate to drain excess oil.
    5. Warm the tomato sauce in a saucepan over low heat until steaming and fragrant. Adjust seasoning with salt and pepper as needed.
    6. To assemble, spread a spoonful of tomato sauce on each plate, arrange the crispy eggplant slices on top, and drizzle more sauce over the crisp components. Garnish with fresh basil leaves.
    7. Serve immediately to enjoy the crispy textures combined with the vibrant tomato sauce and fresh herbs.

    Reinventing classic dishes can be a delightful challenge, and this deconstructed eggplant Parmesan hits all the right notes. Its vibrant presentation and balanced flavors make it a centerpiece that’s as inviting as it is eye-catching.

    Perfect for seasonal gatherings or a cozy night in, this recipe is a reminder that sometimes, breaking the rules leads to the best meals. Enjoy experimenting with each element—crispy, tender, tangy, and fresh—on your own terms.

  • Haunted Kitchen: Bloody Spaghetti & Sausage Fingers for a Spooky Feast

    Haunted Kitchen: Bloody Spaghetti & Sausage Fingers for a Spooky Feast

    As the air turns crisp and the nights grow longer, I find myself drawn to the playful chaos of Halloween cooking. This year, I wanted to craft a dish that sparks both giggles and shivers—something eerily fun and surprisingly easy. The scent of savory sausage and spiced tomato sauce fills my kitchen, turning it into a mini haunted house of flavors.

    The best part? Watching the kids’ eyes light up when they see the gruesome ‘fingers’ and the blood-red pasta. It’s not just a meal; it’s a messy, joyful event that invites everyone to join in the spooky spirit. Plus, it’s perfect for parties where you want your food to be as wild as your costumes.

    Spooky Blood-Red Pasta with Sausage and ‘Fingers’

    This dish features pasta coated in a vibrant red sauce made from spiced tomato and savory sausage, shaped to resemble grotesque fingers for a Halloween-themed presentation. The process includes cooking the pasta and sausage together, shaping the pasta into finger-like structures, and creating a gruesome, blood-red appearance for a fun, spooky meal. The final dish has a saucy, slightly chewy texture with playful, finger-like pasta shapes that are perfect for festive parties.
    Prep Time 15 minutes
    Cook Time 20 minutes
    Total Time 35 minutes
    Servings: 4
    Course: Main Course
    Cuisine: Halloween
    Calories: 480

    Ingredients
      

    • 12 oz pasta (penne or spaghetti)
    • 1 lb Italian sausage casings removed
    • 2 cups tomato sauce spiced for flavor
    • 2 cloves garlic minced
    • 1 teaspoon chili powder adds depth and spice
    • to taste salt and pepper
    • 1 cup blood-red marinara for extra spooky color
    • optional olive oil for frying sausage

    Equipment

    • Large pot
    • Slotted spoon
    • Baking sheet
    • Cooking utensils

    Method
     

    1. Bring a large pot of salted water to a boil and cook the pasta until al dente, following package instructions. Drain and set aside.
    2. In a skillet, cook the sausage over medium heat, breaking it apart with a spatula until browned and cooked through, about 8 minutes.
    3. Add the minced garlic and chili powder to the sausage, cooking for another minute until fragrant.
    4. Pour in the tomato sauce and blood-red marinara, stirring to combine. Simmer for 5-7 minutes to develop flavor and thicken slightly.
    5. Measure out small portions of cooked pasta, then gently shape each into a finger-like form by elongating with your hands or a spoon, flattening one end for a ‘nail’ and tapering the other for a finger shape.
    6. Place the pasta fingers on a baking sheet and spoon some of the spicy sausage sauce over each piece, letting it drip down to mimic blood.
    7. Drizzle or carefully spoon extra red marinara around the base of the pasta fingers to enhance the bloody effect.
    8. Optional: Use thin slices of black olive or green bell pepper for ‘nails’ by pressing them onto the shaped pasta fingers for a spooky touch.
    9. Serve the spooky pasta fingers immediately, allowing the sauce to be warm and the shapes to stand out visually.

    Notes

    For extra gory effect, add chopped green herbs or shredded cheese for ‘flesh’ details. Be playful with shapes and decorations!
    This Bloody Spaghetti with Sausage Fingers is a testament to how playful Halloween can be, even in the kitchen. It’s a no-fuss recipe that turns ordinary ingredients into a creepy masterpiece, perfect for celebrating the season with a bit of chaos.

    So, fire up your stove and embrace the messy fun. Whether you’re feeding a crowd or just feeling festive, this dish adds that extra dash of spooky charm your table deserves. Happy haunting—and happy cooking!

  • Spooky Snacks: Halloween Mummy Pizza

    Spooky Snacks: Halloween Mummy Pizza

    Halloween is my favorite time to turn ordinary meals into creepy, fun treats. This Mummy Pizza combines the joy of pizza with a playful, spooky twist that kids and adults alike will love. The smell of bubbling cheese and sizzling pepperoni instantly signals festive chaos in the kitchen.

    What sets this recipe apart is its simplicity and the silly, messy fun of making tiny bandages out of cheese strips. It’s perfect for a quick party snack or an easy family dinner that sparks creativity in the oven. Plus, it’s a great way to use up leftover pizza dough from the week.

    Mummy Pizza

    Mummy Pizza is a playful dish made by spreading pizza sauce on dough, topping it with cheese and pepperoni, then creating bandage-like strips of cheese to resemble a mummy. After baking until bubbly and golden, the cheese strips crisp up slightly, giving a fun, spooky appearance and a cheesy, tender texture inside.
    Prep Time 10 minutes
    Cook Time 15 minutes
    Total Time 25 minutes
    Servings: 4
    Course: Main Course
    Cuisine: American
    Calories: 320

    Ingredients
      

    • 1 package pizza dough store-bought or homemade
    • 1/2 cup pizza sauce
    • 1 cup shredded mozzarella cheese
    • 12 slices pepperoni slices
    • additional cheese strips cut from extra cheese

    Equipment

    • Baking sheet
    • Rolling pin
    • Knife
    • Baking parchment

    Method
     

    1. Preheat your oven to 400°F (200°C) and line a baking sheet with parchment paper to prevent sticking.
    2. Roll out the pizza dough on a floured surface into a thin circle or rectangle, then transfer it onto the prepared baking sheet.
    3. Spread an even layer of pizza sauce over the dough, leaving a small border around the edges for the crust.
    4. Sprinkle a generous layer of shredded mozzarella cheese evenly over the sauce to create a cheesy base.
    5. Arrange the pepperoni slices on top of the cheese, spacing them out as desired.
    6. Use a knife to cut thin strips from additional cheese to resemble bandages. Space them evenly across the pizza, crisscrossing as if wrapping a mummy.
    7. Place the pizza in the oven and bake for about 12-15 minutes, until the crust is golden and bubbly, and the cheese strips are slightly crispy.
    8. Remove the pizza from the oven and let it cool for a few minutes. The cheese strips will firm up slightly, adding to the mummy effect.
    9. Slice the pizza into pieces and serve while hot, showcasing the playful cheese bandages and crispy pepperoni.
    This Halloween-themed pizza is more than just a meal; it’s a chance to unleash your inner kid and get a little messy. The joy of seeing tiny mummy faces emerge from the oven makes all the chaos worth it.

    Whether you’re hosting a spooky gathering or just craving a playful dinner, these mummies bring a smile to everyone. Plus, they’re a perfect excuse to turn a simple pizza into a storytelling feast with monster faces and tiny bandages. Halloween has never been so deliciously fun.

  • Spooky Sweet & Savory: Halloween Bat Wings That Chime with Flavors

    Spooky Sweet & Savory: Halloween Bat Wings That Chime with Flavors

    Every October, I hunt for recipes that pull me into a nostalgic, yet delightfully chaotic season. This year, I stumbled upon a strange yet charming idea—transforming everyday chicken wings into tiny bats with soy sauce glaze and dark soy accents. The savory aroma emanates with a blend of caramelized sugar, garlic, and soy, making my kitchen smell like a haunted forest in the making.

    These Bat Wings aren’t just about the spooky look—they’re a playful twist on the classic wing, perfect for a Halloween gathering that aims to be both fun and flavorful. The crispy edges, coated in a shiny, dark glaze, crackle with each bite, giving way to juicy, tender meat inside. Honestly, I can’t get enough of that sweet-savory contrast, especially when paired with a quick dip in spicy soy dipping sauce.

    Bat Wings with Soy Glaze

    This dish features crispy chicken wings coated in a shiny soy sauce glaze with dark soy accents, resembling tiny bats for a fun Halloween presentation. The wings are baked until crispy and caramelized, developing a savory-sweet flavor and a crackling exterior. The final appearance is dark, glossy, and bat-shaped, with juicy meat inside.
    Prep Time 15 minutes
    Cook Time 30 minutes
    Total Time 45 minutes
    Servings: 4
    Course: Main Course
    Cuisine: Fusion
    Calories: 320

    Ingredients
      

    • 2 pounds chicken wings drumettes and flats
    • 3 tablespoons soy sauce
    • 1 tablespoon dark soy sauce
    • 2 cloves garlic minced
    • 1 tablespoon brown sugar packed
    • 2 teaspoons rice vinegar
    • 1 tablespoon cornstarch mixed with water
    • 1 tablespoon water for cornstarch slurry
    • vegetable oil for baking and glazing

    Equipment

    • Baking sheet
    • Mixing bowls
    • Silicone brush
    • Oven

    Method
     

    1. Preheat your oven to 400°F (200°C) and line a baking sheet with aluminum foil or parchment paper.
    2. Pat the chicken wings dry with paper towels to ensure crispy skin after baking.
    3. Place the wings in a large mixing bowl and toss them with a little vegetable oil to help the skin crisp up.
    4. Arrange the coated wings in a single layer on the prepared baking sheet, spacing them evenly.
    5. Bake the wings in the oven for about 30 minutes, flipping halfway through, until they are golden brown and crispy.
    6. Meanwhile, combine soy sauce, dark soy sauce, minced garlic, brown sugar, and rice vinegar in a small saucepan over medium heat.
    7. Bring the mixture to a gentle simmer, allowing the sugar to dissolve and the aromas to develop, about 2-3 minutes.
    8. Mix the cornstarch with water to make a slurry, then whisk it into the simmering sauce to thicken it into a glossy glaze.
    9. Brush the glaze generously over the hot, baked wings with a silicone brush, coating them evenly for a shiny, dark finish.
    10. Return the glazed wings to the oven for an additional 5 minutes to set the glaze and deepen the color.
    11. Remove the wings from the oven and let them rest for a couple of minutes — the glaze will become sticky and crackling as it cools.
    12. Serve the wings with the dark soy accents resembling little bats—perfect for a playful Halloween presentation.

    Notes

    For extra fun, use a small cookie cutter or knife to cut wing shapes into the glazed wings before baking for a more bat-like appearance.

    Creating Halloween Bat Wings is a quirky way to add some flavor chaos to your festivities. The simple ingredients and quick marinade make it an accessible yet impressive dish, perfect for last-minute parties or a themed family dinner. Plus, the tricky bat shape makes it easy to wow kids and adults alike.

    As the season deepens, dishes like these remind me how food can carry a bit of magic—turning ordinary ingredients into something memorable. The crispy skin, smoky soy aroma, and playful presentation make this recipe a must-try. It’s a little bit spooky, a lot tasty, and absolutely fun to make.

  • Stuffed Peppers: A Cozy Autumn Twist on Classic Comfort

    Stuffed Peppers: A Cozy Autumn Twist on Classic Comfort

    As the leaves turn vibrant shades of amber and crimson, I find myself craving dishes that are hearty yet bright. Stuffed peppers evoke a sense of nostalgia, yet I love giving them a seasonal twist with roasted squash, crunchy walnuts, and fragrant herbs. The smell of peppers roasting in the oven fills the house with warmth and promises a satisfying meal.

    These stuffed peppers are more than just a comfort food; they’re a canvas for creativity. Whether you prefer a Mediterranean-inspired filling or a spicy Mexican version, they adapt beautifully to whatever you have in your pantry. Best of all, they’re effortless to prepare, perfect for busy weeknights or leisurely weekend meals.

    Stuffed Roasted Peppers with Squash and Walnuts

    This dish features bell peppers filled with a mixture of roasted squash, crunchy walnuts, and fresh herbs, then baked until tender and slightly browned. The peppers are roasted to develop a smoky flavor, while the filling offers a hearty yet bright bite with varying textures from soft squash to crunchy nuts, wrapped in a colorful, appealing presentation.
    Prep Time 20 minutes
    Cook Time 40 minutes
    Total Time 1 hour
    Servings: 4
    Course: Main Course
    Cuisine: Mediterranean
    Calories: 250

    Ingredients
      

    • 4 large bell peppers preferably red or yellow for color
    • 2 cups squash cubes butternut or acorn squash works well
    • 1/2 cup chopped walnuts to add crunch
    • 2 tablespoons olive oil for roasting and filling
    • 2 cloves garlic minced
    • 1/4 cup chopped fresh herbs parsley, basil, or thyme
    • Salt and pepper to taste
    • Optional grated cheese for topping if desired

    Equipment

    • Baking sheet
    • Mixing bowl
    • Knife
    • Cutting board
    • Spoon
    • Oven

    Method
     

    1. Preheat the oven to 400°F (200°C). Slice the squash into small cubes, then spread them on a baking sheet drizzled with a tablespoon of olive oil. Roast until tender and lightly caramelized, about 20 minutes, stirring halfway through.
    2. While the squash roasts, cut off the tops of the bell peppers and remove the seeds and membranes. Place them on a baking sheet lined with parchment paper, and brush the outside with a little olive oil. Roast the peppers until they are slightly softened and charred in spots, about 15-20 minutes.
    3. Transfer the roasted squash to a mixing bowl. Add the minced garlic, chopped herbs, chopped walnuts, and a drizzle of olive oil. Season generously with salt and pepper, then mix until well combined. The filling should look vibrant and slightly chunky.
    4. Once the peppers are cool enough to handle, carefully stuff each pepper with the warm squash mixture, pressing gently to pack the filling in. If desired, sprinkle grated cheese on top for extra flavor.
    5. Return the stuffed peppers to the oven and bake for an additional 15-20 minutes, until the peppers are tender and the filling is heated through. The tops should be lightly golden if cheese is added.
    6. Remove the peppers from the oven and let them cool slightly. Serve warm, garnished with extra herbs if desired. The peppers should be soft with a flavorful, slightly caramelized filling that offers a satisfying blend of textures.

    Notes

    You can customize the filling with different herbs or add a spicy kick with chili flakes. For a vegan version, skip the cheese and increase the nuts or add some nutritional yeast.

    Whenever I make stuffed peppers, I appreciate how they bring everyone together at the table. The vibrant colors and inviting aromas make dinner feel special, even on ordinary days. Pair them with a crisp salad or a warm loaf of bread, and you have a wholesome, satisfying meal that celebrates the flavors of the season.

    This dish is a reminder that simple ingredients, when treated with love and a touch of spice, create something truly memorable. It’s a versatile classic that fits seamlessly into cozy autumn nights or casual family dinners. So go ahead, fill those peppers with your favorite ingredients and enjoy every flavorful bite.

  • Unconventional Cozy: Lazy Saturday Lasagna Soup

    Unconventional Cozy: Lazy Saturday Lasagna Soup

    There’s something magical about transforming the classic lasagna into a comforting soup that’s perfect for lazy weekends. The aroma of bubbling cheese and simmering tomato sauce fills the kitchen, evoking nostalgic family dinners but with a playful twist. This dish is a loving nod to traditional Italian flavors, made simpler and faster without sacrificing flavor.

    Focusing on the chaos of a busy life, I love how this soup lets me indulge in lasagna’s richness without the lengthy layers or multiple baking steps. It’s a cozy bowl that feels indulgent yet quick to prepare, ideal for those nights when time is tight but cravings are high. Plus, it tastes just as satisfying as a plate of layered pasta, but way less fuss.

    Lasagna Soup

    Lasagna soup is a hearty, tomato-based broth filled with ground meat, pasta, and melted cheese, resembling the flavors of traditional lasagna in a single comforting bowl. The dish involves simmering ingredients together until the flavors meld and the cheese is bubbly, resulting in a rich and satisfying soup with a slightly chunky texture and vibrant appearance.
    Prep Time 15 minutes
    Cook Time 30 minutes
    Total Time 45 minutes
    Servings: 4
    Course: Main Course
    Cuisine: Italian
    Calories: 350

    Ingredients
      

    • 1 lb ground beef or Italian sausage or a mix of both
    • 1 medium onion finely chopped
    • 3 cloves garlic minced
    • 28 oz canned crushed tomatoes or passata
    • 4 cups beef or chicken broth
    • 8 oz uncooked pasta small shapes like ditalini or broken lasagna noodles
    • 1 cup shredded mozzarella cheese for topping
    • to taste salt and pepper
    • 2 tbsp olive oil
    • 1 tbsp basil or Italian herbs optional garnish

    Equipment

    • Soup pot
    • Wooden spoon

    Method
     

    1. Heat olive oil in a soup pot over medium heat. Add the chopped onion and cook, stirring occasionally, until translucent and fragrant, about 5 minutes.
    2. Add the minced garlic to the pot and cook for another minute until fragrant, being careful not to burn it.
    3. Increase the heat to medium-high, add the ground beef or sausage, breaking it apart with your spoon, and cook until browned and cooked through, about 8 minutes.
    4. Pour in the crushed tomatoes and broth, stirring to combine all the ingredients evenly. Bring the mixture to a gentle boil.
    5. Add the uncooked pasta to the boiling soup, stir well, and cook uncovered until the pasta is al dente, about 8-10 minutes.
    6. Stir in salt, pepper, and herbs to taste, then let the soup simmer gently for another 5 minutes to meld flavors.
    7. Ladle the hot soup into bowls, sprinkle generously with shredded mozzarella cheese, and garnish with fresh basil if desired.
    8. Serve the soup hot, enjoying the bubbling cheese and savory, tomato-rich broth with tender pasta and seasoned meat.

    Making this lasagna soup is like wrapping yourself in a warm blanket—familiar, cozy, and unexpectedly effortless. It’s a reminder that comfort doesn’t always require hours in the kitchen, especially during colder months or when company drops by unexpectedly. This dish proves that speed can meet soulfulness when you use a few clever shortcuts.

    Whenever I need a little bit of chaos turned comforting, this soup is my go-to. It’s perfect for a quick weeknight dinner or a hearty lunch on a chilly day, filling the house with a tempting, cheesy smell. Yet, it keeps things simple, so I always finish feeling both satisfied and relaxed.

  • The Secret Ingredient That Elevates White Chicken Chili

    The Secret Ingredient That Elevates White Chicken Chili

    Many white chicken chili recipes stick to basic ingredients, but adding a splash of lime juice at the end really brightens it up. It’s a small step that transforms the dish from comforting to crave-worthy. This unexpected twist is my go-to for lively flavor that cuts through the richness of the chicken and creamy beans.

    Cooking this chili is almost meditative; the gentle simmer releases aromas of cumin, garlic, and tender chicken, filling the kitchen with warmth. I love making it on chilly evenings when I want something hearty yet fresh. Plus, it’s a flexible recipe that I can tweak based on what’s in my pantry.

    White Chicken Chili

    White chicken chili is a hearty soup made with tender shredded chicken, creamy white beans, and a savory broth flavored with cumin and garlic. It is simmered until the flavors meld, resulting in a thick, comforting dish with a slightly creamy texture and a vibrant brightness from lime juice added at the end.
    Prep Time 15 minutes
    Cook Time 30 minutes
    Total Time 45 minutes
    Servings: 4
    Course: Main Course
    Cuisine: American
    Calories: 350

    Ingredients
      

    • 1 lb boneless, skinless chicken breasts or thighs, shredded after cooking
    • 1 can white beans such as cannellini or great northern, drained and rinsed
    • 4 cups chicken broth
    • 1 teaspoon ground cumin
    • 3 cloves garlic minced
    • 1 lime juiced at the end
    • 2 tablespoons olive oil
    • 1/2 cup diced onion
    • Salt and pepper to taste

    Equipment

    • Large pot or Dutch oven
    • Knife
    • Cutting board
    • Wooden spoon or spatula

    Method
     

    1. Heat the olive oil in a large pot over medium heat. Add the diced onion and cook, stirring occasionally, until it becomes translucent and fragrant, about 5 minutes.
    2. Add the minced garlic and ground cumin to the onions. Stir for about 30 seconds until fragrant, filling the kitchen with a warm aroma.
    3. Place the chicken breasts into the pot and pour in the chicken broth. Bring the mixture to a gentle simmer, then cover and cook for 15-20 minutes until the chicken is cooked through and tender.
    4. Remove the cooked chicken from the pot and shred it using two forks. Return the shredded chicken back into the pot and stir to combine.
    5. Add the drained and rinsed white beans to the pot. Stir gently, then simmer for another 10 minutes to allow flavors to meld and the beans to heat through.
    6. Squeeze fresh lime juice into the chili and stir. Taste, then add salt and pepper as needed to enhance the flavors.
    7. Once the chili is hot and flavorful, ladle into bowls and serve hot, garnished with additional lime or fresh herbs if desired.

    This white chicken chili feels like a warm blanket on a busy weeknight, offering both simplicity and punch. It’s perfect for feeding a crowd or meal prepping ahead—especially when the weather turns colder.

    Each spoonful delivers a contrast of creamy, spicy, and citrusy notes, reminding me why I keep returning to this comforting dish. It’s a reminder that sometimes, the smallest additions make the biggest difference on a busy table.