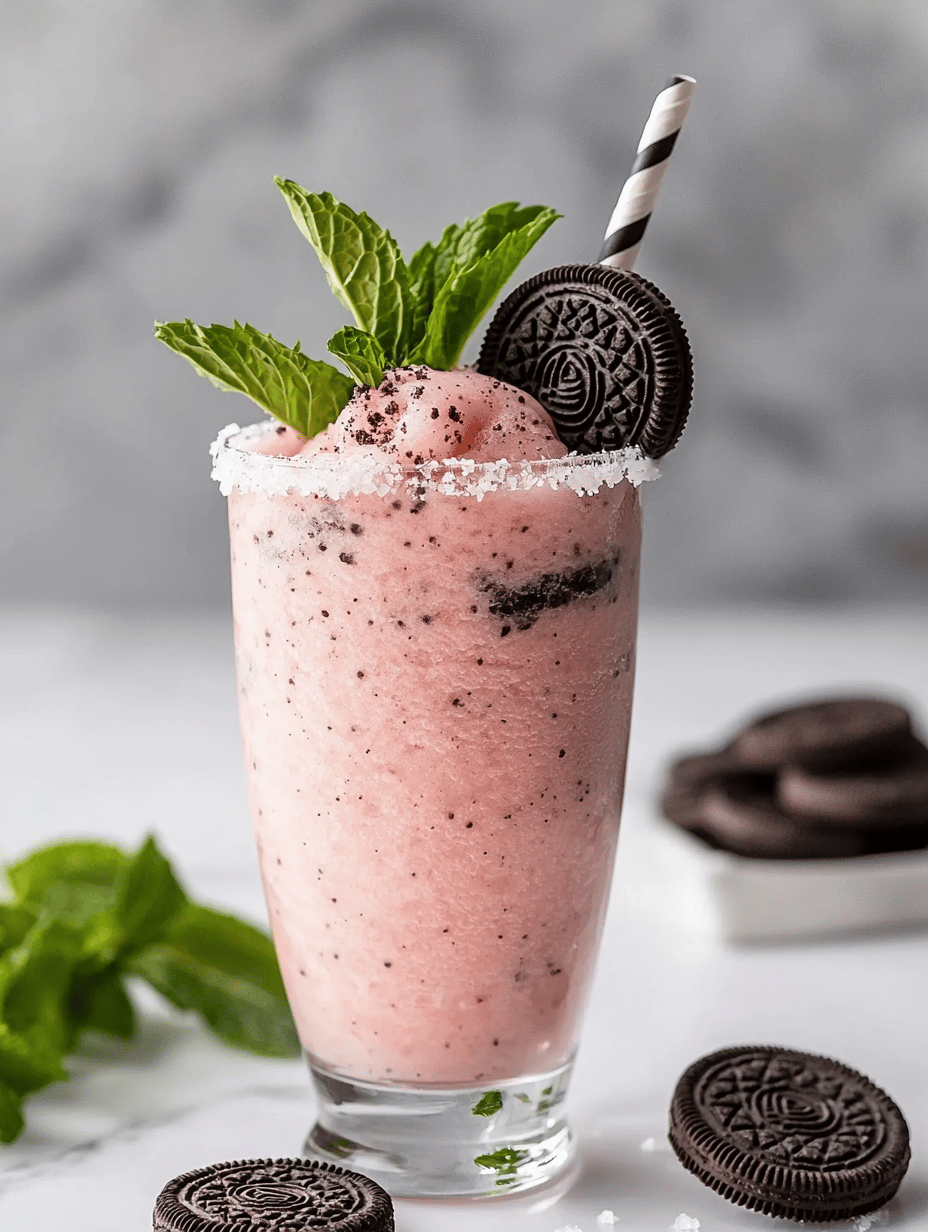
Category: Beverages

  • Enchanted Green Elixir: The Halloween Poison Apple Martini

    Enchanted Green Elixir: The Halloween Poison Apple Martini

    Halloween parties thrive on bewitching drinks that spark curiosity and conversation. This Poison Apple Martini combines a haunting green hue with a crisp, tart flavor reminiscent of biting into a candy-coated apple. It’s a perfect blend of playful fright and elegant sips, ideal for the trick-or-treat season.

    What makes this cocktail stand out is its clever use of bubbling dry ice, creating a misty, mysterious effect that elevates any gathering. Imagine guests watching their glasses fill with spooky fog while savoring the sharp sweetness of green apple schnapps and vodka. It’s more than a drink; it’s an experience that invites a bit of chaos and a lot of fun.

    This recipe is a nod to both nostalgia and modern mixology, making it versatile for both casual get-togethers and fancy costume parties. The balance of flavors feels just right—sweet, sour, with a hint of mysterious spice from garnishes. It’s a visual and sensory celebration of all things Halloween.

    Poison Apple Martini

    The Poison Apple Martini is a visually striking cocktail with a vivid green hue and a crisp, tart flavor reminiscent of biting into a candy-coated apple. It features bubbling dry ice to produce a spooky mist effect, creating an immersive and festive Halloween experience. The drink combines green apple schnapps and vodka, resulting in a smooth, refreshing final appearance with a smoky, foggy presentation.
    Prep Time 10 minutes
    Total Time 10 minutes
    Servings: 2
    Course: Main Course
    Cuisine: Halloween
    Calories: 150

    Ingredients
      

    • 2 oz green apple schnapps main flavoring
    • 1.5 oz vodka base spirit
    • 1 oz fresh lime juice adds tartness
    • 1 small piece dry ice for fog effect, handling with care

    Equipment

    • Cocktail shaker
    • Martini glasses
    • Measuring jigger
    • Strainer
    • Small serving cups or dishes for dry ice

    Method
     

    1. Fill a cocktail shaker with green apple schnapps, vodka, and fresh lime juice.
    2. Seal the shaker tightly and shake vigorously for about 15 seconds until well chilled and combined.
    3. Strain the mixture into chilled martini glasses to achieve a smooth, clear finish.
    4. Carefully place a small piece of dry ice into each glass, making sure to handle with tongs or gloves. Watch as the fog begins to billow from the glass, creating a spooky mist effect.
    5. Serve immediately and enjoy the bubbling, foggy spectacle along with the tart, crisp flavors of the cocktail.

    Notes

    Handle dry ice with care, using gloves or tongs. Do not ingest dry ice directly. For safety, serve the drink immediately after adding the dry ice fog for the best visual effect.
    This Poison Apple Martini is a seasonal staple that hooks everyone’s attention and taste buds. Its eerie charm and vibrant flavor make it an instant party favorite, perfect for creating memorable moments. Whether you’re hosting a spooky soirée or just adding some magic to your evening, this recipe delivers.

    As October wanes, this drink serves as a reminder to indulge in fun, creativity, and a little bit of mischief. Its playful presentation sparks joy and curiosity, making it a highlight of the fall festivities. Cheers to a hauntingly good time with a cocktail that’s as delightful to look at as it is to sip.

  • Frozen Strawberry Dreams: The Unexpected Fountain of Refreshment

    Frozen Strawberry Dreams: The Unexpected Fountain of Refreshment

    On scorching days, I’ve discovered that a simple strawberry slushie can transform my mood in an instant. It’s not just about the icy sweetness, but the way the aroma of ripe strawberries fills the kitchen as I blend. The process feels almost meditative, turning fresh fruit into a frosty escape.

    But this isn’t your average frozen treat. I love the unpredictability of textures—the way the first sip is smooth, and then bursts into tiny frozen chunks. It’s a nostalgic reminder of summer afternoons, yet totally modern with just a handful of ingredients.

    Strawberry Slushie

    A strawberry slushie is a refreshing frozen drink made by blending ripe strawberries with sweetener and ice until smooth. The final texture is icy and slightly chunky, with a vibrant red color and fruity aroma, perfect for hot days. It involves simple blending techniques to create a frosty, sip-worthy treat.
    Prep Time 10 minutes
    Total Time 10 minutes
    Servings: 2
    Course: Main Course
    Cuisine: International
    Calories: 120

    Ingredients
      

    • 2 cups fresh strawberries, hulled large ripe strawberries
    • 2 tablespoons honey or sugar adjust to taste
    • 1 cup ice cubes preferably crushed
    • 1/2 cup cold water or fruit juice for blending

    Equipment

    • Blender
    • Measuring cups and spoons

    Method
     

    1. Place the hulled strawberries into the blender along with the honey or sugar.
    2. Add the ice cubes to the blender. This will give the slushie its frosty texture.
    3. Pour in the cold water or fruit juice to help facilitate blending and improve creaminess.
    4. Secure the lid on the blender and blend on high until the mixture is smooth and slightly slushy, about 30-45 seconds.
    5. Check the consistency—if it’s too thick, add a splash more water or juice and blend briefly again.
    6. Pour the slushie into chilled glasses. The mixture should be vibrant red with a textured, icy appearance.
    7. Optional: Garnish with a fresh strawberry or a sprig of mint for a colorful touch.
    8. Serve immediately and enjoy the cool, fruity burst with each sip!

    This strawberry slushie is perfect for lazy afternoons or impromptu gatherings. It pulls together quickly and tastes endlessly fresh — just the way I like it when the sun is blazing.

    As the seasons shift, I keep coming back to this recipe, craving that bright, berry burst. It’s a reminder that sometimes the simplest ingredients make the biggest splash, especially when the heat is on.

  • Sparkling Secrets: The Art of the Perfect Champagne Slushie

    Sparkling Secrets: The Art of the Perfect Champagne Slushie

    Imagine a hot summer day where the only thing that can cool you is a icy blast of bubbly perfection. Instead of reaching for regular cocktails, I love reinventing my favorite beverages with a surprising twist — the champagne slushie. This frozen treat transforms the elegance of champagne into a playful, refreshing dessert that feels both fancy and fun.

    What makes this recipe special is how it balances the crispness of champagne with the sweetness of fruit and a chilly texture that feels like celebration in every sip. It’s a little chaotic to make, but the payoff is a sparkling, slushy glass of joy you can enjoy at any gathering or quiet evening. It’s a reminder that cocktails can be both stunning and simple.

    Champagne Slushie

    This champagne slushie is a frozen beverage that combines bubbly champagne with fruit flavors, resulting in a icy, sparkling treat. The mixture is blended to a smooth, slushy consistency with a festive appearance, perfect for warm weather gatherings or special celebrations.
    Prep Time 10 minutes
    Total Time 10 minutes
    Servings: 4
    Course: Main Course
    Cuisine: Mixed Drinks
    Calories: 150

    Ingredients
      

    • 1 bottle champagne chilled
    • 1 cup fruit juice or puree e.g., strawberry, peach, or mango
    • 2 cups ice cubes
    • 2 tablespoons sugar optional, for added sweetness

    Equipment

    • Blender
    • Measuring cups and spoons

    Method
     

    1. Pour the chilled champagne into the blender, followed by the fruit juice or puree, and add the sugar if using.
      1 bottle champagne
    2. Add the ice cubes to the blender to create a frosty base for the slushie.
      1 bottle champagne
    3. Blend everything on high speed until the mixture is smooth, thick, and slushy with a fizzy sparkle.
    4. Taste the mixture and add more sugar if desired, then briefly blend again to incorporate.
      1 bottle champagne
    5. Pour the slushie into chilled glasses, allowing the icy, bubbly beverage to fill each glass evenly.
    6. Garnish with a slice of fruit or a sprig of mint if desired, and serve immediately for the best frosty, fizzy experience.
      1 bottle champagne

    This icy champagne treat feels like a miniature celebration with every sip. It’s perfect for summer parties, girls’ nights, or whenever you need a little bubbly escape. Plus, it’s delightfully easy to adapt with different fruits or sparkling drinks.

    In these warm months, a cold champagne slushie is the perfect way to cool down while feeling fancy. It’s a reminder that good things come frozen, and sometimes, chaos in the kitchen leads to the most fun memories. Cheers to the little moments that sparkle just as much as this drink does!

  • Unexpected Elegance: The Whiskey Slushie Experience

    Unexpected Elegance: The Whiskey Slushie Experience

    During the dog days of summer, I stumbled upon an unusual trick to keep cool: a whiskey slushie with a twist of citrus and a hint of mint. This icy concoction transforms a classic adult beverage into a refreshing dessert you can sip with a smile, even when the heat feels relentless. Its secret? A smart balance of booze and sweet, frozen into a silky texture that feels just right in the warmth.

    What excites me most is how this recipe crosses boundaries—frosty and festive, but also grown-up and sophisticated. It’s perfect for spontaneous gatherings or that quiet moment you need to treat yourself. No blender struggles, no complicated ingredients—just simple ingredients that come alive in the freezer.

    Whiskey Citrus Mint Slushie

    This whiskey slushie is created by combining citrus juice, fresh mint, whiskey, and sweeteners, then freezing the mixture until firm. It has a smooth, icy texture with a vibrant, frosty appearance, perfect for a refreshing summer treat. The final product resembles a frozen cocktail with a slightly granular but silky consistency.
    Prep Time 10 minutes
    Total Time 10 minutes
    Servings: 2
    Course: Main Course
    Cuisine: American
    Calories: 150

    Ingredients
      

    • 1/2 cup fresh citrus juice (lemon, lime, or orange) preferably freshly squeezed
    • 2 tablespoons honey or simple syrup adjust sweetness to taste
    • 1/4 cup fresh mint leaves lightly crushed
    • 3 ounces whiskey your choice of bourbon or rye
    • 1 cup water cold

    Equipment

    • Measuring cups and spoons
    • Whisk
    • Freezer-safe container
    • Ladle or large spoon

    Method
     

    1. Combine the citrus juice, honey, water, and crushed mint leaves in a mixing bowl. Whisk until the honey dissolves completely, and the mixture is well integrated, releasing a fresh aroma of mint.
    2. Add the whiskey to the mixture and stir gently to blend all the flavors together. The liquid will become fragrant with citrus and mint notes while the alcohol remains evenly distributed.
    3. Pour the mixture into a freezer-safe container, ensuring it’s wide enough for even freezing. Cover it with a lid or plastic wrap.
    4. Place the container in the freezer and freeze until the mixture is solid but scoopable, about 4 hours. Every 30 minutes, scrape or stir the mixture with a fork to break up ice crystals and ensure a smooth, icy consistency.
    5. Once frozen, scoop the whiskey citrus mint slushie into glasses. You should see a fluffy, yet icy texture with tiny ice crystals that melt smoothly in the mouth.
    6. Garnish the glasses with a sprig of fresh mint or a thin citrus wheel for an extra burst of color and aroma. Serve immediately for the best icy, refreshing experience.

    Notes

    For a sweeter profile, adjust the honey level. If you prefer a stronger citrus flavor, increase the juice slightly. Remember to stir well during freezing to prevent large ice crystals for a smoother texture.

    As the seasons shift and the demand for cooling treats rises, this whiskey slushie script offers a dash of elegance on a lazy afternoon. It’s a reminder that even simple ingredients, when handled with a little creativity, can turn into something memorable. Everyone needs that one easy, impressive thing in their summer toolkit.

    Enjoy the slow melting, the fragrant whiffs of citrus, and the sharp splash of whiskey each time you take a sip. It’s the kind of refreshment that feels both familiar and exciting, perfect for making the hottest days a little more bearable. Cheers to spontaneous ideas and icy delights that keep life interesting.

  • The Secret Vanilla Slushie That Sparks Childhood Memories

    The Secret Vanilla Slushie That Sparks Childhood Memories

    Imagine a hot day, the sun blaring down, and the cool whisper of vanilla ice melting on your tongue. Vanilla slushies have a nostalgic charm, but this recipe explores a lesser-known twist that makes it irresistibly smooth and aromatic. It’s not just a drink; it’s a quick escape to those carefree summer afternoons.

    This recipe is perfect for those moments when you crave a sweet treat without the fuss. With just a handful of ingredients and a blender, you’re set for a delightful refreshment that’s both simple and surprisingly sophisticated. It’s a little secret I’ve tucked away, now ready to share.

    Vanilla Slushie with a Twist

    This vanilla slushie is made by blending smooth vanilla ice cream with milk and flavorings to create a frosty, creamy beverage. The mixture is pulsed until it reaches a thick, scoopable texture that melts in the mouth, resembling a smooth ice treat. Its appearance is velvety and pale, perfect for a refreshing summer drink.
    Prep Time 5 minutes
    Total Time 5 minutes
    Servings: 2
    Course: Main Course
    Cuisine: American
    Calories: 250

    Ingredients
      

    • 2 cups vanilla ice cream preferably softened
    • 1 cup milk whole or your preferred type
    • 1 teaspoon vanilla extract for enhanced flavor
    • optional sweetener honey, agave, or sugar, to taste

    Equipment

    • Blender
    • Measuring cups and spoons

    Method
     

    1. Add the vanilla ice cream, milk, vanilla extract, and sweetener (if using) into the blender.
    2. Start blending on low speed to break up the ice cream, then increase to high for about 30 seconds until the mixture is smooth and creamy.
    3. Pause the blender and check the texture; it should be thick and velvety, resembling a soft snow cone.
    4. If the mixture is too thick, add a splash more milk and pulse briefly to incorporate.
    5. Once blended to your desired consistency, turn off the blender and give the mixture a gentle stir with a spoon to ensure even flavor.
    6. Pour the vanilla slushie into glasses, using a spoon or ladle, and serve immediately for a refreshing cold treat.
    As the seasons shift, having a go-to frozen delight becomes a sweet necessity. This vanilla slushie is a swift way to beat the hottest days with a burst of creamy, fragrant bliss. It’s easy enough to whip up in minutes, making it a perfect spontaneous treat.

    Remember, the best part is customizing it—add a splash of vanilla bean paste or sprinkle some cinnamon on top for extra joy. Whether enjoyed solo or with friends, this slushie whispers the delights of childhood while fitting seamlessly into your busy day.

  • Frozen Fury: The Gatorade Slushie Revolution

    Frozen Fury: The Gatorade Slushie Revolution

    When summer heat turns up the dial, I reach for something unexpected—my homemade Gatorade slushie. It’s a quick fix for the classic thirst and a nostalgic throwback to childhood sidelines. Blending icy coolness with tangy electrolyte boost makes it my go-to outdoor refreshment.

    This recipe turns a sports beverage into a dessert that’s both satisfying and functional. Instead of plain ice or sugary drinks, I toss in assorted flavors of Gatorade and freeze. The result is a vibrant, slushy explosion of flavor that keeps me energized during long outdoor adventures.

    WHY I LOVE THIS RECIPE?

    • It combines my love for icy treats with the need for electrolytes during summer hikes.
    • The bright colors and flavors spark joy every time I make it.
    • It’s super simple to customize with different Gatorade flavors and add-ins.
    • Making it feels like a fun science experiment with friends or family.
    • It’s a nostalgic nod to sports days and family picnics of the past.

    AVOID MY DISASTER (You’re Welcome)

    • FORGOT to freeze the Gatorade overnight? It will be too soupy—freeze for a few hours first.
    • DUMPED all the Gatorade in one container, then realized it was too thick—add a splash of water, then re-freeze.
    • OVER-TORCHED the mixture when trying to speed up freezing—use a lower setting or smaller container next time.
    • MISSED adding lemon juice? It dulls the flavors; squeeze fresh before freezing for a zesty kick.

    QUICK FIXES THAT SAVE YOUR DAY

    • When slush is too icy: splash in a little hot water, stir, then re-freeze for a smoother texture.
    • Shield the mixture with a plastic wrap if ice crystals form unevenly on top.
    • When flavor’s dull: add a few drops of lime or lemon juice and stir well.
    • When you forget to blend: quick stir with a fork or spoon while serving.
    • If mixture refuses to freeze: work in a smaller container or a metal tray, speed up the process.

    Gatorade Slushie

    This Gatorade slushie is a frozen beverage made by blending chilled electrolyte drinks and then freezing until solid. It transforms a sports drink into a colorful, icy treat with a vibrant, granular texture. The final product is a refreshing, crunchy slushie perfect for hot days and outdoor adventures.
    Prep Time 10 minutes
    Cook Time 4 hours
    Total Time 4 hours 10 minutes
    Servings: 4
    Course: Main Course
    Cuisine: American
    Calories: 80

    Ingredients
      

    • 2 quarts Gatorade (assorted flavors) preferably chilled overnight for best results
    • 1 tablespoon lemon juice freshly squeezed for zest

    Equipment

    • Freezer
    • Blender

    Method
     

    1. Pour the chilled Gatorade into a large, shallow container and place it in the freezer.
    2. Freeze the Gatorade for at least 4 hours or until it’s firm enough to scoop, stirring occasionally to prevent ice crystals from forming unevenly.
    3. Once frozen solid, transfer the Gatorade chunks to a blender and pulse until finely crushed, resembling coarse snow or granular ice.
    4. Add the lemon juice to the crushed Gatorade in the blender and blend briefly until evenly combined.
    5. Scoop the mixture back into the shallow container or an available freezer-safe dish, spreading it out evenly.
    6. Return the dish to the freezer and freeze for another 2 to 3 hours until the slushie reaches the desired icy, crunchy texture.
    7. Before serving, scrape the surface with a fork to break up any icy crystals and make it fluffy and scoopable.
    8. Serve immediately in glasses or cups, garnished with a slice of lemon or a colorful straw if desired.

    Notes

    For a smoother texture, work in smaller batches or blend longer. Feel free to experiment with different Gatorade flavors for unique color and flavor combinations.

    This simple slushie takes me back to carefree summer afternoons, where icy treats and bright colors ruled. Now, it’s also a practical way to stay refreshed and replenished during my outdoor escapades.

    With only a few ingredients and minimal effort, this Gatorade slushie turns hydration into a fun ritual. It’s perfect for hot days when you need both a cool refresher and a quick dose of energy. Honestly, I find myself craving that icy tang long after the heat subsides.

  • Blue Raspberry Slushie: The Cold Concoction You Never Knew You Needed

    Blue Raspberry Slushie: The Cold Concoction You Never Knew You Needed

    Imagine standing on a hot sidewalk, the sun beating down, and suddenly a twinge of nostalgia hits you. That vibrant blue hue of a blue raspberry slushie isn’t just eye-catching—it’s a sensory invitation. Today, I’ll guide you through making a DIY version that bursts with summer flavor, guilt-free and refreshingly cool.

    This recipe dives into the cheerful chaos of childhood favorites with a modern twist that suits grown-up taste buds. You’ll notice how the tartness mingles with just enough sweetness, creating a balance that’s both lively and soothing. Just a few minutes, a handful of ingredients, and you’ll have a frozen treat perfect for any heatwave or spontaneous summer party.

    Blue Raspberry Slushie

    This blue raspberry slushie is a frozen beverage made by blending frozen blue raspberry fruit or flavored ice with sweetener and lemon juice. It has a bright, icy texture with vibrant blue color, offering a tart and sweet flavor profile that’s both refreshing and visually eye-catching.
    Prep Time 10 minutes
    Total Time 10 minutes
    Servings: 2
    Course: Main Course
    Cuisine: American
    Calories: 120

    Ingredients
      

    • 2 cups frozen blue raspberry fruit or flavored ice or frozen blue raspberry concentrate
    • 2 tbsp granulated sugar adjust to taste
    • 1 tbsp lemon juice freshly squeezed for brightness
    • 1/2 cup water

    Equipment

    • Blender
    • Measuring cups and spoons

    Method
     

    1. Combine the water and sugar in a small saucepan over medium heat, stirring until the sugar dissolves completely and the syrup is clear. Remove from heat and let it cool slightly.
    2. Pour the cooled syrup into your blender, then add the frozen blue raspberry fruit or flavored ice along with the lemon juice.
    3. Blend on high until the mixture is smooth and icy, with a slushy consistency that looks thick and vibrant blue.
    4. Check the texture—if it’s too thick, add a splash of water and blend briefly to loosen. If it’s too liquid, add a few more frozen berries and blend again until desired consistency is reached.
    5. Pour the slushie into chilled glasses, allowing the bright blue beverage to mound attractively with icy peaks.
    6. Serve immediately with a colorful straw or a garnish of fresh berries for visual pop and added fun.

    Notes

    For an extra burst of flavor, add a few drops of blue raspberry extract. To make it dairy-free, skip creamy add-ins and stick to frozen fruits.

    Crafting this blue raspberry slushie at home transforms a simple snack into a small adventure. It’s more than just a cold drink—it’s your instant escape, wrapped in icy sweetness. During these warm days, a sip offers a cool burst of joy, a reminder of carefree afternoons.

    As summer winds unwind, this frosty delight keeps spirits high even when the heat tries to slow you down. No matter the occasion, this recipe ensures a quick blast of fun with every icy sip.

  • Tropical Chill: The Art of Making a Perfect Pia Colada Slushie

    Tropical Chill: The Art of Making a Perfect Pia Colada Slushie

    As someone who once tried to recreate a pia colada using canned pineapple and coconut flakes, I learned that frozen fruit is your best friend for that icy, creamy texture. This slushie is my go-to when unexpected heat hits and I crave a nostalgic escape with a modern twist. The aroma of fresh pineapple blending with coconut milk immediately transports me to a beach breeze.

    In this recipe, I focus on the little things—like how chilling the glasses enhances the experience or the perfect ratio of pineapple juice to coconut for that sweet, tart, and tropical balance. It’s a treat that doesn’t demand a fancy cocktail shaker, just frozen fruit, some imagination, and a good blender. Let’s dive into creating a slushie that’s as vibrant as a sunset in Santorini.

    Frosted Pineapple Coconut Slushie

    This frozen beverage combines ripe pineapple and coconut milk blended into a smooth, icy texture. The mixture results in a vibrant, creamy slushie that showcases tropical flavors with a refreshing appeal. The final drink is visually appealing and perfect for hot days, with a slightly thick consistency ideal for sipping through a straw.
    Prep Time 5 minutes
    Total Time 5 minutes
    Servings: 2
    Course: Main Course
    Cuisine: Tropical
    Calories: 150

    Ingredients
      

    • 2 cups frozen pineapple chunks preferably chopped and frozen in bite-sized pieces
    • 1 cup coconut milk full-fat for creaminess
    • 1 cup pineapple juice for added flavor and liquid balance
    • 1 tablespoon honey or agave syrup optional for extra sweetness

    Equipment

    • Blender
    • Measuring Cups

    Method
     

    1. Place the frozen pineapple chunks into the blender basket, ensuring they’re evenly distributed.
    2. Pour in the coconut milk, pineapple juice, and add honey or agave syrup if using. This creates a liquid base that will help blend everything smoothly.
    3. Secure the lid of the blender tightly, then start blending at a low speed, gradually increasing to high. Blend until the mixture is smooth, thick, and evenly icy, about 30-45 seconds. You should hear a consistent blending sound with no large chunks remaining.
    4. Stop the blender and check the texture. If it’s too thick, add a splash more pineapple juice and blend briefly to incorporate.
    5. Pour the slushie into chilled glasses to keep the drink icy longer. You can also garnish with tiny pineapple slices or a sprig of mint for a visual touch.
    6. Serve immediately with a straw, allowing guests to sip the refreshing, tropical flavors straight from the glass.

    Notes

    For an extra freeze, chill the glasses in the freezer for 10 minutes before pouring. Adjust sweetness with more honey or agave as desired. Use fresh pineapple and full-fat coconut milk for the best flavor and texture.

    This pia colada slushie is a breath of fresh, tropical air in the middle of busy workdays or lazy weekends. Its bright, fresh flavors remind us to pause and celebrate small joys, even if just for a moment. With a little prep and a lot of chill, it’s your perfect escape in a glass.

    Whether you’re entertaining friends or simply craving a moment of pure, cool bliss, this recipe is a cheerful addition to any summer or vacation table. No matter the season, it’s a little reminder that sunshine and good vibes are just a blend away.

  • Spooky Sips: The Haunted Halloween Monster Mash Punch

    Spooky Sips: The Haunted Halloween Monster Mash Punch

    As October’s chill settles in, I love the thrill of creating drinks that turn the ordinary into the extraordinary. This Halloween Monster Mash Punch is more than just a beverage—it’s a bubbling cauldron of chaos, color, and nostalgia. The scent of fruity syrups blends with a whisper of mint, beckoning guests to dive into its goblin-green depths.

    What makes this punch stand out is its playful chaos. Each sip unleashes a cascade of flavors that feel like a monster waking from its slumber, ready to spook and delight. It’s perfect for those who love their Halloween to be a little wild and wonderfully weird.

    Halloween Monster Mash Punch

    This vibrant green punch combines fruity syrups, citrus sodas, and fresh mint for a visually striking beverage. The mixture is blended until smooth and bubbly, resulting in a thick, frothy drink with a playful appearance that resembles a bubbling cauldron of chaos.
    Prep Time 15 minutes
    Total Time 15 minutes
    Servings: 8
    Course: Main Course
    Cuisine: Halloween
    Calories: 150

    Ingredients
      

    • 2 cups fruit punch syrup preferably green or lime flavor
    • 1 cup lemon-lime soda chilled for fizz
    • 1 cup pineapple juice adds sweetness and tropical flavor
    • few leaves fresh mint for flavor and garnish
    • crushed ice ice to chill the drink

    Equipment

    • Large mixing bowl
    • Blender
    • Measuring cups and spoons
    • Ladle
    • Serving pitcher

    Method
     

    1. Add the fruit punch syrup, pineapple juice, and a handful of crushed ice into the blender. Blend on high until the mixture is smooth and frothy, about 30 seconds. You should see bubbles forming and the color turning vibrant green.
    2. Pour the bubbly mixture into a large serving pitcher, allowing some foam to spill over for a wild, chaotic look. Then, gently stir in the chilled lemon-lime soda to add fizz and lighten the texture.
    3. Tear the fresh mint leaves into smaller pieces and add them to the punch. Stir gently to release their aroma and a hint of minty freshness throughout the drink.
    4. Once mixed, ladle the Monster Mash Punch into individual glasses. Garnish each with a sprig of mint and maybe a spooky straw or glow stick for extra fun.
    5. Serve immediately and enjoy the bubbling, wild chaos of this festive Halloween drink!

    Carousel through your party with a punch that screams Halloween without saying a word. It’s easy to make, visually stunning, and brings a spark of chaos to any gathering. Plus, it’s a fun way to get everyone into the spooky spirit—even the ones who refuse to wear masks!

    As the night deepens and the shadows grow longer, this punch will keep the energy lively and the spirits high. It’s not just a drink—it’s a celebration in a cup, capturing the magic and mayhem of a Halloween night.

  • Enchanted Evil: The Spooky Charm of the Halloween Poison Apple Martini

    Enchanted Evil: The Spooky Charm of the Halloween Poison Apple Martini

    Every fall, haunted house lights flicker on the corner, and pumpkin spice fills the air. But this year, I wanted to craft something that’s not just a visual stunt but a drink that whispers secrets from the dark. The Halloween Poison Apple Martini does exactly that, with a sinister twist and a tempting shimmer.

    The moment I first poured the vibrant green apple liqueur, it reminded me of how childhood candies metamorphose into adult thrillers. The scent of crisp apples layered with a dash of dangerous-looking shimmer made my kitchen smell like a haunted orchard. It’s a cocktail that offers more than just festivity—it’s an intoxicating ritual of the season.

    Halloween Poison Apple Martini

    The Halloween Poison Apple Martini is a vibrant, green cocktail that combines apple liqueur and vodka, enhanced with a shimmering, spooky finish. It features a smooth, chilled texture with an eye-catching luminous appearance, perfect for seasonal festivities. The drink is shaken until well mixed and poured into a glass, garnished as desired for a devilishly good presentation.
    Prep Time 5 minutes
    Total Time 5 minutes
    Servings: 1
    Course: Main Course
    Calories: 200

    Ingredients
      

    • 2 ounces green apple liqueur choose a vibrant, bright green variety
    • 1 ounce vodka
    • 1 teaspoon edible shimmer powder for a glowing, spooky effect
    • 0.5 ounce fresh lemon juice to balance sweetness
    • ice cubes as needed ice

    Equipment

    • Cocktail shaker
    • Martini glass
    • Strainer

    Method
     

    1. Fill the cocktail shaker halfway with ice cubes to chill the mixture.
    2. Add the green apple liqueur, vodka, fresh lemon juice, and edible shimmer powder to the shaker.
    3. Secure the lid on the shaker and shake vigorously for about 15 seconds until the mixture is well chilled and slightly frothy.
    4. Remove the lid and strain the mixture into a chilled martini glass, allowing the shimmering liquid to flow smoothly.
    5. Garnish with a small slice of green apple or a spooky garnish as desired.
    6. Serve immediately and enjoy the luminous, refreshing sip with a haunting twist.
    As the night deepens and shadows dance, this Poison Apple Martini keeps the spirits alive with its hypnotic glow. It’s perfect for setting a mischievous tone at your Halloween gathering or a spooky solo toast to the season.

    So, embrace the eerie elegance of this cocktail, letting its glossy allure and tantalizing flavor become your signature sip of October. It’s a reminder that sometimes, the most playful horrors are the sweetest.