Category: Appetizers

  • Haunted Kitchen: Spook-tacular Halloween Deviled Egg Eyeballs

    Haunted Kitchen: Spook-tacular Halloween Deviled Egg Eyeballs

    Every October, my kitchen transforms into a playground of eerie delights. This year, I decided to craft a creepy twist on the classic deviled eggs, turning them into unsettling eyeballs for our Halloween feast. The moment I cracked open the eggs and saw the vibrant green centers, I knew these would steal the show.

    These eyeball deviled eggs aren’t just creepy—they’re irresistibly creamy with a pop of briny flavor from the olives, making each bite an unsettlingly satisfying experience. I love how their spooky appearance sparks giggles and gasps around the table, especially when everyone’s too excited to notice how delicious they are.

    Creepy Eyeball Deviled Eggs

    This dish features classic deviled eggs with a spooky twist, where the creamy yolk filling is topped with green-colored centers resembling unsettling eyeballs. The eggs are boiled, halved, and filled with a mayonnaise-based mixture, then decorated to create an eerie Halloween presentation with olive pupils and a vibrant green center, resulting in a smooth, creamy texture and a striking appearance.
    Prep Time 20 minutes
    Cook Time 10 minutes
    Total Time 30 minutes
    Servings: 12
    Course: Main Course
    Cuisine: Halloween
    Calories: 80

    Ingredients
      

    • 6 large eggs fresh large eggs
    • 3 tablespoons mayonnaise
    • 1 teaspoon yellow mustard
    • to taste salt and pepper
    • 1 small olive pitted, sliced into discs
    • 1 drop green food coloring for the yolk centers

    Equipment

    • Kitchen knife
    • Boiling pot
    • Mixing bowl
    • Piping bag or spoon
    • Small knife or toothpick

    Method
     

    1. Place the eggs in a boiling pot and cover with water. Bring to a boil over medium-high heat, then cook for 9-10 minutes until fully set. Transfer eggs to ice water to cool completely, which helps the shells peel easily.
    2. Gently tap each egg on the counter to crack the shell, then peel carefully to reveal smooth, white eggs. Slice each egg in half lengthwise with a sharp knife, and carefully remove the yolks into a mixing bowl. Place the egg whites on a serving platter.
    3. Mash the yolks with a fork until crumbly, then add mayonnaise, mustard, salt, and pepper. Mix until the filling is smooth and creamy, resembling a thick paste.
    4. Divide the yolk mixture evenly and spoon or pipe it back into the hollowed egg whites, creating a smooth, filled appearance.
    5. Prepare the green centers by adding a tiny drop of green food coloring to a small portion of the yolk mixture, and mix well to create a vivid green hue. Using a small spoon or piping bag, add a small dollop of this green mixture into the center of each filled egg, pressing lightly to ensure it stays in place.
    6. Cut the olive into tiny discs to resemble pupils. Place a single olive slice in the green center of each egg to mimic an unsettling eyeball, pressing gently to secure.
    7. Arrange the decorated eggs on a serving platter. For a more creepy effect, you can slightly tilt or position some eggs at an angle for added visual interest.
    8. Serve immediately or refrigerate until ready to display at your Halloween feast. Enjoy these eerie yet delicious deviled eggs, which combine creamy texture with a spooky appearance.

    Notes

    Feel free to experiment with different colored centers or pupil sizes for varied spooky effects.

    As the night winds down, these eyeball eggs remain a fun centerpiece—an easy yet memorable recipe for any Halloween gathering. They bring a little chaos and a lot of flavor, perfect for breaking the ice or wrapping up a spooky feast.

    Making these eyeballs gave me a chance to embrace the holiday’s playful darkness. Plus, they remind me that a little bit of creepy can be cozy and fun, especially when shared with good friends or family.

  • Spooky Spider Cheese Ball: A Halloween Delight

    Spooky Spider Cheese Ball: A Halloween Delight

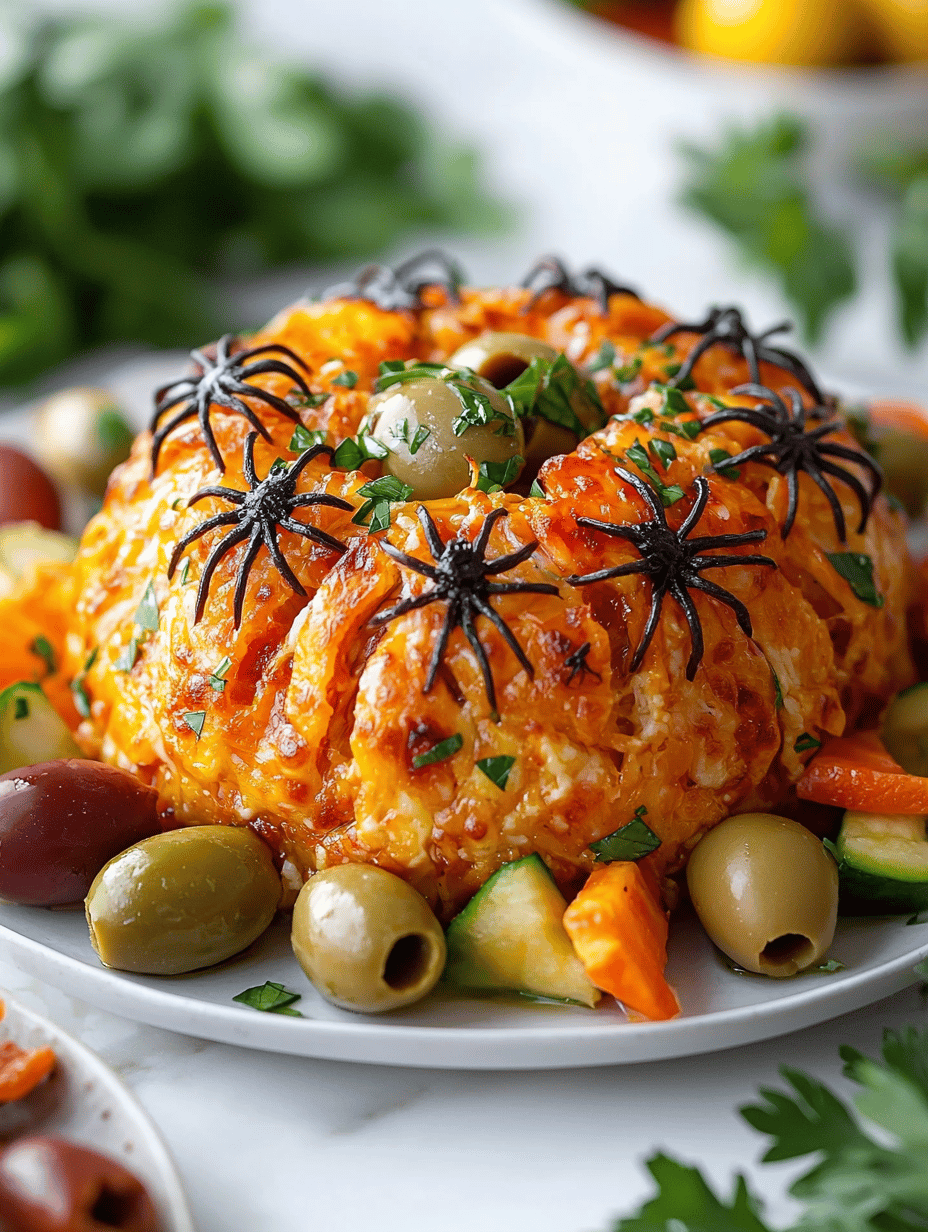
    As the nights grow longer and the air turns crisp, I find myself craving playful, crowd-pleasing snacks for Halloween. This Spider Cheese Ball transforms a simple appetizer into a spooky centerpiece that’s as fun to look at as it is to eat. It’s the perfect mix of nostalgic comfort and festive chaos.

    Crafted with creamy cheese and adorned with black olives and pretzels, it’s a visual feast. Seeing those tiny legs crawling across the serving platter always sparks a grin and invites everyone to dig in. This recipe invites a little chaos into the kitchen, and I love every bit of it.

    Spider Cheese Ball

    The Spider Cheese Ball is a creamy cheese mixture shaped into a ball and decorated with black olives and pretzels to resemble a spider. It features a smooth, cheese-based exterior with crunchy and flavorful toppings that create a playful, spooky presentation for Halloween. The final product has a soft, cheesy interior with eye-catching adornments resembling spider legs.
    Prep Time 15 minutes
    Total Time 15 minutes
    Servings: 8
    Course: Main Course
    Cuisine: American
    Calories: 250

    Ingredients
      

    • 8 oz cream cheese softened at room temperature
    • 1 cup shredded cheddar cheese for flavor and texture
    • 2 tablespoons sour cream adds creaminess
    • 1 teaspoon garlic powder
    • to taste salt and pepper for seasoning
    • half black olives pitted, sliced into small rounds
    • 1 pack pretzels small pretzel rods for spider legs

    Equipment

    • Mixing bowl
    • Rubber spatula
    • Plastic wrap
    • Serving platter

    Method
     

    1. In a mixing bowl, combine the softened cream cheese, shredded cheddar, sour cream, garlic powder, and a pinch of salt and pepper. Mix with a rubber spatula until smooth and creamy, with no lumps remaining. This creates the cheesy mixture base.
    2. Transfer the cheese mixture onto a piece of plastic wrap and shape it into a round ball using your hands or a spatula. Wrap it tightly and refrigerate for about 30 minutes to firm up, making it easier to decorate and serve.
    3. Remove the cheese ball from the fridge and carefully unwrap it. Place it on a serving platter. Smooth the surface if needed to ensure a neat round shape.
    4. Slice the black olives into small rounds to create the spider’s eyes and tiny legs. Use a few slices for eyes and thin strips or slices for the spider’s legs.
    5. Insert two olive slices into the top of the cheese ball to serve as eyes. Place the small olive circles close together for a cute, spooky face.
    6. Arrange the pretzel rods around the cheese ball, pressing them lightly into the surface to resemble spider legs crawling outward from the body.
    7. Gently press additional olive slices on the pretzel legs if you’d like to add more spider-like details or eyes.
    8. Once decorated, place the assembled spider cheese ball on your serving platter. Serve immediately or keep refrigerated until ready to enjoy.
    9. Enjoy this fun, spooky appetizer with friends and family as part of your Halloween festivities.

    This Spider Cheese Ball isn’t just fun to make; it sparks joy around the table. Its quirky charm makes it a memorable part of any Halloween spread. Plus, it’s a reminder that sometimes, the silly foods are the most enjoyed.

    Every bite delivers familiar flavors with a twist, creating a playful, festive atmosphere. It’s a treat that adds a touch of mischief and a whole lot of flavor to your holiday gathering. Enjoy the fun, and let those tiny legs scare up some smiles!

  • Spooktacular Mummy Meatballs: The Halloween Party Hit

    Spooktacular Mummy Meatballs: The Halloween Party Hit

    For the past few Halloween seasons, I’ve noticed that many hosts turn to the same old spooky snacks. But this year, I wanted to bring a little chaos to my appetizer table. Enter my homemade mummy meatballs, where every bite is a festive surprise wrapped in gooey cheese bandages.

    These little monsters are more than just a treat; they’ve become a charming tradition in my house, reminiscent of childhood nightmares and childhood garlic smells mingling in the oven. The secret? A savory blend of seasoned beef, crispy edges, and those adorable, googly cheese eyes that make everyone smile.

    Homemade Mummy Meatballs

    These mummy meatballs are baked or fried beef meatballs wrapped in gooey cheese strips to resemble mummies, with googly cheese eyes adding a playful touch. The dish features seasoned ground beef with a crispy exterior and cheesy, gooey interior, finished with whimsical decoration for a festive appearance.
    Prep Time 20 minutes
    Cook Time 20 minutes
    Total Time 40 minutes
    Servings: 4
    Course: Main Course
    Cuisine: Halloween, Party Food
    Calories: 250

    Ingredients
      

    • 1 lb ground beef preferably 80% lean
    • 1 cup bread crumbs for binding
    • 1 egg egg to help bind the mixture
    • 1 tsp garlic powder for flavor
    • 1 tsp onion powder adds depth of flavor
    • 1/2 tsp salt seasoning
    • 1/4 tsp black pepper to taste
    • 2 oz cheddar cheese for wrapping and melting
    • 1 cup shredded mozzarella cheese for gooey mummy wrappings
    • small handful googly cheese eyes available at baking or candy stores

    Equipment

    • Mixing bowl
    • Baking Sheet or Frying Pan
    • Cooking Twine or Toothpicks
    • Cheese Grater
    • Small Saucepan

    Method
     

    1. Preheat your oven to 400°F (200°C) and line a baking sheet with parchment paper or lightly grease it.
    2. In a large mixing bowl, combine the ground beef, breadcrumbs, egg, garlic powder, onion powder, salt, and black pepper. Mix everything until well incorporated but do not overmix to keep the meat tender.
    3. Use your hands to roll the mixture into 12 equally-sized meatballs, about 1.5 inches each, and place them evenly spaced on the prepared baking sheet.
    4. Bake the meatballs in the preheated oven for 15-20 minutes, until they are cooked through and have a golden exterior. Alternatively, fry them in a skillet until browned and cooked fully.
    5. While the meatballs are baking, grate the cheddar cheese and melt it gently in a small saucepan over low heat, stirring until smooth.
    6. Once the meatballs are cooked, let them cool slightly so they’re easier to handle. Then, carefully cut a small slit at the top of each meatball and gently slide a small piece of melted cheddar cheese into the opening to mimic a mummy’s bandage.
    7. Wrap shredded mozzarella cheese around each meatball, creating thin strips that resemble mummy wrappings. Position the strips unevenly to give a ragged, spooky look.
    8. Press a googly cheese eye onto each meatball just above the mozzarella wraps, giving the mummy a playful, googly-eyed expression.
    9. Arrange the finished mummy meatballs on a platter, and serve them warm or at room temperature for a spooky, fun appetizer.

    Notes

    Ensure the cheese is not too hot when placing the eyes to prevent melting them. For a fun variation, add tiny pretzel sticks for mummy arms.
    As the evening winds down, I find that the smell of garlic, herbs, and roasted meat still lingers in my kitchen air. Cooking these mummy meatballs is my way of turning a simple dish into a fun-filled project that gets everyone excited.

    This recipe is perfect for creating a lively, spooky atmosphere, whether at a Halloween party or a family dinner. The playful presentation sparks joy, and the savory flavors keep everyone coming back for more. Food doesn’t have to be fancy to bring people together; sometimes, it just needs a little creepiness and plenty of cheese.

  • Spooky Smiles: Halloween Mummy Hot Dogs with a Fun Twist

    Spooky Smiles: Halloween Mummy Hot Dogs with a Fun Twist

    Halloween is the perfect time to embrace playful, slightly spooky treats that bring joy to both kids and adults. This year, I decided to dress up classic hot dogs in adorable mummy wraps, turning our snack into a miniature homage to vintage horror movies—minus the screams. The aroma of warm bread and sizzling sausages fills the kitchen, setting a cozy, festive scene.

    What makes these Mummy Hot Dogs special is how effortlessly they combine creepy with cute. They’re a quick, satisfying project that transforms simple ingredients into a fun centerpiece for any Halloween gathering. Plus, they’re guaranteed to make little ones giggle and grown-ups nostalgic for childhood costume parties.

    Mummy Hot Dogs

    Mummy Hot Dogs are a fun snack made by wrapping cooked hot dogs in strips of pastry or dough, resembling mummies. The hot dogs are baked until the pastry is golden and crispy, with small eyes placed on top for a playful, spooky appearance. The final dish features a crunchy exterior with tender sausages inside, perfect for festive gatherings.
    Prep Time 10 minutes
    Cook Time 15 minutes
    Total Time 25 minutes
    Servings: 8
    Course: Main Course
    Cuisine: Halloween
    Calories: 250

    Ingredients
      

    • 8 pieces hot dogs preferably all-beef or your choice
    • 1 roll puff pastry dough thawed if frozen
    • 1 egg egg beaten, for egg wash
    • 8 small small candies or edible eyes for the mummy’s eyes

    Equipment

    • Baking sheet
    • Parchment paper
    • Sharp Knife
    • Small spoon or toothpick

    Method
     

    1. Preheat your oven to 400°F (200°C) and line a baking sheet with parchment paper.
    2. Unroll the puff pastry and cut it into thin strips, about 1/4 inch wide. This creates the bandages for your mummies.
    3. Wrap each hot dog with the pastry strips in a crisscross pattern, leaving some space at the top for the ‘face’ and a pair of eyes. Be sure to overlap the strips to mimic mummy bandages.
    4. Place the wrapped hot dogs onto the prepared baking sheet, spacing them evenly apart.
    5. Brush the pastry with the beaten egg to give it a shiny, golden finish.
    6. Bake in the preheated oven for about 12-15 minutes, or until the pastry is puffed up and golden brown.
    7. Remove the hot dogs from the oven and let them cool slightly. Carefully place small candies or edible eyes onto the top of the pastry to create a spooky face.
    8. Serve immediately while the pastry is crispy and the hot dogs are warm inside, perfect for a fun Halloween treat!

    Notes

    For extra creepiness, add small strips of black olives or pepper strips as eyebrows or scars.

    These Mummy Hot Dogs aren’t just a treat—they’re a quick celebration of the holiday’s spirit. As they bake, the smell of toasted bread mingles with savory sausage, creating an irresistible aroma that pulls everyone to the table.

    Enjoy their silly, spooky charm and how they turn an ordinary gathering into something memorable. Sometimes, it’s the simplest recipes that become the most cherished memories—especially when they look this delightfully spooky.

  • Spooky Bat-Shaped Halloween Guacamole with Tortilla Chips

    Spooky Bat-Shaped Halloween Guacamole with Tortilla Chips

    Halloween is the perfect time to embrace fun, quirky snacks that spark joy and creativity. This year, I decided to elevate my party spread with a playful twist on classic guacamole. Shaping tortilla chips as mischievous bats adds a touch of chaos and whimsy to the table.

    Transforming simple ingredients into a festive masterpiece makes the prep feel like a mini craft session. The aroma of ripe avocados mixed with zesty lime and cumin instantly sets a cheerful, spooky mood. Plus, who doesn’t love a good food puzzle that doubles as decoration?

    Bat-Shaped Guacamole with Tortilla Chips

    This dish features a creamy avocado-based guacamole seasoned with lime and cumin, showcasing a smooth texture with mixture-embedded chunks of ripe avocado. The guacamole is decorated with whimsical bat-shaped tortilla chips, creating a festive visual appeal suitable for Halloween celebrations. The final presentation combines luscious, bright-green dip with playful, crispy chips resembling bats.
    Prep Time 15 minutes
    Cook Time 10 minutes
    Total Time 25 minutes
    Servings: 4
    Course: Main Course
    Cuisine: festive
    Calories: 150

    Ingredients
      

    • 3 ripe avocados halved, pitted
    • 2 tablespoons lime juice freshly squeezed
    • 1/2 teaspoon ground cumin adjust to taste
    • to taste salt
    • 1 cup tortilla chips preferably round and crispy

    Equipment

    • Mixing bowl
    • Fork or masher
    • Knife
    • Cutting board
    • Baking sheet
    • Silicone bat-shaped cookie cutter
    • Tortilla chip bag or pre-made chips

    Method
     

    1. Cut the avocados in half, remove the pits, and scoop the flesh into a mixing bowl. Use a fork or masher to mash the avocado until smooth with some small chunks remaining for texture.
    2. Add lime juice, ground cumin, and a pinch of salt to the mashed avocado. Stir everything together until well combined and the mixture is creamy with a vibrant green color.
    3. Transfer the guacamole to a serving bowl and smooth the surface with a spatula for an even look.
    4. Preheat your oven to 350°F (175°C). Spread the tortilla chips on a baking sheet and bake for about 5-7 minutes until they are just crisp and lightly golden, if you want them extra crispy.
    5. Once cooled slightly, use a silicone bat-shaped cookie cutter to cut bat shapes out of the tortilla chips. Carefully lift the cutouts and set aside.
    6. Arrange the baked, bat-shaped tortilla chips decoratively on top of the guacamole, placing some upright around the edges for a festive, spooky effect. Serve immediately for the best crispiness.

    Notes

    For added fun, you can also create more bat shapes or other Halloween-themed shapes with extra tortilla chips. Serve this festive guacamole with additional chips or veggie sticks for dipping.
    This bat-shaped guacamole not only delights the eyes but also offers a fresh, creamy bite that keeps everyone coming back. It’s a celebration of simple ingredients with a spooky spin, perfect for Oktoberfest gatherings or last-minute costume parties.

    As the night winds down, the lingering aroma of seasoned avocado and crispy tortilla bats will still evoke smiles. Enjoying this playful dish reminds me how food can turn into a delightful, chaotic art form. Here’s to more imperfectly perfect Halloween feasts!

  • Spook-tacularly Cute Halloween Ghost Veggie Platter

    Spook-tacularly Cute Halloween Ghost Veggie Platter

    In a season filled with costumes and candy, this platter offers a moment of lighthearted creativity. It’s ideal for parties, after-school snacks, or a quick treat that surprises everyone. Making it is almost as fun as eating it, and it sparks the perfect Halloween cheer.

    Halloween Themed No-Bake Cheesecake Parfaits

    This layered dessert features creamy cheesecake filling combined with crushed cookies and vibrant toppings, assembled in individual glasses for a festive presentation. The dish has a smooth, velvety texture with crunchy and chewy elements, finished with colorful garnishes for visual appeal.
    Prep Time 20 minutes
    Total Time 20 minutes
    Servings: 4
    Course: Main Course
    Cuisine: American
    Calories: 450

    Ingredients
      

    • 16 ounces cream cheese, softened full-fat for best texture
    • 1/2 cup granulated sugar adds sweetness to the filling
    • 1 teaspoon vanilla extract for flavor
    • 2 cups heavy cream chilled for whipping
    • 1 cup crushed chocolate cookies for layers and garnish
    • 1/2 cup colored candy toppings or sprinkles for festive decoration

    Equipment

    • Mixing bowls
    • Whisk
    • Measuring cups and spoons
    • Serving glasses or jars
    • Spatula

    Method
     

    1. In a large mixing bowl, beat the softened cream cheese with the granulated sugar and vanilla extract until smooth and creamy, about 2-3 minutes.
    2. In a separate chilled bowl, whip the heavy cream until stiff peaks form, about 3-4 minutes.
    3. Gently fold the whipped cream into the cream cheese mixture in thirds, using a spatula, until fully combined and smooth.
    4. Spoon a layer of the cheesecake filling into each serving glass, about one-third of the total volume.
    5. Sprinkle crushed cookies evenly over the first layer for added crunch.
    6. Repeat with another layer of the cheesecake filling, followed by more crushed cookies.
    7. Finish with a final layer of cheesecake filling on top, smoothing the surface with a spatula.
    8. Decorate the parfaits with colorful candies or sprinkles for a festive Halloween touch.
    9. Chill the parfaits in the refrigerator for at least 1 hour to set before serving.

    Notes

    You can customize the decorations with themed candies or edible eyes for extra holiday fun.
    As the spooky season ramps up, these adorable spirits remind us that a little creativity goes a long way. They add charm and a touch of chaos to your table without the complexity. Happy haunting and happy snacking.

  • Spooky Elegance: Halloween Eyeball Caprese Bites

    Spooky Elegance: Halloween Eyeball Caprese Bites

    As Halloween night approaches, I love turning simple ingredients into eerie, delightful finger foods. These Eyeball Caprese Bites transform fresh mozzarella into tiny, creepy eyeballs that look straight out of a spooky film. The combination of creamy cheese, ripe cherry tomatoes, and fresh basil creates a burst of flavor with a haunting twist.

    This recipe isn’t just about the look—it’s about capturing that thrill of playful chaos in the kitchen. The vibrant red of the tomatoes paired with the white mozzarella makes for a striking, festive appetizer. It’s perfect for parties or just spooking your family at home with edible art.

    Eyeball Caprese Bites

    These Eyeball Caprese Bites are bite-sized appetizers that feature creamy fresh mozzarella topped with cherry tomato halves and a small basil leaf to mimic creepy eyeballs. The assembly involves skewering and decorating the ingredients, resulting in a visually striking and flavorful snack. They have a soft, moist texture with vibrant, haunting appearance ideal for Halloween parties.
    Prep Time 15 minutes
    Total Time 15 minutes
    Servings: 12
    Course: Main Course
    Cuisine: Fusion
    Calories: 50

    Ingredients
      

    • 12 pieces fresh mozzarella balls small, bite-sized
    • 12 pieces cherry tomatoes halved
    • 12 leaves fresh basil small leaves for eyeball pupils

    Equipment

    • Toothpicks or small skewers
    • Knife
    • Cutting board

    Method
     

    1. Arrange your fresh mozzarella balls, halved cherry tomatoes, and basil leaves on your workspace for easy assembly.
    2. Insert a toothpick or small skewer through a mozzarella ball, piercing through the center.
    3. Slide a halved cherry tomato onto the toothpick, resting against the mozzarella to resemble an eyeball with red sclera.
    4. Place a small basil leaf on top of the cherry tomato to mimic a creepy eyeball’s pupil, pinning it in place with the toothpick.
    5. Repeat this process with the remaining ingredients until all are assembled, creating a collection of eerie eyeballs.

    Notes

    Optional: You can add a small dab of pesto or olive tapenade on top of the basil for extra flavor and a more sinister look.

    Making these eyeball bites feels like a mini magic trick—transforming ingredients into creepy yet delicious decor. They remind me how fun and flexible holiday food can be, especially when you throw in a touch of horror. Plus, they vanish quickly, the moment they hit the platter.

    This recipe is a gentle reminder that Halloween is a time for playful creativity and surprising flavors. Nothing beats the joy of sharing a spooky snack that’s as fun to make as it is to eat. Enjoy your spooky feast, and let the eerie, mouthwatering chaos begin!

  • Spooky Delicious: Halloween Mummy Meatballs for All Ages

    Spooky Delicious: Halloween Mummy Meatballs for All Ages

    Halloween is the perfect time for playful bites that bring out both nostalgia and creativity. These Mummy Meatballs transform a simple comfort food into a spooky centerpiece that delights kids and adults alike. The aroma of seasoned beef mingling with crispy cheese strips is as festive as it is irresistible.

    I love how these meatballs combine a familiar dish with just enough whimsy to surprise your guests. Wrapping them in ghostly strips of cheese makes each bite a tiny horror movie scene—delicious and fun. Plus, they bake quickly, leaving you free to focus on other spooky festivities.

    Halloween Mummy Meatballs

    These meatballs are made from seasoned ground beef mixed with herbs and breadcrumbs, shaped into small balls, baked until golden brown, and then wrapped in strips of cheese to resemble mummies. The final dish features juicy, tender meatballs with crispy cheese bandages that create a playful Halloween presentation.
    Prep Time 20 minutes
    Cook Time 25 minutes
    Total Time 45 minutes
    Servings: 4
    Course: Main Course
    Cuisine: American
    Calories: 280

    Ingredients
      

    • 1 1/2 pounds ground beef 80% lean
    • 1/2 cup breadcrumbs
    • 1 large egg
    • 2 cloves garlic minced
    • 1 tablespoon fresh parsley chopped
    • to taste salt and pepper
    • 8 ounces cheddar cheese sliced into thin strips
    • optional baking spray or oil

    Equipment

    • Baking sheet
    • Mixing bowls
    • Cooking spoon
    • Baking parchment or silicone mat

    Method
     

    1. Preheat your oven to 400°F (200°C). Line a baking sheet with parchment paper or a silicone baking mat for easy cleanup.
    2. In a large mixing bowl, combine the ground beef, breadcrumbs, egg, minced garlic, chopped parsley, and a pinch of salt and pepper. Mix everything together gently until well incorporated, being careful not to overmix.
    3. Use your hands to shape the mixture into small, uniform meatballs about 1 to 1.5 inches in diameter. Place them evenly spaced on the prepared baking sheet.
    4. Bake the meatballs in the preheated oven for about 20-25 minutes, or until they are browned and cooked through. You should hear a gentle sizzle and see the meatballs develop a firm texture.
    5. Remove the cooked meatballs from the oven and let them cool slightly so they are easy to handle.
    6. Take thin slices of cheese and carefully wrap each meatball in strips to resemble a mummy, leaving small gaps for ‘eyes’ or just overlapping for a bandaged effect. Ensure the cheese sticks well and covers most of each meatball.

    Notes

    You can add small olive or peppercorn pieces on top of the cheese to mimic eyes for extra spooky effect.
    This recipe is a seasonal favorite that brings a little chaos to the dinner table with minimal fuss. It’s perfect for parties, potlucks, or a fun family dinner that sparks laughter and delight.

    As autumn air fills your kitchen, these Mummy Meatballs are sure to be a hit. Their cheesy, savory aroma is a warm reminder that holiday treats don’t have to be complicated to be memorable.

  • Spooky Chic: Halloween Mummy Hot Dogs for a Ghoulish Feast

    Spooky Chic: Halloween Mummy Hot Dogs for a Ghoulish Feast

    As the leaves turn vibrant and the air feels crisp, Halloween invites us to embrace playful scares and deliciously themed treats. But this year, I wanted to elevate the classic hot dog into a costume party on a plate — turning ordinary into extraordinary with a mummy twist. The magic lies in the little details: the shredded puff pastry wrapping, the tiny eyes peeking out, all coming together as a delightful centerpiece.

    This recipe isn’t just about Halloween aesthetics; it’s a nostalgic nod to childhood picnics but with a sophisticated spin. The aroma of baked dough mingling with grilled hot dogs fills my kitchen with a warm, slightly smoky scent that’s perfect for spooky season. It’s quick, cute, and just a little chaotic — ideal for busy nights or unexpected guests.

    ## WHY I LOVE THIS RECIPE?
    – It brings out my inner kid with its playful, spooky look.
    – The smell of baked pastry and hot dogs is irresistibly nostalgic.
    – It’s a fun activity to do with kids, blending chaos with creativity.
    – I love how it sparks conversations at any Halloween table.

    Mummy Hot Dogs in Puff Pastry

    This dish features hot dogs wrapped in shredded puff pastry to resemble mummies, then baked until golden and crispy. The final result is a fun, spooky appetizer with a flaky exterior and playful, googly eyes peeking out, perfect for Halloween celebrations.
    Prep Time 15 minutes
    Cook Time 20 minutes
    Total Time 35 minutes
    Servings: 4
    Course: Main Course
    Cuisine: Halloween
    Calories: 250

    Ingredients
      

    • 4 pieces hot dogs any variety you like
    • 1 package shredded puff pastry thawed if frozen
    • 1 egg egg wash beaten
    • small googly eyes small edible candy eyes
    • to taste salt and pepper for seasoning the hot dogs

    Equipment

    • Baking sheet
    • Parchment paper
    • Knife
    • Fork
    • Small Bowls

    Method
     

    1. Preheat the oven to 400°F (200°C) and line a baking sheet with parchment paper for easy cleanup.
    2. Place each hot dog on a plate and season lightly with salt and pepper to enhance flavor.
    3. Unroll the shredded puff pastry and gently separate it into thin strands or shreds, using your fingers or a fork to create a shaggy, mummy-like texture.
    4. Wrap the hot dogs with the shredded pastry, spiraling and layering the strands to resemble a mummy’s wrappings, leaving small gaps for the eyes.
    5. Brush the wrapped hot dogs gently with the beaten egg wash; this will give them a shiny, golden appearance when baked.
    6. Using a small spoon or tweezers, carefully place two edible googly eyes on the front of each mummy, positioning them near the gaps for a spooky effect.
    7. Arrange the wrapped hot dogs on the prepared baking sheet, spacing them slightly apart to allow for puffing and expansion.
    8. Bake in the preheated oven for about 15-20 minutes, or until the pastry is golden brown and crispy, and the hot dogs are heated through.
    9. Remove from the oven and let the mummies cool slightly on the baking sheet, which helps the pastry set and become crispy.
    10. Serve these fun mummies warm, perfect as a spooky appetizer or party snack during Halloween festivities.

    Notes

    For extra spooky details, use thin strips of black olives or strips of bell peppers to create scars or bandages around the mummies.
    These mummy hot dogs are just the kind of fun, easy-to-make dish that adds a touch of whimsy to any Halloween gathering. They’re perfect for parties, or even a spooky movie night with friends. The best part? They come together quickly, leaving you more time to enjoy the costumes and candy.

    As the night falls and the candles flicker, these little mummies will stand out as a beloved treat—fun, a little spooky, and utterly delicious. Plus, they’re a clever way to get everyone to eat their hot dogs, even the pickiest goblins and ghouls. Remember, a little messy chaos can lead to the tastiest memories.

  • Halloween Jack-o’-Lantern Stuffed Bell Peppers: A Spooky Feast

    Halloween Jack-o’-Lantern Stuffed Bell Peppers: A Spooky Feast

    Every October, I dive into creative ways to celebrate Halloween with my favorite seasonally quirky twist. This year, I decided to craft a dish that combines the whimsy of carved pumpkins with a cozy, savory stuffing—entered the realm of Halloween stuffed bell pepper Jack-o’-Lanterns. They look adorable on the table, but what really excites me is the surprise inside each “carved” pepper.

    Fresh bell peppers are transformed into tiny pumpkins with playful facial cuts, then filled with a spicy, cheesy mixture that melts beautifully. The scent of roasted peppers mingling with garlic and herbs fills the kitchen with fall charm. It’s a visual treat and a flavor explosion all in one bite, perfect for celebrating the spooky season with friends and family.

    Halloween Stuffed Bell Pepper Jack-o’-Lanterns

    This dish features colorful bell peppers carved into pumpkin faces, filled with a spicy, cheesy stuffing, and roasted until tender and bubbling. The peppers take on a carved, jack-o’-lantern appearance with a savory, melty interior, making for a festive and flavorful presentation.
    Prep Time 20 minutes
    Cook Time 30 minutes
    Total Time 50 minutes
    Servings: 4
    Course: Main Course
    Cuisine: American
    Calories: 250

    Ingredients
      

    • 4 large bell peppers preferably orange or yellow for a pumpkin-like appearance
    • 1 cup cooked quinoa or rice for the stuffing base
    • 1 cup shredded cheddar cheese or any melting cheese
    • 1/2 cup cooked black beans rinsed and drained
    • 2 cloves garlic minced
    • 1 tsp cumin ground
    • 1 tsp paprika smoked or sweet
    • to taste salt and pepper
    • 2 tbsp olive oil for roasting

    Equipment

    • Chef’s knife
    • Cutting board
    • Mixing bowl
    • Baking sheet
    • Spoon
    • Small paring knife

    Method
     

    1. Preheat your oven to 375°F (190°C).
    2. Wash the bell peppers thoroughly and slice off the tops. Carefully carve small facial features into each pepper using a paring knife to resemble tiny jack-o’-lanterns. Remove the seeds and membranes to create hollow, pumpkin-like shapes.
    3. Brush the outside of each carved pepper with a little olive oil to help them roast evenly and develop a nice color.
    4. Place the carved peppers on a baking sheet lined with parchment paper and roast in the oven for about 15 minutes, until they start to soften and the faces look a little more carved and slightly shriveled.
    5. Meanwhile, in a mixing bowl, combine cooked quinoa, shredded cheese, black beans, minced garlic, cumin, paprika, salt, and pepper. Stir until well mixed and the cheese begins to melt slightly.
    6. Carefully spoon the spicy cheese mixture into each roasted pepper, pressing gently to fill them completely and create a rounded, overflowing look.
    7. Return the stuffed peppers to the oven and bake for an additional 15 minutes, until the filling is hot, bubbly, and slightly golden on top.
    8. Remove the peppers from the oven and let them cool slightly. Serve warm, with their carved faces and cheesy filling on display.

    Notes

    For extra festive effect, you can use a small fork to create additional facial details or add a light drizzle of salsa or sour cream for flavor contrast.

    Whipping up these stuffed peppers offers a fun, interactive touch to your Halloween spread. Each bite balances festive flavors with comforting textures, making it more than just a decoration—it’s a delightful meal. As the last pepper disappears, your table will echo with satisfied smiles and curious questions about how you made your own edible pumpkins.

    Seasonal, playful, and surprisingly simple to make, these Jack-o’-Lantern peppers are a wonderful way to add charm and flavor to any October gathering. They remind us that festive eats can be both adorable and delicious, perfect for creating memories around the dinner table. Let the spooky spirit inspire your kitchen adventures this season.