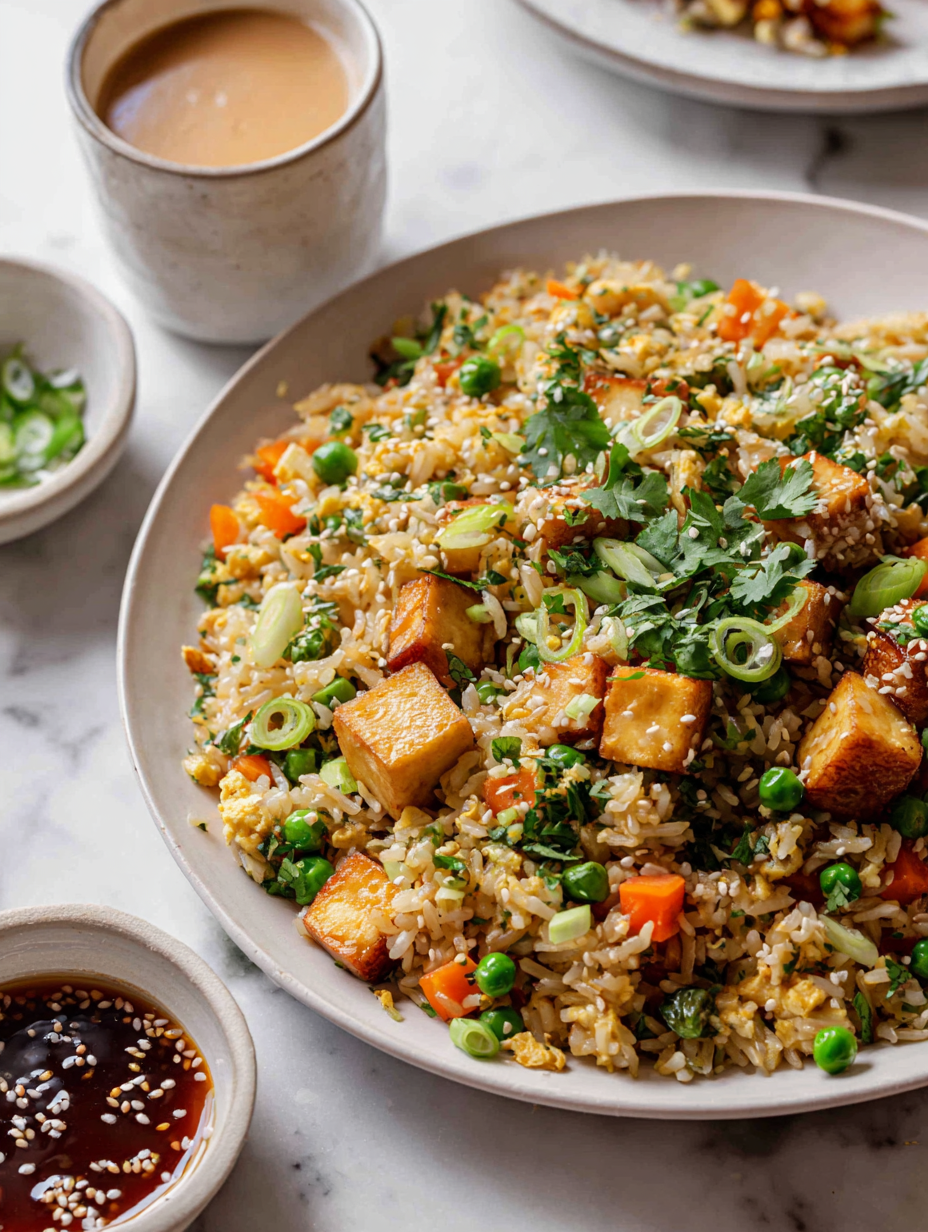
Author: HarperEvans

  • Spooky Sweetness: Halloween Graveyard Pudding Cups

    Spooky Sweetness: Halloween Graveyard Pudding Cups

    As October’s chill settles in, I love how desserts can transform into mini spooky landscapes. These Halloween Graveyard Pudding Cups do just that, turning a simple treat into a tiny eerie scene. The smell of rich chocolate mingling with the crunch of crushed cookies makes my kitchen feel alive with festive chaos.

    Crafting these requires just a few ingredients, but the visual impact is fantastic. Kids and adults alike are drawn to the eerie tombstones and the pretend dirt, making them perfect for any Halloween gathering. Let’s dive into creating a spooky, delicious centerpiece that’s as fun to make as it is to eat.

    Halloween Graveyard Pudding Cups

    These Halloween Graveyard Pudding Cups are layered desserts featuring rich chocolate pudding topped with crushed cookies to resemble dirt. Decorated with tombstone-shaped cookies and candy cobwebs, they create a spooky miniature landscape with a creamy, crunchy texture. The assembled cups resemble a disturbed graveyard, perfect for festive Halloween celebrations.
    Prep Time 15 minutes
    Cook Time 10 minutes
    Total Time 25 minutes
    Servings: 4
    Course: Main Course
    Cuisine: Halloween
    Calories: 250

    Ingredients
      

    • 2 cups milk for pudding
    • 1/4 cup unsweetened cocoa powder to add chocolate flavor
    • 1/2 cup powdered sugar for sweetness
    • 1 teaspoon vanilla extract
    • 1 package instant chocolate pudding mix prepared according to package instructions
    • 1 1/2 cups crushed chocolate cookies for dirt and texture
    • 4 large cookie tombstones store-bought or homemade, cut into tombstone shapes
    • Optional candy cobwebs or spider decorations for extra spooky effect

    Equipment

    • Mixing bowls
    • Whisk
    • Measuring cups and spoons
    • Serving cups or jars
    • Spoon or spatula
    • Baking sheet
    • Parchment paper

    Method
     

    1. Whisk together the milk, cocoa powder, powdered sugar, and vanilla in a large bowl until smooth and slightly thickened.
    2. Add the instant chocolate pudding mix to the mixture and whisk vigorously for about 2 minutes until well combined and beginning to thicken.
    3. Spoon or pipe the chocolate pudding into individual cups or jars, filling each about two-thirds full.
    4. Gently top the pudding layers with crushed cookies to resemble loose dirt and create a rough, uneven surface for the graveyard scene.
    5. Place cookie tombstones into the crushed cookie surface, sticking them upright to resemble gravestones.
    6. Decorate the scene by adding candy cobwebs or small spider decorations on and around the tombstones for a spooky effect.
    7. Repeat layering and decorating in remaining cups for a full set of spooky graveyard scenes, then chill in the refrigerator for at least 15 minutes before serving.

    Notes

    For easier assembly, prepare the pudding in advance and have everything set up before layering. Using store-bought tombstone cookies simplifies the process, but you can also cut out shapes from sturdy cookies or graham crackers. Chill the assembled cups to help set the decorations and improve flavor.

    These graveyard pudding cups are a perfect way to bring a touch of spooky fun to your dessert table. Their quirky, chaotic look is matched by the irresistible taste of chocolate and vanilla layers.

    Enjoy the process of decorating and the delight on everyone’s faces as they discover the little edible graveyard. With minimal effort and maximum spookiness, these cups will become a highlight of your Halloween festivities.

  • Unconventional Fall Casserole You Haven’t Tried Yet

    Unconventional Fall Casserole You Haven’t Tried Yet

    Fall always whispers comfort, but my obsession is how casseroles transform humble ingredients into cozy masterpieces. I love experimenting with fall vegetables that often go unnoticed—think parsnips, kohlrabi, or even sweet potatoes that aren’t roasted but baked into something new. This recipe is a brave twist, spotlighting those overlooked gems.

    In the midst of pumpkin spice everything, I crave a dish that surprises my palate while still embracing the season’s warmth. There’s joy in layering flavors and textures—crisp topping, tender veggies, gooey cheese—that come together in a casserole that feels both nostalgic and exciting. It’s the kind of dish that turns a busy weeknight into a special occasion.

    Fall Vegetable Casserole with Crispy Topping

    This casserole features a blend of fall vegetables such as parsnips, kohlrabi, and sweet potatoes baked until tender, with a crunchy breadcrumb and cheese topping. The dish combines layered textures—soft vegetables beneath a crisp crust—creating a comforting, hearty presentation perfect for the season.
    Prep Time 20 minutes
    Cook Time 40 minutes
    Total Time 1 hour
    Servings: 4
    Course: Main Course
    Cuisine: comfort food
    Calories: 320

    Ingredients
      

    • 2 cups parsnips, peeled and sliced preferably uniform slices for even cooking
    • 2 cups kohlrabi, peeled and cubed
    • 2 cups sweet potatoes, peeled and cubed
    • 2 tablespoons olive oil for roasting vegetables
    • 1 cup shredded cheese cheddar or Gruyère work well
    • 1 cup bread crumbs preferably panko for crunch
    • 2 tablespoons butter, melted
    • 1 teaspoon fresh thyme, chopped

    Equipment

    • Chef’s knife
    • Cutting board
    • Large mixing bowl
    • Baking Dish
    • Small bowl
    • Grater
    • Oven

    Method
     

    1. Preheat your oven to 375°F (190°C) and lightly grease a baking dish.
    2. Combine sliced parsnips, cubed kohlrabi, and sweet potatoes in a large bowl. Drizzle with olive oil, season with salt, pepper, and chopped thyme, then toss to coat evenly.
    3. Spread the seasoned vegetables evenly in the prepared baking dish, creating a layered base.
    4. Bake the vegetables uncovered for about 25-30 minutes, or until they are tender and slightly browned around the edges.
    5. While the vegetables bake, prepare the crispy topping by mixing bread crumbs with melted butter and chopped thyme in a small bowl.
    6. Sprinkle the shredded cheese evenly over the roasted vegetables, then spread the buttered bread crumb mixture on top.
    7. Return the dish to the oven and bake for an additional 10-15 minutes, until the topping is golden brown and crispy, and the cheese is melted and bubbly.
    8. Remove from the oven and let it rest for a few minutes. Serve warm to enjoy the soft vegetables contrasted with the crunchy topping.
    As the crisp air settles in, this casserole becomes my go-to comfort food with a twist. It’s perfect for potlucks or cozy family dinners when everyone craves something familiar yet unexpected. Trust me, those little extra veggies tucked inside will have everyone asking for seconds.

    This recipe captures the essence of fall—the earthy smells, the vibrant colors, and the comforting textures. It’s a reminder that you can reinvent classics with just a few unusual ingredients, making every meal an adventure. And honestly, that’s what makes spilling hot gravy all over the plate somehow worth it.

  • Spooky Delicious: Halloween Mummy Meatballs for All Ages

    Spooky Delicious: Halloween Mummy Meatballs for All Ages

    Halloween is the perfect time for playful bites that bring out both nostalgia and creativity. These Mummy Meatballs transform a simple comfort food into a spooky centerpiece that delights kids and adults alike. The aroma of seasoned beef mingling with crispy cheese strips is as festive as it is irresistible.

    I love how these meatballs combine a familiar dish with just enough whimsy to surprise your guests. Wrapping them in ghostly strips of cheese makes each bite a tiny horror movie scene—delicious and fun. Plus, they bake quickly, leaving you free to focus on other spooky festivities.

    Halloween Mummy Meatballs

    These meatballs are made from seasoned ground beef mixed with herbs and breadcrumbs, shaped into small balls, baked until golden brown, and then wrapped in strips of cheese to resemble mummies. The final dish features juicy, tender meatballs with crispy cheese bandages that create a playful Halloween presentation.
    Prep Time 20 minutes
    Cook Time 25 minutes
    Total Time 45 minutes
    Servings: 4
    Course: Main Course
    Cuisine: American
    Calories: 280

    Ingredients
      

    • 1 1/2 pounds ground beef 80% lean
    • 1/2 cup breadcrumbs
    • 1 large egg
    • 2 cloves garlic minced
    • 1 tablespoon fresh parsley chopped
    • to taste salt and pepper
    • 8 ounces cheddar cheese sliced into thin strips
    • optional baking spray or oil

    Equipment

    • Baking sheet
    • Mixing bowls
    • Cooking spoon
    • Baking parchment or silicone mat

    Method
     

    1. Preheat your oven to 400°F (200°C). Line a baking sheet with parchment paper or a silicone baking mat for easy cleanup.
    2. In a large mixing bowl, combine the ground beef, breadcrumbs, egg, minced garlic, chopped parsley, and a pinch of salt and pepper. Mix everything together gently until well incorporated, being careful not to overmix.
    3. Use your hands to shape the mixture into small, uniform meatballs about 1 to 1.5 inches in diameter. Place them evenly spaced on the prepared baking sheet.
    4. Bake the meatballs in the preheated oven for about 20-25 minutes, or until they are browned and cooked through. You should hear a gentle sizzle and see the meatballs develop a firm texture.
    5. Remove the cooked meatballs from the oven and let them cool slightly so they are easy to handle.
    6. Take thin slices of cheese and carefully wrap each meatball in strips to resemble a mummy, leaving small gaps for ‘eyes’ or just overlapping for a bandaged effect. Ensure the cheese sticks well and covers most of each meatball.

    Notes

    You can add small olive or peppercorn pieces on top of the cheese to mimic eyes for extra spooky effect.
    This recipe is a seasonal favorite that brings a little chaos to the dinner table with minimal fuss. It’s perfect for parties, potlucks, or a fun family dinner that sparks laughter and delight.

    As autumn air fills your kitchen, these Mummy Meatballs are sure to be a hit. Their cheesy, savory aroma is a warm reminder that holiday treats don’t have to be complicated to be memorable.

  • Tropical Chill: The Art of Making a Perfect Pia Colada Slushie

    Tropical Chill: The Art of Making a Perfect Pia Colada Slushie

    As someone who once tried to recreate a pia colada using canned pineapple and coconut flakes, I learned that frozen fruit is your best friend for that icy, creamy texture. This slushie is my go-to when unexpected heat hits and I crave a nostalgic escape with a modern twist. The aroma of fresh pineapple blending with coconut milk immediately transports me to a beach breeze.

    In this recipe, I focus on the little things—like how chilling the glasses enhances the experience or the perfect ratio of pineapple juice to coconut for that sweet, tart, and tropical balance. It’s a treat that doesn’t demand a fancy cocktail shaker, just frozen fruit, some imagination, and a good blender. Let’s dive into creating a slushie that’s as vibrant as a sunset in Santorini.

    Frosted Pineapple Coconut Slushie

    This frozen beverage combines ripe pineapple and coconut milk blended into a smooth, icy texture. The mixture results in a vibrant, creamy slushie that showcases tropical flavors with a refreshing appeal. The final drink is visually appealing and perfect for hot days, with a slightly thick consistency ideal for sipping through a straw.
    Prep Time 5 minutes
    Total Time 5 minutes
    Servings: 2
    Course: Main Course
    Cuisine: Tropical
    Calories: 150

    Ingredients
      

    • 2 cups frozen pineapple chunks preferably chopped and frozen in bite-sized pieces
    • 1 cup coconut milk full-fat for creaminess
    • 1 cup pineapple juice for added flavor and liquid balance
    • 1 tablespoon honey or agave syrup optional for extra sweetness

    Equipment

    • Blender
    • Measuring Cups

    Method
     

    1. Place the frozen pineapple chunks into the blender basket, ensuring they’re evenly distributed.
    2. Pour in the coconut milk, pineapple juice, and add honey or agave syrup if using. This creates a liquid base that will help blend everything smoothly.
    3. Secure the lid of the blender tightly, then start blending at a low speed, gradually increasing to high. Blend until the mixture is smooth, thick, and evenly icy, about 30-45 seconds. You should hear a consistent blending sound with no large chunks remaining.
    4. Stop the blender and check the texture. If it’s too thick, add a splash more pineapple juice and blend briefly to incorporate.
    5. Pour the slushie into chilled glasses to keep the drink icy longer. You can also garnish with tiny pineapple slices or a sprig of mint for a visual touch.
    6. Serve immediately with a straw, allowing guests to sip the refreshing, tropical flavors straight from the glass.

    Notes

    For an extra freeze, chill the glasses in the freezer for 10 minutes before pouring. Adjust sweetness with more honey or agave as desired. Use fresh pineapple and full-fat coconut milk for the best flavor and texture.

    This pia colada slushie is a breath of fresh, tropical air in the middle of busy workdays or lazy weekends. Its bright, fresh flavors remind us to pause and celebrate small joys, even if just for a moment. With a little prep and a lot of chill, it’s your perfect escape in a glass.

    Whether you’re entertaining friends or simply craving a moment of pure, cool bliss, this recipe is a cheerful addition to any summer or vacation table. No matter the season, it’s a little reminder that sunshine and good vibes are just a blend away.

  • Spice Up Your Fall with These Unconventional Pumpkin Cookies!

    Spice Up Your Fall with These Unconventional Pumpkin Cookies!

    As the leaves turn vibrant shades of orange and gold, I find myself craving a treat that captures the essence of autumn. But this time, I wanted to go beyond the usual pumpkin pie or muffins. That’s when I decided to craft a batch of pumpkin cookies with a twist—flavored with unexpected spices and a hint of savory magic.

    These cookies are not just sweet bites; they are a scent-memory in the making. Crisp edges, chewy centers, and a complex blend of spices make each bite an adventure. Perfect for those who love to surprise their palate with something both familiar and entirely new.

    Spiced Pumpkin Cookies with Savory Touches

    These pumpkin cookies are baked treats featuring a moist, chewy center and crisp edges, infused with warm spices and subtle savory elements. They are prepared by mixing wet and dry ingredients, shaping the dough, and baking until golden, resulting in aromatic cookies with a slightly spiced and complex flavor profile.
    Prep Time 20 minutes
    Cook Time 12 minutes
    Total Time 32 minutes
    Servings: 12
    Course: Main Course
    Cuisine: American
    Calories: 150

    Ingredients
      

    • 1 cup canned pumpkin pureed pumpkin, preferably unsweetened
    • 1/2 cup granulated sugar
    • 1/4 cup brown sugar light or dark
    • 1/4 cup olive oil or melted coconut oil
    • 1 large egg
    • 1 1/2 cups all-purpose flour
    • 1 teaspoon baking soda
    • 1/2 teaspoon ground cinnamon warm spiced aroma
    • 1/4 teaspoon ground ginger adds a spicy heat
    • 1/4 teaspoon ground cloves intensifies warm spice
    • 1/2 teaspoon vanilla extract enhances flavor
    • 1/4 teaspoon sea salt balances sweetness
    • 2 tablespoons herbs or spices such as sage or rosemary, optional

    Equipment

    • Mixing bowls
    • Whisk
    • Spatula
    • Baking sheet
    • Parchment paper
    • Cooling rack

    Method
     

    1. Preheat your oven to 350°F (175°C) and line a baking sheet with parchment paper to prevent sticking.
    2. In a large mixing bowl, whisk together the pumpkin, granulated sugar, brown sugar, and oil until smooth and well combined. You should see a slightly thick, cohesive mixture with a light orange hue.
    3. Add the egg and vanilla extract to the wet mixture, whisking again until the mixture is even and slightly fluffy.
    4. In a separate bowl, sift together the flour, baking soda, cinnamon, ginger, cloves, and salt to distribute the spices evenly. This helps prevent clumping and guarantees all cookies are flavorful.
    5. Gradually fold the dry ingredients into the wet mixture using a spatula, mixing until just combined. The dough will be slightly thick but still scoopable.
    6. Using a cookie scoop or tablespoon, portion out the dough onto the prepared baking sheet, spacing them about 2 inches apart to give room for spreading.
    7. Lightly flatten each cookie slightly with the back of a spatula or your fingers for even baking and attractive shape.
    8. Bake in the preheated oven for 12-15 minutes, or until the edges turn golden brown and the centers look set but still soft.
    9. Remove the cookies from the oven and allow them to cool on the baking sheet for 5 minutes before transferring to a wire rack to cool completely. This resting ensures they set properly and develop the perfect chewy-center, crispy-edge texture.
    10. Once cooled, enjoy these aromatic cookies as a delightful autumn treat, appreciating their complex spice blend and inviting scent.

    Notes

    For added flavor, mix in chopped nuts or dried cranberries before baking. Store cookies in an airtight container at room temperature for up to 3 days.
    Baking these pumpkin cookies is a delightful reminder that seasonal treats can be built on bold ideas. They pair beautifully with a cup of chai or a dollop of whipped cream, making any afternoon a little more special.

    As the season shifts, these cookies will fill your kitchen with warm aromas that linger long after baking. They’re a testament to how a small change—like adding a pinch of smoked paprika—can transform a simple cookie into something memorable. Enjoy these morsels as a cozy end to your busy day or a sweet surprise for someone you love.

  • The Secret Ingredient That Transforms Your Pumpkin Pancakes

    The Secret Ingredient That Transforms Your Pumpkin Pancakes

    Imagine waking up to a kitchen filled with the warm aroma of pumpkin and cinnamon. These pancakes are not just your average breakfast; they’re a cozy ritual that cleverly sneaks in extra nutrients without sacrificing flavor. Using a surprising ingredient—chickpea flour—gives these pumpkin pancakes a hearty, satisfying texture that keeps me full longer and fuels my morning.

    As someone who loves exploring ingredient swaps, I discovered that replacing traditional flour with chickpea flour adds a nutty undertone and a protein boost. The best part? The batter comes together quickly, perfect for lazy weekend mornings or when you want a comforting brunch without the fuss. Plus, they’re just as good topped with a drizzle of maple syrup as with a dollop of Greek yogurt.

    Pumpkin Chickpea Flour Pancakes

    These pumpkin pancakes are made by blending pumpkin puree with eggs, spices, and chickpea flour, then cooking the batter on a griddle until golden brown. The result is a hearty, slightly nutty pancake with a moist, tender crumb and a appealing color from the pumpkin.
    Prep Time 10 minutes
    Cook Time 15 minutes
    Total Time 25 minutes
    Servings: 4
    Course: Main Course
    Cuisine: American
    Calories: 180

    Ingredients
      

    • 1 cup chickpea flour sifted
    • 1 cup pumpkin puree
    • 2 eggs eggs
    • 1 teaspoon ground cinnamon
    • 0.5 teaspoon ground ginger
    • 0.25 teaspoon ground nutmeg
    • 0.5 teaspoon salt
    • 1 tablespoon maple syrup optional for serving
    • butter or oil as needed for cooking

    Equipment

    • Mixing bowl
    • Whisk
    • Non-stick skillet or griddle
    • Spatula

    Method
     

    1. In a large mixing bowl, whisk together the sifted chickpea flour, ground cinnamon, ground ginger, ground nutmeg, and salt until well combined.
    2. Add the pumpkin puree and eggs to the dry mixture. Whisk until the batter is smooth and slightly thickened, with no lumps remaining.
    3. Let the batter rest for 2-3 minutes; this allows the chickpea flour to absorb the liquids and relax, making the pancakes extra tender.
    4. Heat a non-stick skillet or griddle over medium heat and lightly grease with butter or oil. Once hot, pour about 1/4 cup of batter for each pancake.
    5. Cook the pancakes for 3-4 minutes until bubbling around the edges and the underside is golden brown. Flip carefully with a spatula and cook for another 2-3 minutes until cooked through.
    6. Transfer the cooked pancakes to a plate and repeat with the remaining batter, adding more butter or oil to the skillet as needed.
    7. Serve the pancakes warm, optionally drizzled with maple syrup or topped with your favorite toppings.

    Notes

    For extra flavor, add a dash of vanilla extract or chopped nuts to the batter before cooking.
    These pumpkin pancakes are more than just a breakfast—they’re a small act of self-care that celebrates the flavors of fall. Making them fills my kitchen with the scent of roasted spices and roasted pumpkin, instantly evoking nostalgic autumn memories.

    Every time I cook this recipe, I’m reminded how a simple ingredient swap can turn an ordinary meal into a delightful culinary adventure. It’s a reminder to keep experimenting, to find joy in everyday moments, and to enjoy these cozy mornings as the seasons change.

  • Spooky Sips: The Haunted Halloween Monster Mash Punch

    Spooky Sips: The Haunted Halloween Monster Mash Punch

    As October’s chill settles in, I love the thrill of creating drinks that turn the ordinary into the extraordinary. This Halloween Monster Mash Punch is more than just a beverage—it’s a bubbling cauldron of chaos, color, and nostalgia. The scent of fruity syrups blends with a whisper of mint, beckoning guests to dive into its goblin-green depths.

    What makes this punch stand out is its playful chaos. Each sip unleashes a cascade of flavors that feel like a monster waking from its slumber, ready to spook and delight. It’s perfect for those who love their Halloween to be a little wild and wonderfully weird.

    Halloween Monster Mash Punch

    This vibrant green punch combines fruity syrups, citrus sodas, and fresh mint for a visually striking beverage. The mixture is blended until smooth and bubbly, resulting in a thick, frothy drink with a playful appearance that resembles a bubbling cauldron of chaos.
    Prep Time 15 minutes
    Total Time 15 minutes
    Servings: 8
    Course: Main Course
    Cuisine: Halloween
    Calories: 150

    Ingredients
      

    • 2 cups fruit punch syrup preferably green or lime flavor
    • 1 cup lemon-lime soda chilled for fizz
    • 1 cup pineapple juice adds sweetness and tropical flavor
    • few leaves fresh mint for flavor and garnish
    • crushed ice ice to chill the drink

    Equipment

    • Large mixing bowl
    • Blender
    • Measuring cups and spoons
    • Ladle
    • Serving pitcher

    Method
     

    1. Add the fruit punch syrup, pineapple juice, and a handful of crushed ice into the blender. Blend on high until the mixture is smooth and frothy, about 30 seconds. You should see bubbles forming and the color turning vibrant green.
    2. Pour the bubbly mixture into a large serving pitcher, allowing some foam to spill over for a wild, chaotic look. Then, gently stir in the chilled lemon-lime soda to add fizz and lighten the texture.
    3. Tear the fresh mint leaves into smaller pieces and add them to the punch. Stir gently to release their aroma and a hint of minty freshness throughout the drink.
    4. Once mixed, ladle the Monster Mash Punch into individual glasses. Garnish each with a sprig of mint and maybe a spooky straw or glow stick for extra fun.
    5. Serve immediately and enjoy the bubbling, wild chaos of this festive Halloween drink!

    Carousel through your party with a punch that screams Halloween without saying a word. It’s easy to make, visually stunning, and brings a spark of chaos to any gathering. Plus, it’s a fun way to get everyone into the spooky spirit—even the ones who refuse to wear masks!

    As the night deepens and the shadows grow longer, this punch will keep the energy lively and the spirits high. It’s not just a drink—it’s a celebration in a cup, capturing the magic and mayhem of a Halloween night.

  • Enchanted Evil: The Spooky Charm of the Halloween Poison Apple Martini

    Enchanted Evil: The Spooky Charm of the Halloween Poison Apple Martini

    Every fall, haunted house lights flicker on the corner, and pumpkin spice fills the air. But this year, I wanted to craft something that’s not just a visual stunt but a drink that whispers secrets from the dark. The Halloween Poison Apple Martini does exactly that, with a sinister twist and a tempting shimmer.

    The moment I first poured the vibrant green apple liqueur, it reminded me of how childhood candies metamorphose into adult thrillers. The scent of crisp apples layered with a dash of dangerous-looking shimmer made my kitchen smell like a haunted orchard. It’s a cocktail that offers more than just festivity—it’s an intoxicating ritual of the season.

    Halloween Poison Apple Martini

    The Halloween Poison Apple Martini is a vibrant, green cocktail that combines apple liqueur and vodka, enhanced with a shimmering, spooky finish. It features a smooth, chilled texture with an eye-catching luminous appearance, perfect for seasonal festivities. The drink is shaken until well mixed and poured into a glass, garnished as desired for a devilishly good presentation.
    Prep Time 5 minutes
    Total Time 5 minutes
    Servings: 1
    Course: Main Course
    Calories: 200

    Ingredients
      

    • 2 ounces green apple liqueur choose a vibrant, bright green variety
    • 1 ounce vodka
    • 1 teaspoon edible shimmer powder for a glowing, spooky effect
    • 0.5 ounce fresh lemon juice to balance sweetness
    • ice cubes as needed ice

    Equipment

    • Cocktail shaker
    • Martini glass
    • Strainer

    Method
     

    1. Fill the cocktail shaker halfway with ice cubes to chill the mixture.
    2. Add the green apple liqueur, vodka, fresh lemon juice, and edible shimmer powder to the shaker.
    3. Secure the lid on the shaker and shake vigorously for about 15 seconds until the mixture is well chilled and slightly frothy.
    4. Remove the lid and strain the mixture into a chilled martini glass, allowing the shimmering liquid to flow smoothly.
    5. Garnish with a small slice of green apple or a spooky garnish as desired.
    6. Serve immediately and enjoy the luminous, refreshing sip with a haunting twist.
    As the night deepens and shadows dance, this Poison Apple Martini keeps the spirits alive with its hypnotic glow. It’s perfect for setting a mischievous tone at your Halloween gathering or a spooky solo toast to the season.

    So, embrace the eerie elegance of this cocktail, letting its glossy allure and tantalizing flavor become your signature sip of October. It’s a reminder that sometimes, the most playful horrors are the sweetest.

  • Spooky Chic: Halloween Mummy Hot Dogs for a Ghoulish Feast

    Spooky Chic: Halloween Mummy Hot Dogs for a Ghoulish Feast

    As the leaves turn vibrant and the air feels crisp, Halloween invites us to embrace playful scares and deliciously themed treats. But this year, I wanted to elevate the classic hot dog into a costume party on a plate — turning ordinary into extraordinary with a mummy twist. The magic lies in the little details: the shredded puff pastry wrapping, the tiny eyes peeking out, all coming together as a delightful centerpiece.

    This recipe isn’t just about Halloween aesthetics; it’s a nostalgic nod to childhood picnics but with a sophisticated spin. The aroma of baked dough mingling with grilled hot dogs fills my kitchen with a warm, slightly smoky scent that’s perfect for spooky season. It’s quick, cute, and just a little chaotic — ideal for busy nights or unexpected guests.

    ## WHY I LOVE THIS RECIPE?
    – It brings out my inner kid with its playful, spooky look.
    – The smell of baked pastry and hot dogs is irresistibly nostalgic.
    – It’s a fun activity to do with kids, blending chaos with creativity.
    – I love how it sparks conversations at any Halloween table.

    Mummy Hot Dogs in Puff Pastry

    This dish features hot dogs wrapped in shredded puff pastry to resemble mummies, then baked until golden and crispy. The final result is a fun, spooky appetizer with a flaky exterior and playful, googly eyes peeking out, perfect for Halloween celebrations.
    Prep Time 15 minutes
    Cook Time 20 minutes
    Total Time 35 minutes
    Servings: 4
    Course: Main Course
    Cuisine: Halloween
    Calories: 250

    Ingredients
      

    • 4 pieces hot dogs any variety you like
    • 1 package shredded puff pastry thawed if frozen
    • 1 egg egg wash beaten
    • small googly eyes small edible candy eyes
    • to taste salt and pepper for seasoning the hot dogs

    Equipment

    • Baking sheet
    • Parchment paper
    • Knife
    • Fork
    • Small Bowls

    Method
     

    1. Preheat the oven to 400°F (200°C) and line a baking sheet with parchment paper for easy cleanup.
    2. Place each hot dog on a plate and season lightly with salt and pepper to enhance flavor.
    3. Unroll the shredded puff pastry and gently separate it into thin strands or shreds, using your fingers or a fork to create a shaggy, mummy-like texture.
    4. Wrap the hot dogs with the shredded pastry, spiraling and layering the strands to resemble a mummy’s wrappings, leaving small gaps for the eyes.
    5. Brush the wrapped hot dogs gently with the beaten egg wash; this will give them a shiny, golden appearance when baked.
    6. Using a small spoon or tweezers, carefully place two edible googly eyes on the front of each mummy, positioning them near the gaps for a spooky effect.
    7. Arrange the wrapped hot dogs on the prepared baking sheet, spacing them slightly apart to allow for puffing and expansion.
    8. Bake in the preheated oven for about 15-20 minutes, or until the pastry is golden brown and crispy, and the hot dogs are heated through.
    9. Remove from the oven and let the mummies cool slightly on the baking sheet, which helps the pastry set and become crispy.
    10. Serve these fun mummies warm, perfect as a spooky appetizer or party snack during Halloween festivities.

    Notes

    For extra spooky details, use thin strips of black olives or strips of bell peppers to create scars or bandages around the mummies.
    These mummy hot dogs are just the kind of fun, easy-to-make dish that adds a touch of whimsy to any Halloween gathering. They’re perfect for parties, or even a spooky movie night with friends. The best part? They come together quickly, leaving you more time to enjoy the costumes and candy.

    As the night falls and the candles flicker, these little mummies will stand out as a beloved treat—fun, a little spooky, and utterly delicious. Plus, they’re a clever way to get everyone to eat their hot dogs, even the pickiest goblins and ghouls. Remember, a little messy chaos can lead to the tastiest memories.

  • Revive Your Winter Days with a Classic Chicken Noodle Soup Twist

    Revive Your Winter Days with a Classic Chicken Noodle Soup Twist

    As the chilly days settle in, I find myself craving something familiar yet new—something that warms both stomach and soul. Chicken noodle soup is a timeless comfort, but today I add a twist: a hint of toasted garlic and fresh herbs that elevate the simple broth. It’s the aroma of garlic sizzling that pulls everyone to the kitchen, ready for a bowl.

    This recipe isn’t just for cold nights; it’s a celebration of homey chaos. I love how gooey the noodles get when they soak up all that savory broth, a little messy but absolutely worth it. It’s my go-to when I want to fuss less but still serve something hearty and satisfying.

    Chicken Noodle Soup with Toasted Garlic and Fresh Herbs

    This chicken noodle soup is made by simmering chicken, vegetables, and herbs in a savory broth, then adding cooked noodles and toasted garlic for extra flavor. The dish has a comforting, hearty texture with tender chicken and slightly chewy noodles, finished with aromatic herbs and crispy garlic topping.
    Prep Time 15 minutes
    Cook Time 30 minutes
    Total Time 45 minutes
    Servings: 4
    Course: Main Course
    Cuisine: comfort food
    Calories: 320

    Ingredients
      

    • 1 lb boneless, skinless chicken breasts cut into bite-sized pieces
    • 2 carrots carrots peeled and sliced
    • 2 celery stalks celery stalks sliced
    • 4 cloves garlic minced
    • 1 large onion chopped
    • 8 cups chicken broth
    • 2 cups egg noodles uncooked
    • 2 tablespoons olive oil
    • 1 teaspoon dried thyme
    • 1/4 cup fresh parsley chopped
    • 3 cloves garlic sliced thin for toasting

    Equipment

    • Large pot
    • Skillet
    • Knife
    • Cutting board
    • Ladle

    Method
     

    1. Heat olive oil in a large pot over medium heat. Add the chopped onion, carrots, and celery, and cook until vegetables are tender and the onion is translucent, about 5 minutes.
    2. Add the minced garlic and dried thyme to the pot, cooking for another minute until fragrant. Stir constantly to prevent burning.
    3. Pour in the chicken broth and bring the mixture to a boil. Once boiling, add the chicken pieces and reduce heat to a gentle simmer. Cook until chicken is cooked through, about 10 minutes.
    4. Add the uncooked egg noodles to the broth and cook until tender, about 8 minutes. Stir occasionally to prevent sticking.
    5. Meanwhile, heat a small skillet over medium-low heat. Add sliced garlic and toast until golden brown and crispy, about 2-3 minutes. Remove from heat to prevent burning.
    6. Once the noodles are cooked and the chicken is tender, stir in chopped parsley and check the seasoning. Adjust salt and pepper if needed.
    7. Serve the soup hot, garnished with the crispy toasted garlic on top for extra flavor and texture.

    Notes

    For extra flavor, sauté vegetables longer or add a squeeze of lemon before serving.

    In the end, this chicken noodle soup reminds me that comfort food doesn’t have to be boring. It’s a dish that embraces imperfections and celebrates flavors that tell a story. Each spoonful brings a wave of warmth that’s perfect for sharing or savoring quietly on a busy day.

    As the season shifts, I find myself returning to this recipe more often. It’s a reminder that some classics gain new life when you bring your own favorite twists to the table. And honestly, it’s the little smells—garlic, chicken, fresh herbs—that make every pot feel like a cozy retreat.